> ## Documentation Index
> Fetch the complete documentation index at: https://docs.usertour.io/llms.txt
> Use this file to discover all available pages before exploring further.
# Localization
> Translate flows, checklists, banners and more into your users' languages, and deliver each user the right one automatically.
Localization lets you author content once and deliver it in each user's language. Every content type that shows text to end users can be translated — flows, checklists, launchers, banners, announcements, and resource centers.
Key ideas, up front:
* **Translations belong to a content version.** They are edited alongside the draft and go live through the normal publish flow — nothing changes for end users until you publish.
* **Language selection is driven by one attribute: `locale_code`.** You tell Usertour which language each user should see. Usertour never guesses from the browser.
* **Untranslated text falls back to the source.** A half-finished translation never breaks content: any text you haven't translated is shown in the language the content was authored in.
## How language selection works
When content is delivered to a user, Usertour picks the language like this:
1. Read the user's `locale_code` attribute (set via `usertour.identify()` — see [Setting the user's language](#setting-the-users-language)).
2. Find an **enabled** translation whose code matches exactly (`zh-CN` matches `zh-CN`).
3. If there is no exact match, fall back to the primary language: a user with `fr-CA` gets a translation coded `fr`.
4. If nothing matches — or the user has no `locale_code` at all — the user sees the content in its source language.
Usertour deliberately does **not** detect the browser language. The correct
language for your product is the one your app is rendered in, and only your
app knows that. If your app is already internationalized, passing its active
language as `locale_code` is a one-line change and is always right — a
separate guess by Usertour could disagree with what the user sees around it.
## Set up your languages
Languages are defined once per project, then every content shares the list.
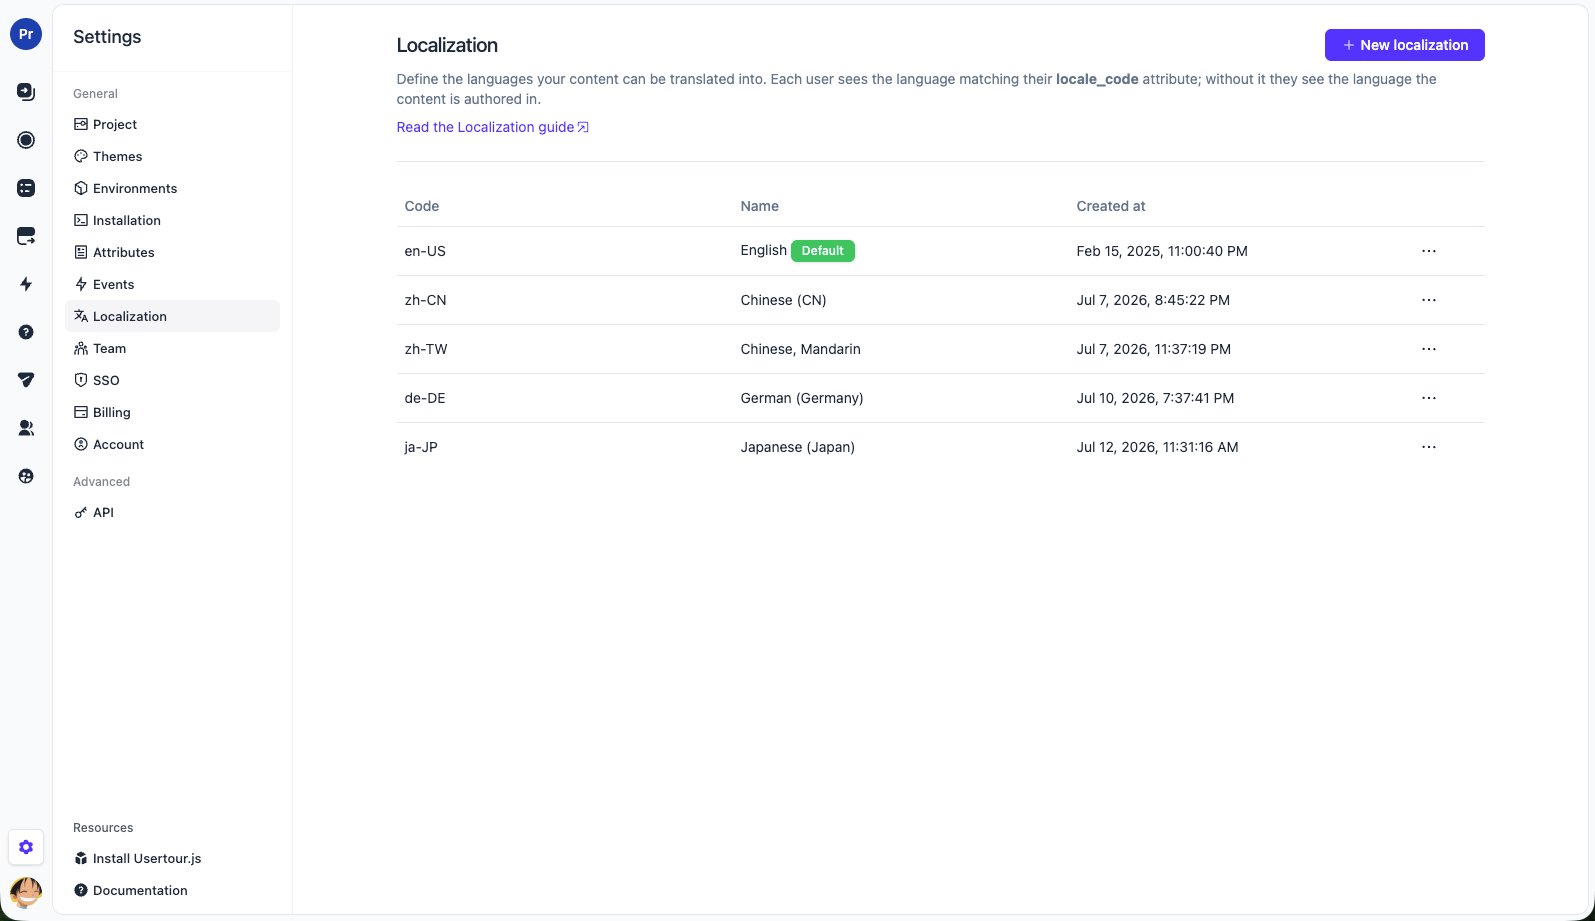
1. Go to **Settings → Localization**.
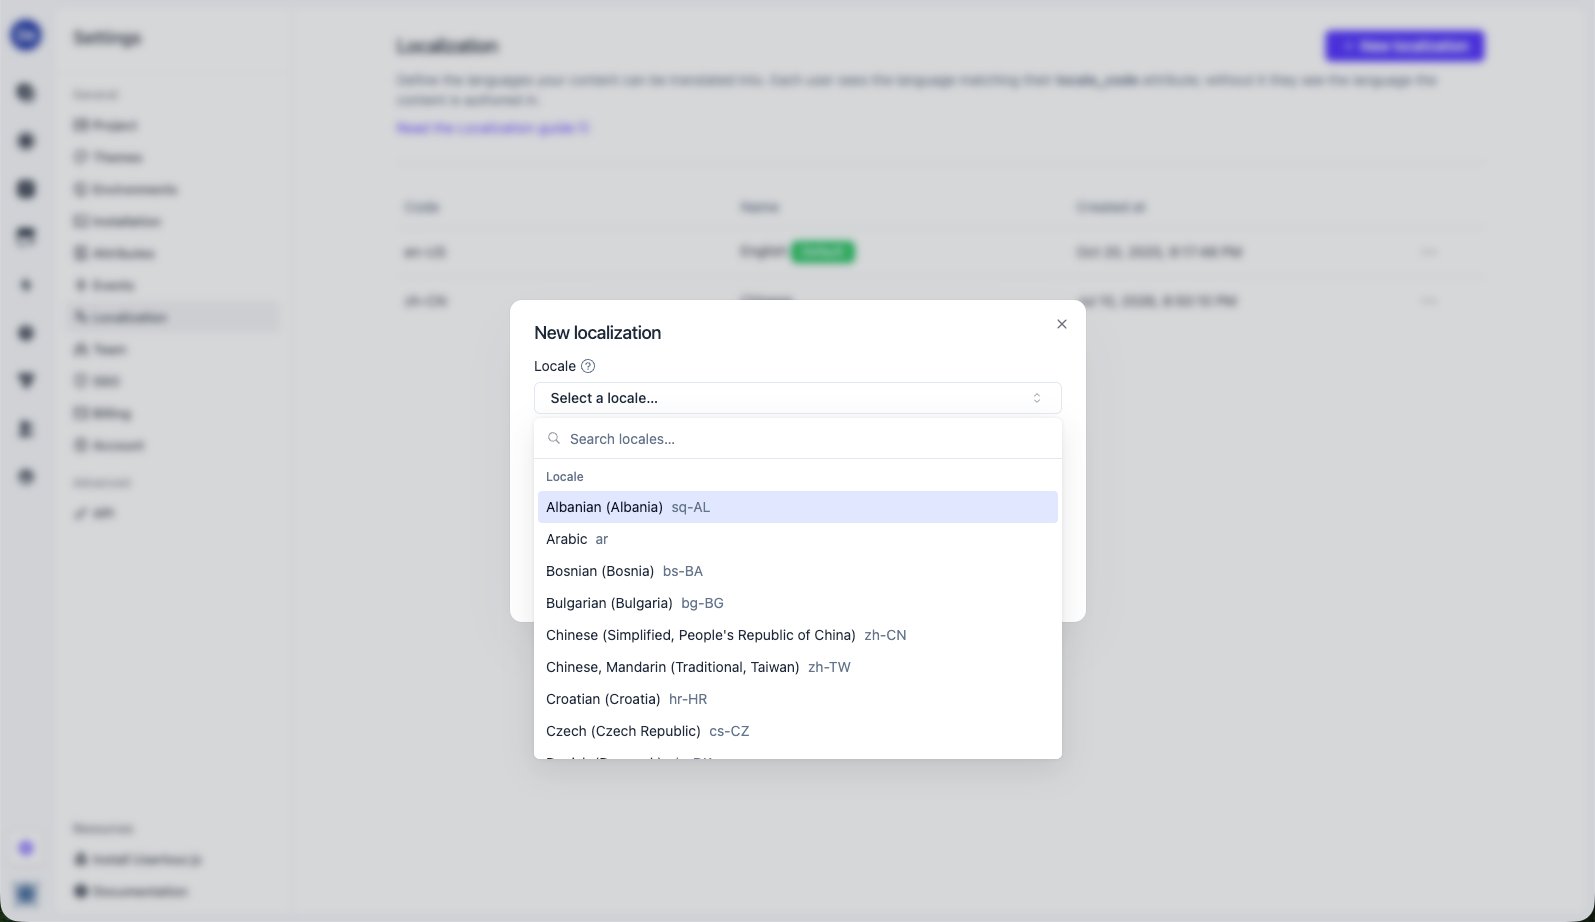
2. Click **New localization**.
3. Pick a locale from the list — the **Name** and **Code** fields fill in automatically and stay editable.
4. Click **Create localization**.
 Two fields matter later:
* **Code** is what gets matched against each user's `locale_code` attribute, using the rules above.
* **Name** is the display name used across the dashboard. End users never see it.
### The default localization
The localization marked **Default** represents the language your content is *authored* in. It is not a translation target — there is nothing to translate into it — and users who don't match any translation get this language. Use the **⋯ → Set as project default** menu to change it.
## Translate your content
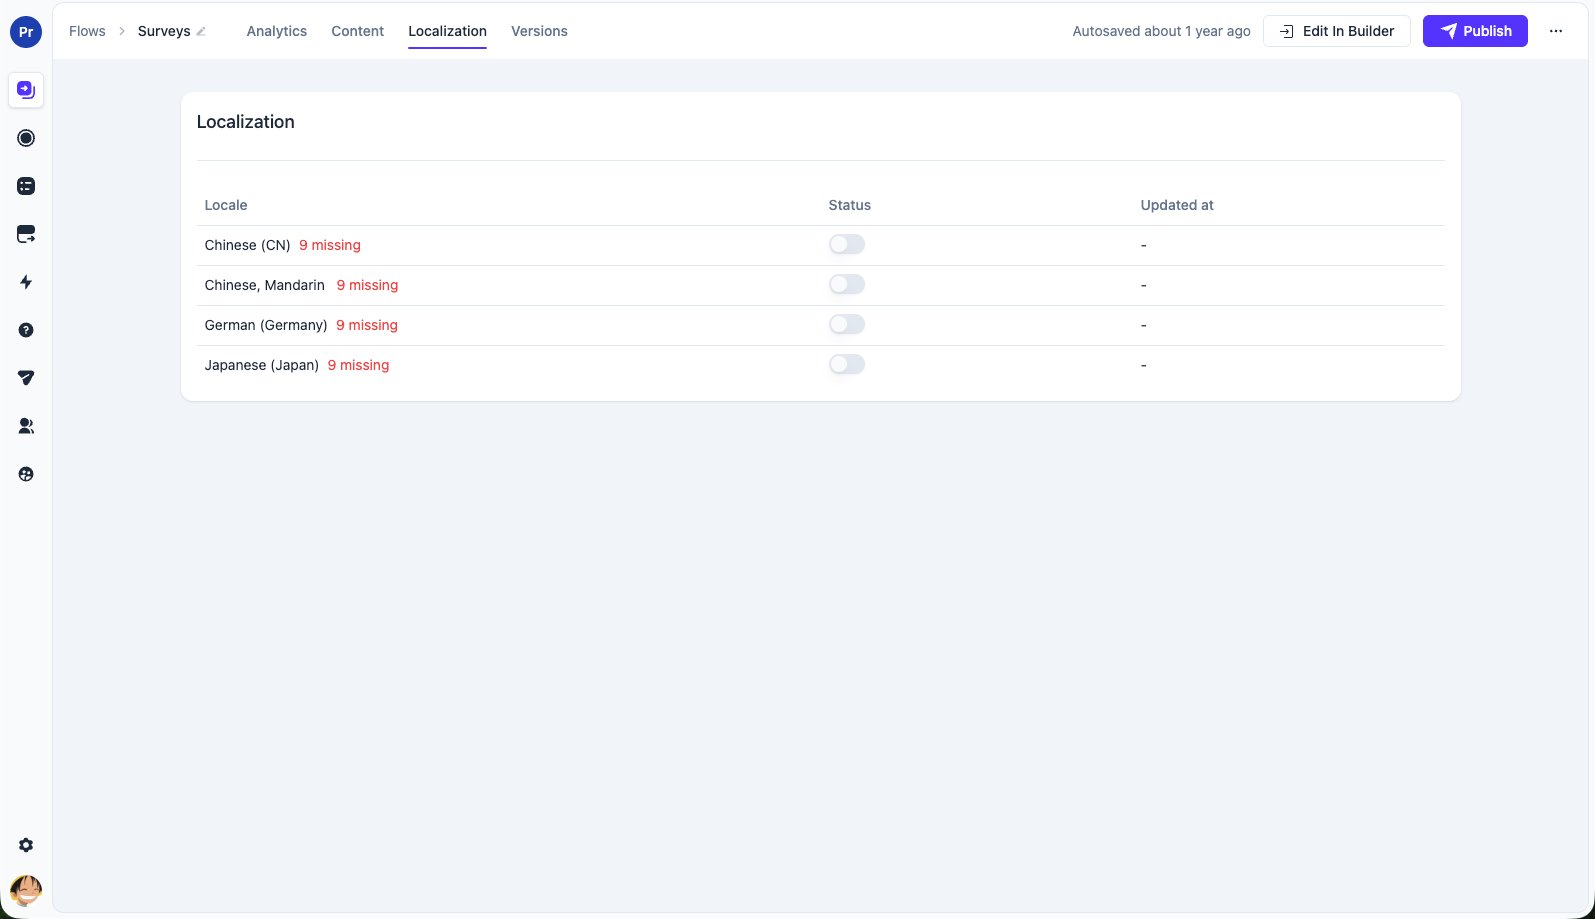
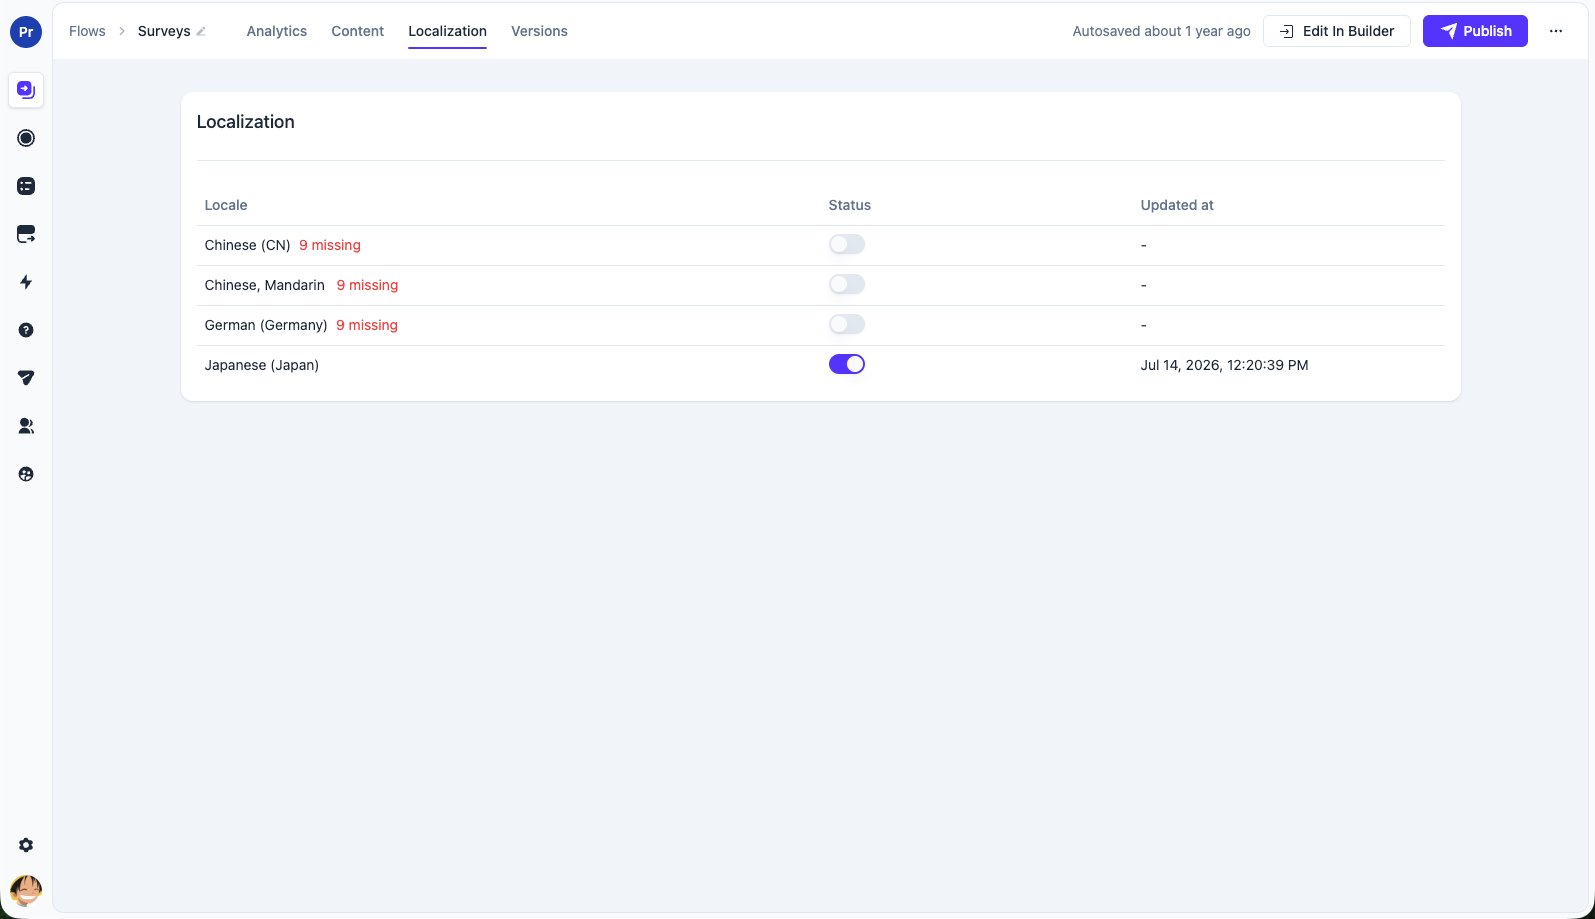
Open any flow, checklist, banner or other content and switch to the **Localization** tab. You'll see one row per language with how much is still missing, an enable switch, and when it was last updated.
Two fields matter later:
* **Code** is what gets matched against each user's `locale_code` attribute, using the rules above.
* **Name** is the display name used across the dashboard. End users never see it.
### The default localization
The localization marked **Default** represents the language your content is *authored* in. It is not a translation target — there is nothing to translate into it — and users who don't match any translation get this language. Use the **⋯ → Set as project default** menu to change it.
## Translate your content
Open any flow, checklist, banner or other content and switch to the **Localization** tab. You'll see one row per language with how much is still missing, an enable switch, and when it was last updated.
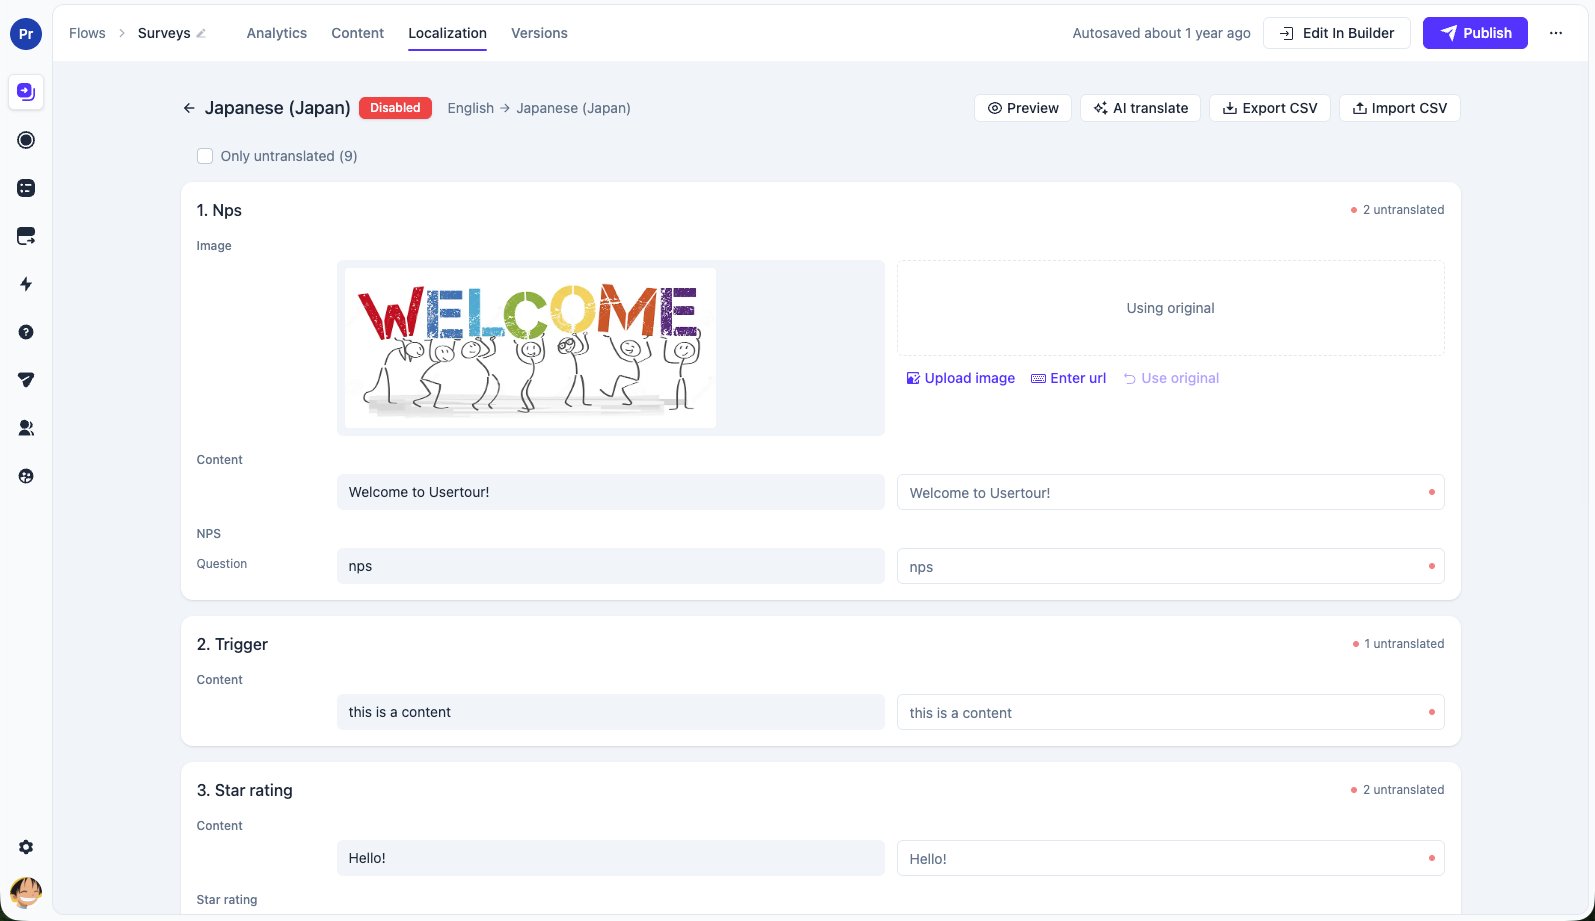
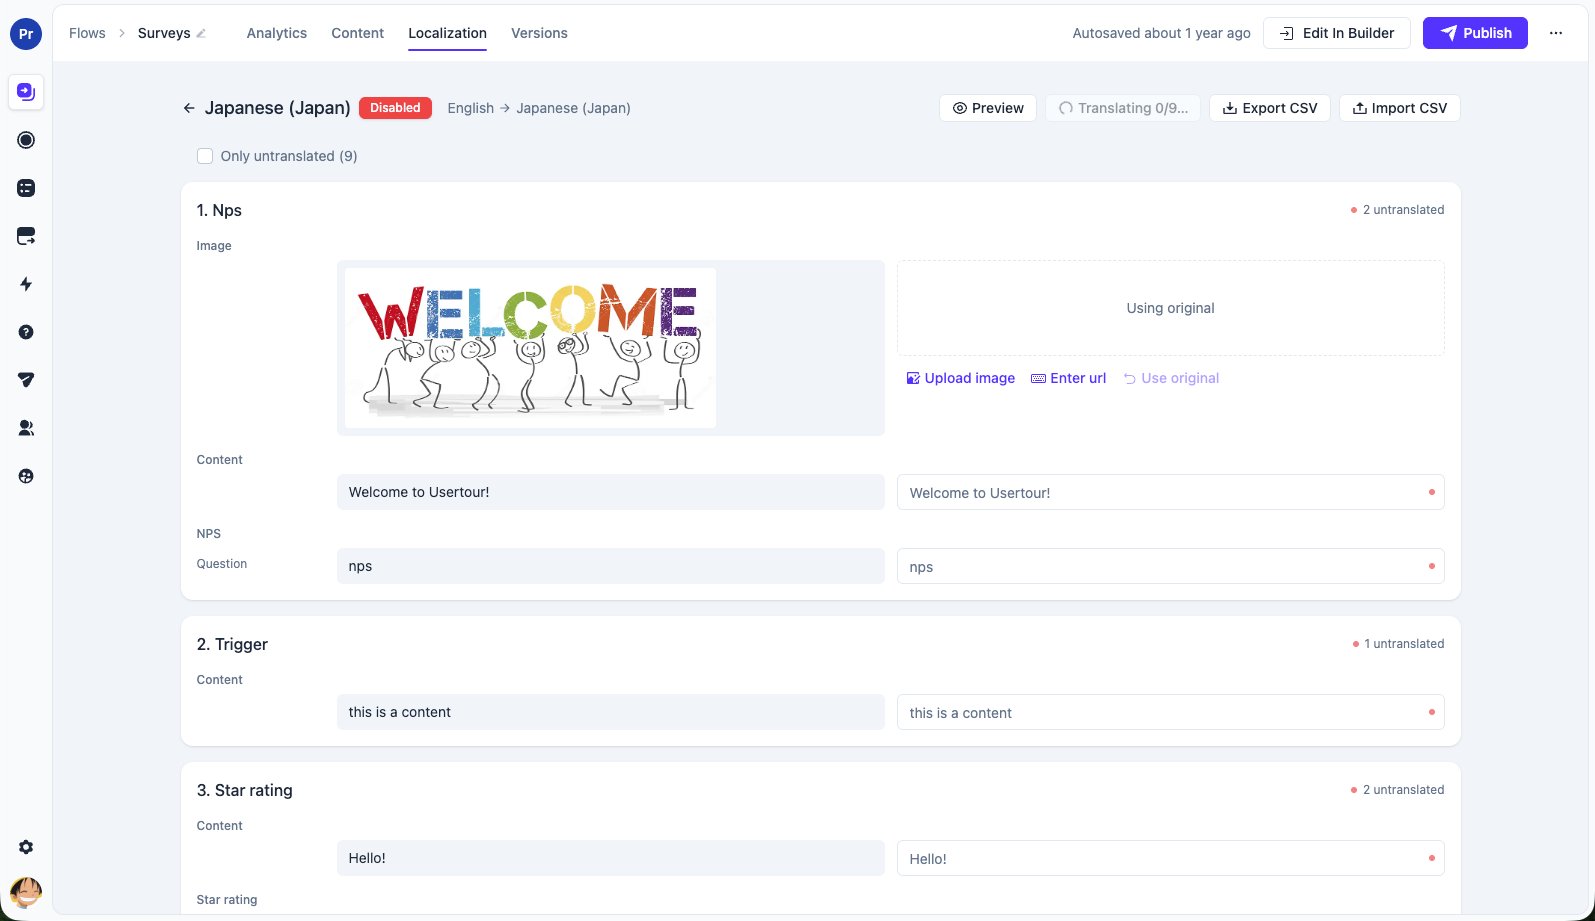
 Click a language to open the translation editor. Source text is on the left, your translation goes on the right. Text is grouped the way the content is structured — one card per flow step, or per section for other content types.
 While you work:
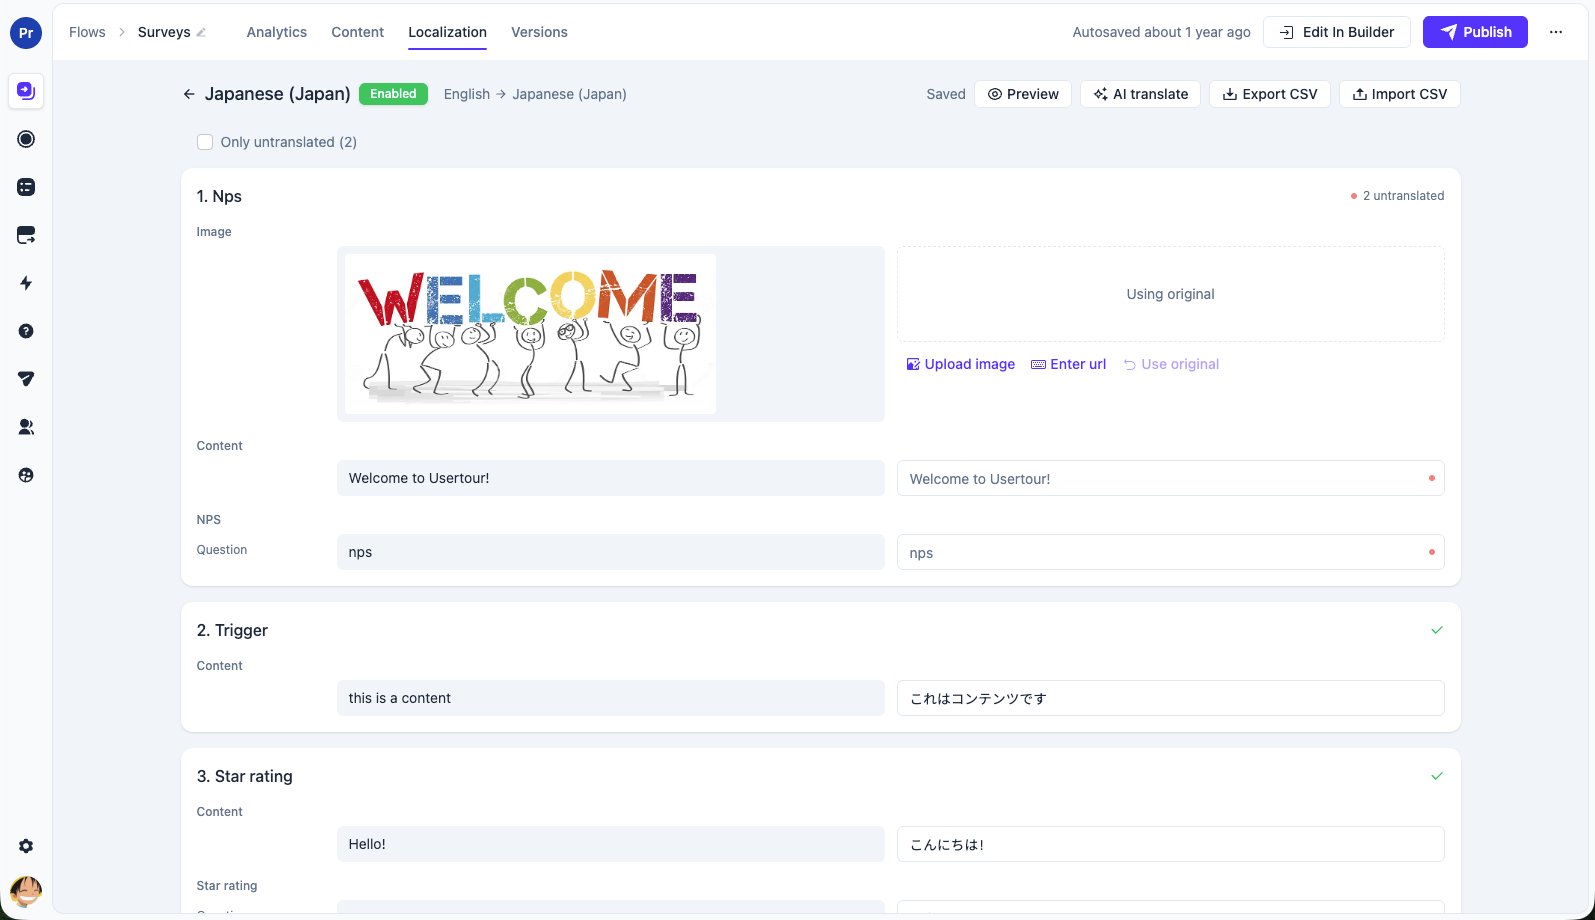
* A **red dot** marks rows that are still untranslated. Check **Only untranslated** to hide everything you've already done.
* A **yellow dot** marks rows whose source text changed after you translated them — see [Keeping translations up to date](#keeping-translations-up-to-date).
* Each card's header counts what's left in it; a green check means the card is done.
* Everything **autosaves** as you type — the Saving/Saved indicator sits next to the header actions.
* Leaving a translation **blank** means "fall back to the source language" for that text.
Rich text keeps its formatting automatically. A sentence with a bold phrase
in the middle appears as separate rows (before / bold part / after) so the
translation slots back into the same formatting. Translate the fragments so
they read correctly when joined.
Editing translations never disturbs what's live: if the version you're translating is currently published, your first change automatically continues on a new draft, and end users keep seeing the published translation until you publish again.
### AI translate
If machine translation is available on your instance, the editor offers it at two levels:
* The **AI translate** button in the header translates everything that's still untranslated, in batches, with a progress indicator. If it stops early (for example, a provider hiccup), click it again — it continues from what's still missing.
* Hovering a single row shows a magic-wand button that translates just that text.
While you work:
* A **red dot** marks rows that are still untranslated. Check **Only untranslated** to hide everything you've already done.
* A **yellow dot** marks rows whose source text changed after you translated them — see [Keeping translations up to date](#keeping-translations-up-to-date).
* Each card's header counts what's left in it; a green check means the card is done.
* Everything **autosaves** as you type — the Saving/Saved indicator sits next to the header actions.
* Leaving a translation **blank** means "fall back to the source language" for that text.
Rich text keeps its formatting automatically. A sentence with a bold phrase
in the middle appears as separate rows (before / bold part / after) so the
translation slots back into the same formatting. Translate the fragments so
they read correctly when joined.
Editing translations never disturbs what's live: if the version you're translating is currently published, your first change automatically continues on a new draft, and end users keep seeing the published translation until you publish again.
### AI translate
If machine translation is available on your instance, the editor offers it at two levels:
* The **AI translate** button in the header translates everything that's still untranslated, in batches, with a progress indicator. If it stops early (for example, a provider hiccup), click it again — it continues from what's still missing.
* Hovering a single row shows a magic-wand button that translates just that text.
 Machine translation fills blanks only — it never overwrites a translation you've already written or edited. Review the results before publishing; they land in the editor like any other edit.
On Usertour Cloud, machine translation is included with every paid plan. On
self-hosted instances you bring your own AI provider — see
[Machine translation on self-hosted](#machine-translation-on-self-hosted).
### Export and import CSV
For external translators or a translation agency, use the **Export CSV** / **Import CSV** buttons in the editor header.
The file has three columns — `path`, `source`, `translation`:
```csv theme={null}
path,source,translation
steps/abc123/0.0.0:text.0.0,Welcome to our app!,¡Bienvenido a nuestra aplicación!
steps/abc123/0.0.1:button.text,Next,Siguiente
```
Rules on import:
* Fill in the `translation` column and leave `path` and `source` untouched — rows are matched by `path`, and paths are internal identifiers, not meant to be edited.
* A **blank** translation keeps whatever is currently in the editor; it never clears an existing translation.
* Rows that don't match the current content are skipped silently, so importing a slightly stale file is safe.
Media URLs (images, videos) are included in the export so a translator can swap in localized assets, but they're optional and don't count as missing translations.
### Preview
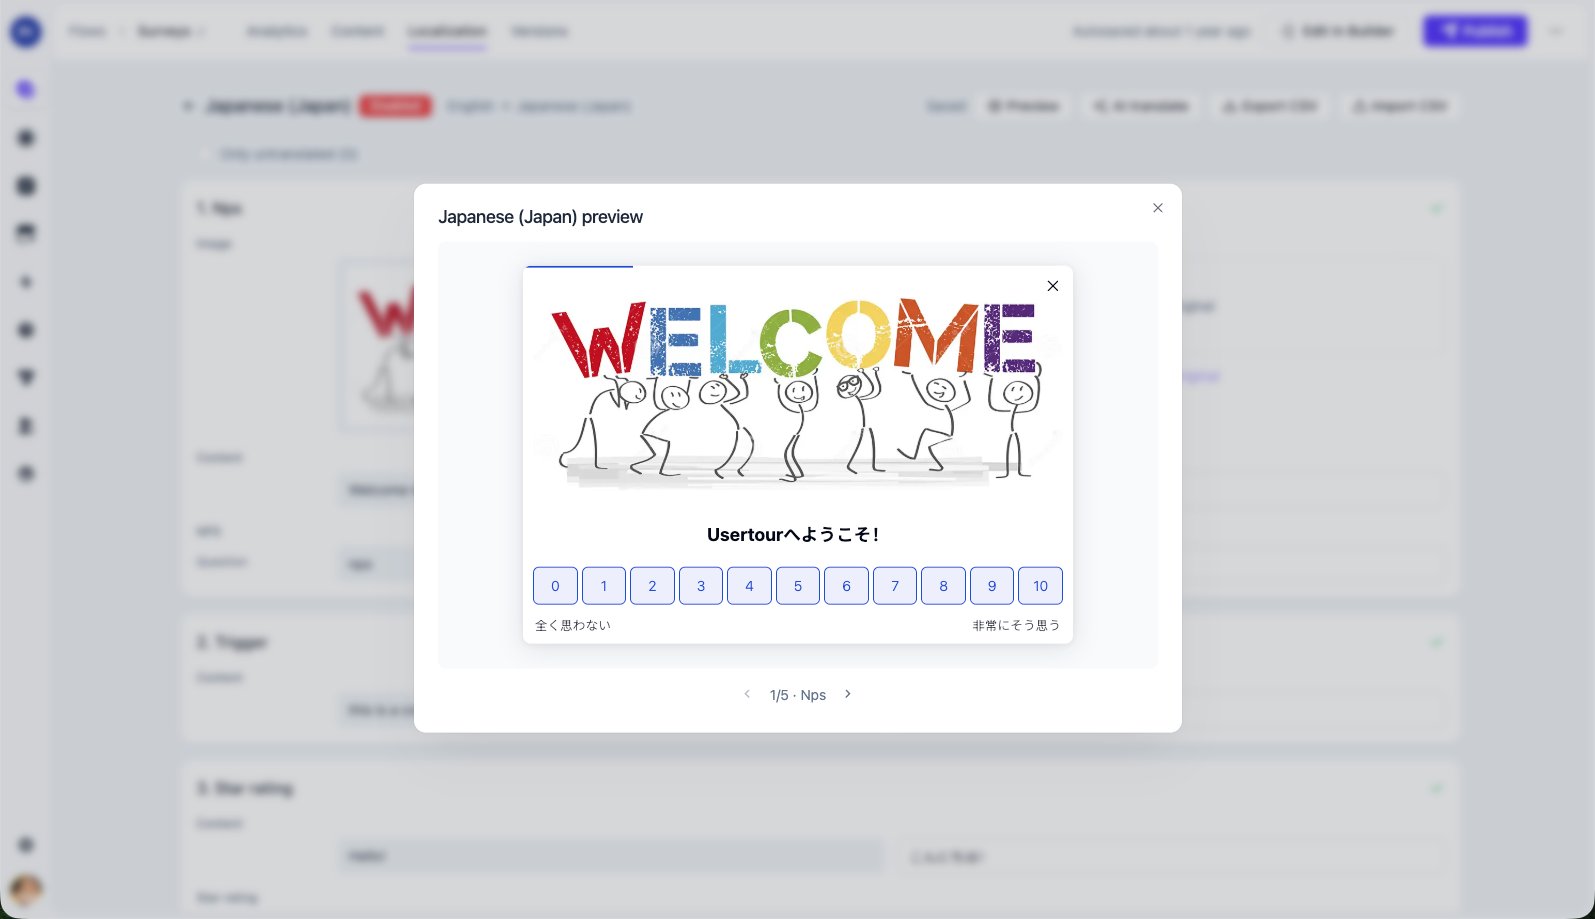
The **Preview** button in the editor header renders the content with your working translations applied — no publish needed.
Machine translation fills blanks only — it never overwrites a translation you've already written or edited. Review the results before publishing; they land in the editor like any other edit.
On Usertour Cloud, machine translation is included with every paid plan. On
self-hosted instances you bring your own AI provider — see
[Machine translation on self-hosted](#machine-translation-on-self-hosted).
### Export and import CSV
For external translators or a translation agency, use the **Export CSV** / **Import CSV** buttons in the editor header.
The file has three columns — `path`, `source`, `translation`:
```csv theme={null}
path,source,translation
steps/abc123/0.0.0:text.0.0,Welcome to our app!,¡Bienvenido a nuestra aplicación!
steps/abc123/0.0.1:button.text,Next,Siguiente
```
Rules on import:
* Fill in the `translation` column and leave `path` and `source` untouched — rows are matched by `path`, and paths are internal identifiers, not meant to be edited.
* A **blank** translation keeps whatever is currently in the editor; it never clears an existing translation.
* Rows that don't match the current content are skipped silently, so importing a slightly stale file is safe.
Media URLs (images, videos) are included in the export so a translator can swap in localized assets, but they're optional and don't count as missing translations.
### Preview
The **Preview** button in the editor header renders the content with your working translations applied — no publish needed.
 For a real end-to-end check in your own app, set `locale_code` on your test user and open the draft as usual.
## Enable and publish
Two switches control what ships:
1. **Enable the language** — the **Status** switch on the Localization tab. A disabled translation is never delivered, no matter how complete it is. This lets you translate incrementally and flip the switch when you're happy.
2. **Publish the version** — translations are part of the content version, so they go live exactly when the version does. If the content is already published, toggling or editing a translation creates a draft; publish it to ship the change.
For a real end-to-end check in your own app, set `locale_code` on your test user and open the draft as usual.
## Enable and publish
Two switches control what ships:
1. **Enable the language** — the **Status** switch on the Localization tab. A disabled translation is never delivered, no matter how complete it is. This lets you translate incrementally and flip the switch when you're happy.
2. **Publish the version** — translations are part of the content version, so they go live exactly when the version does. If the content is already published, toggling or editing a translation creates a draft; publish it to ship the change.
 ## Keeping translations up to date
When you change source copy after it has been translated, the affected rows are flagged:
* The Localization tab and each card show an **outdated** count.
* In the editor, flagged rows carry a **yellow dot** and a **Source changed** hint, so a reviewer can see exactly what needs another look.
* Editing the row (or translating it with the magic wand) clears the flag.
## Keeping translations up to date
When you change source copy after it has been translated, the affected rows are flagged:
* The Localization tab and each card show an **outdated** count.
* In the editor, flagged rows carry a **yellow dot** and a **Source changed** hint, so a reviewer can see exactly what needs another look.
* Editing the row (or translating it with the magic wand) clears the flag.
 Newly added source text isn't flagged as outdated — it simply shows up as untranslated, and the header **AI translate** button will pick it up.
## Setting the user's language
Set the `locale_code` attribute when you identify the user:
```javascript theme={null}
usertour.identify('user-123', {
name: 'Jane Smith',
email: 'jane@example.com',
locale_code: 'zh-CN',
});
```
If your app is internationalized, pass its active language directly, for example:
```javascript theme={null}
usertour.identify(user.id, {
locale_code: i18n.language, // e.g. 'de', 'fr-CA', 'zh-CN'
});
```
When the user switches languages inside your app, update the attribute — content that's currently showing is re-delivered in the new language:
```javascript theme={null}
await usertour.updateUser({ locale_code: 'ja' });
```
`locale_code` is a standard user attribute, so you can also use it in start conditions and segments like any other attribute.
## Built-in UI language
Besides your own copy, Usertour's widgets contain built-in interface text — checklist dismiss prompts, resource center search and empty states, survey buttons, screen-reader labels, and date formatting. These follow the same signal: the user's `locale_code`, falling back to your project's default localization, then English.
Built-in translations ship for: English, Simplified Chinese, Traditional Chinese, Japanese, Korean, French, German, Spanish, Portuguese, and Dutch. For other languages the built-in text stays in English while your translated content still shows correctly.
## What's translatable
| Content type | Translatable text |
| ------------------- | ------------------------------------------------------------------------------------------------- |
| **Flow** | Everything in each step: rich text, buttons, and survey questions (labels, placeholders, options) |
| **Checklist** | Launcher button text, checklist content, task names and descriptions |
| **Launcher** | Tooltip content and button text |
| **Banner** | Banner content |
| **Announcement** | Title, intro and detail content, "read more" label |
| **Resource center** | Header text, tab names, block labels, and the display names of content list entries |
A few things intentionally never translate:
* **Content names** (the name in your dashboard's content list) stay stable — they're used in analytics and by your team. For resource center lists, give each entry a translatable **List item name** in the block editor instead.
* **Event trackers** have no end-user-visible text.
## Machine translation on self-hosted
Self-hosted instances enable the AI translate buttons by configuring an AI provider through environment variables — any Anthropic key, an OpenAI-compatible gateway, or AWS Bedrock. See [Environment Variables](/open-source/env) for the `AI_*` reference. Once configured, machine translation is available with no plan gating.
Newly added source text isn't flagged as outdated — it simply shows up as untranslated, and the header **AI translate** button will pick it up.
## Setting the user's language
Set the `locale_code` attribute when you identify the user:
```javascript theme={null}
usertour.identify('user-123', {
name: 'Jane Smith',
email: 'jane@example.com',
locale_code: 'zh-CN',
});
```
If your app is internationalized, pass its active language directly, for example:
```javascript theme={null}
usertour.identify(user.id, {
locale_code: i18n.language, // e.g. 'de', 'fr-CA', 'zh-CN'
});
```
When the user switches languages inside your app, update the attribute — content that's currently showing is re-delivered in the new language:
```javascript theme={null}
await usertour.updateUser({ locale_code: 'ja' });
```
`locale_code` is a standard user attribute, so you can also use it in start conditions and segments like any other attribute.
## Built-in UI language
Besides your own copy, Usertour's widgets contain built-in interface text — checklist dismiss prompts, resource center search and empty states, survey buttons, screen-reader labels, and date formatting. These follow the same signal: the user's `locale_code`, falling back to your project's default localization, then English.
Built-in translations ship for: English, Simplified Chinese, Traditional Chinese, Japanese, Korean, French, German, Spanish, Portuguese, and Dutch. For other languages the built-in text stays in English while your translated content still shows correctly.
## What's translatable
| Content type | Translatable text |
| ------------------- | ------------------------------------------------------------------------------------------------- |
| **Flow** | Everything in each step: rich text, buttons, and survey questions (labels, placeholders, options) |
| **Checklist** | Launcher button text, checklist content, task names and descriptions |
| **Launcher** | Tooltip content and button text |
| **Banner** | Banner content |
| **Announcement** | Title, intro and detail content, "read more" label |
| **Resource center** | Header text, tab names, block labels, and the display names of content list entries |
A few things intentionally never translate:
* **Content names** (the name in your dashboard's content list) stay stable — they're used in analytics and by your team. For resource center lists, give each entry a translatable **List item name** in the block editor instead.
* **Event trackers** have no end-user-visible text.
## Machine translation on self-hosted
Self-hosted instances enable the AI translate buttons by configuring an AI provider through environment variables — any Anthropic key, an OpenAI-compatible gateway, or AWS Bedrock. See [Environment Variables](/open-source/env) for the `AI_*` reference. Once configured, machine translation is available with no plan gating.