> ## Documentation Index
> Fetch the complete documentation index at: https://docs.usertour.io/llms.txt
> Use this file to discover all available pages before exploring further.
# Selecting Elements
> Use the OpenPicker extension to point at an element and get a CSS selector — and define stable selectors with your developers so flows don't break on the next release.
Tooltips that attach to an element, and start rules like **Element is present** or **Element is clicked**, all need a **CSS selector** that tells Usertour which element on the page to target. You can type a selector by hand, or point at the element visually with the picker.
## The element picker
Next to any selector field you'll see a crosshair **picker** button. It's powered by [OpenPicker](https://openpicker.dev) — an open-source browser extension, maintained by the Usertour team, that lets you point at an element on your own site and hands back a CSS selector.
To pick an element:
1. Click the crosshair button next to the selector field.
2. If the OpenPicker extension isn't installed yet, Usertour prompts you to add it from the Chrome Web Store, then continues automatically.
3. Confirm or enter the URL of the page where the element lives — the picker opens that page in a new tab.
4. Hover to highlight the element you want and click it. The picker returns a CSS selector — and how many elements it currently matches — back into the field.
OpenPicker can pick on a different tab or origin than the Usertour app. That cross-tab hop is exactly why it's a browser extension rather than something embedded in the page.
## Define stable selectors
This is the most important part of element targeting, and the difference between onboarding that keeps working and onboarding that silently breaks.
An auto-generated selector — something like `div > div:nth-child(3) > button.css-1x2y3z` — only describes *where an element sits today*. The next time your app's markup changes (a redesign, a refactor, even one new wrapper `
`), that selector stops matching, the tooltip loses its anchor, and the flow breaks. A single routine release can take your onboarding down without anyone ever touching Usertour.
The fix is to **agree on stable hooks with your developers** — usually a dedicated `data-*` attribute on the elements your flows target:
```html theme={null}
```
```css theme={null}
[data-tour="billing-upgrade"]
```
A `data-tour` attribute is added on purpose, survives restyles and refactors, and doubles as documentation — developers can see an element is referenced by onboarding and won't remove it by accident. The attribute's value (`billing-upgrade`) is the unique id, so there's no need for a separate `id` attribute. Treat the elements your flows point at as a contract between your team and your product's markup.
### Why not reuse `data-testid`?
It's tempting to point flows at an existing `data-testid`, but for onboarding it has two traps:
* **It may not ship to production.** Many teams strip `data-testid` from production builds to shrink bundles and avoid exposing internals. Onboarding runs in production, so the moment the attribute is stripped, every selector relying on it breaks.
* **It's coupled to your test suite.** A test id exists for tests; a developer refactoring tests can rename or remove it without realizing onboarding depends on it.
A dedicated `data-tour` attribute keeps onboarding decoupled from your tests and guaranteed to reach production.
### Make the picker use only your stable attributes
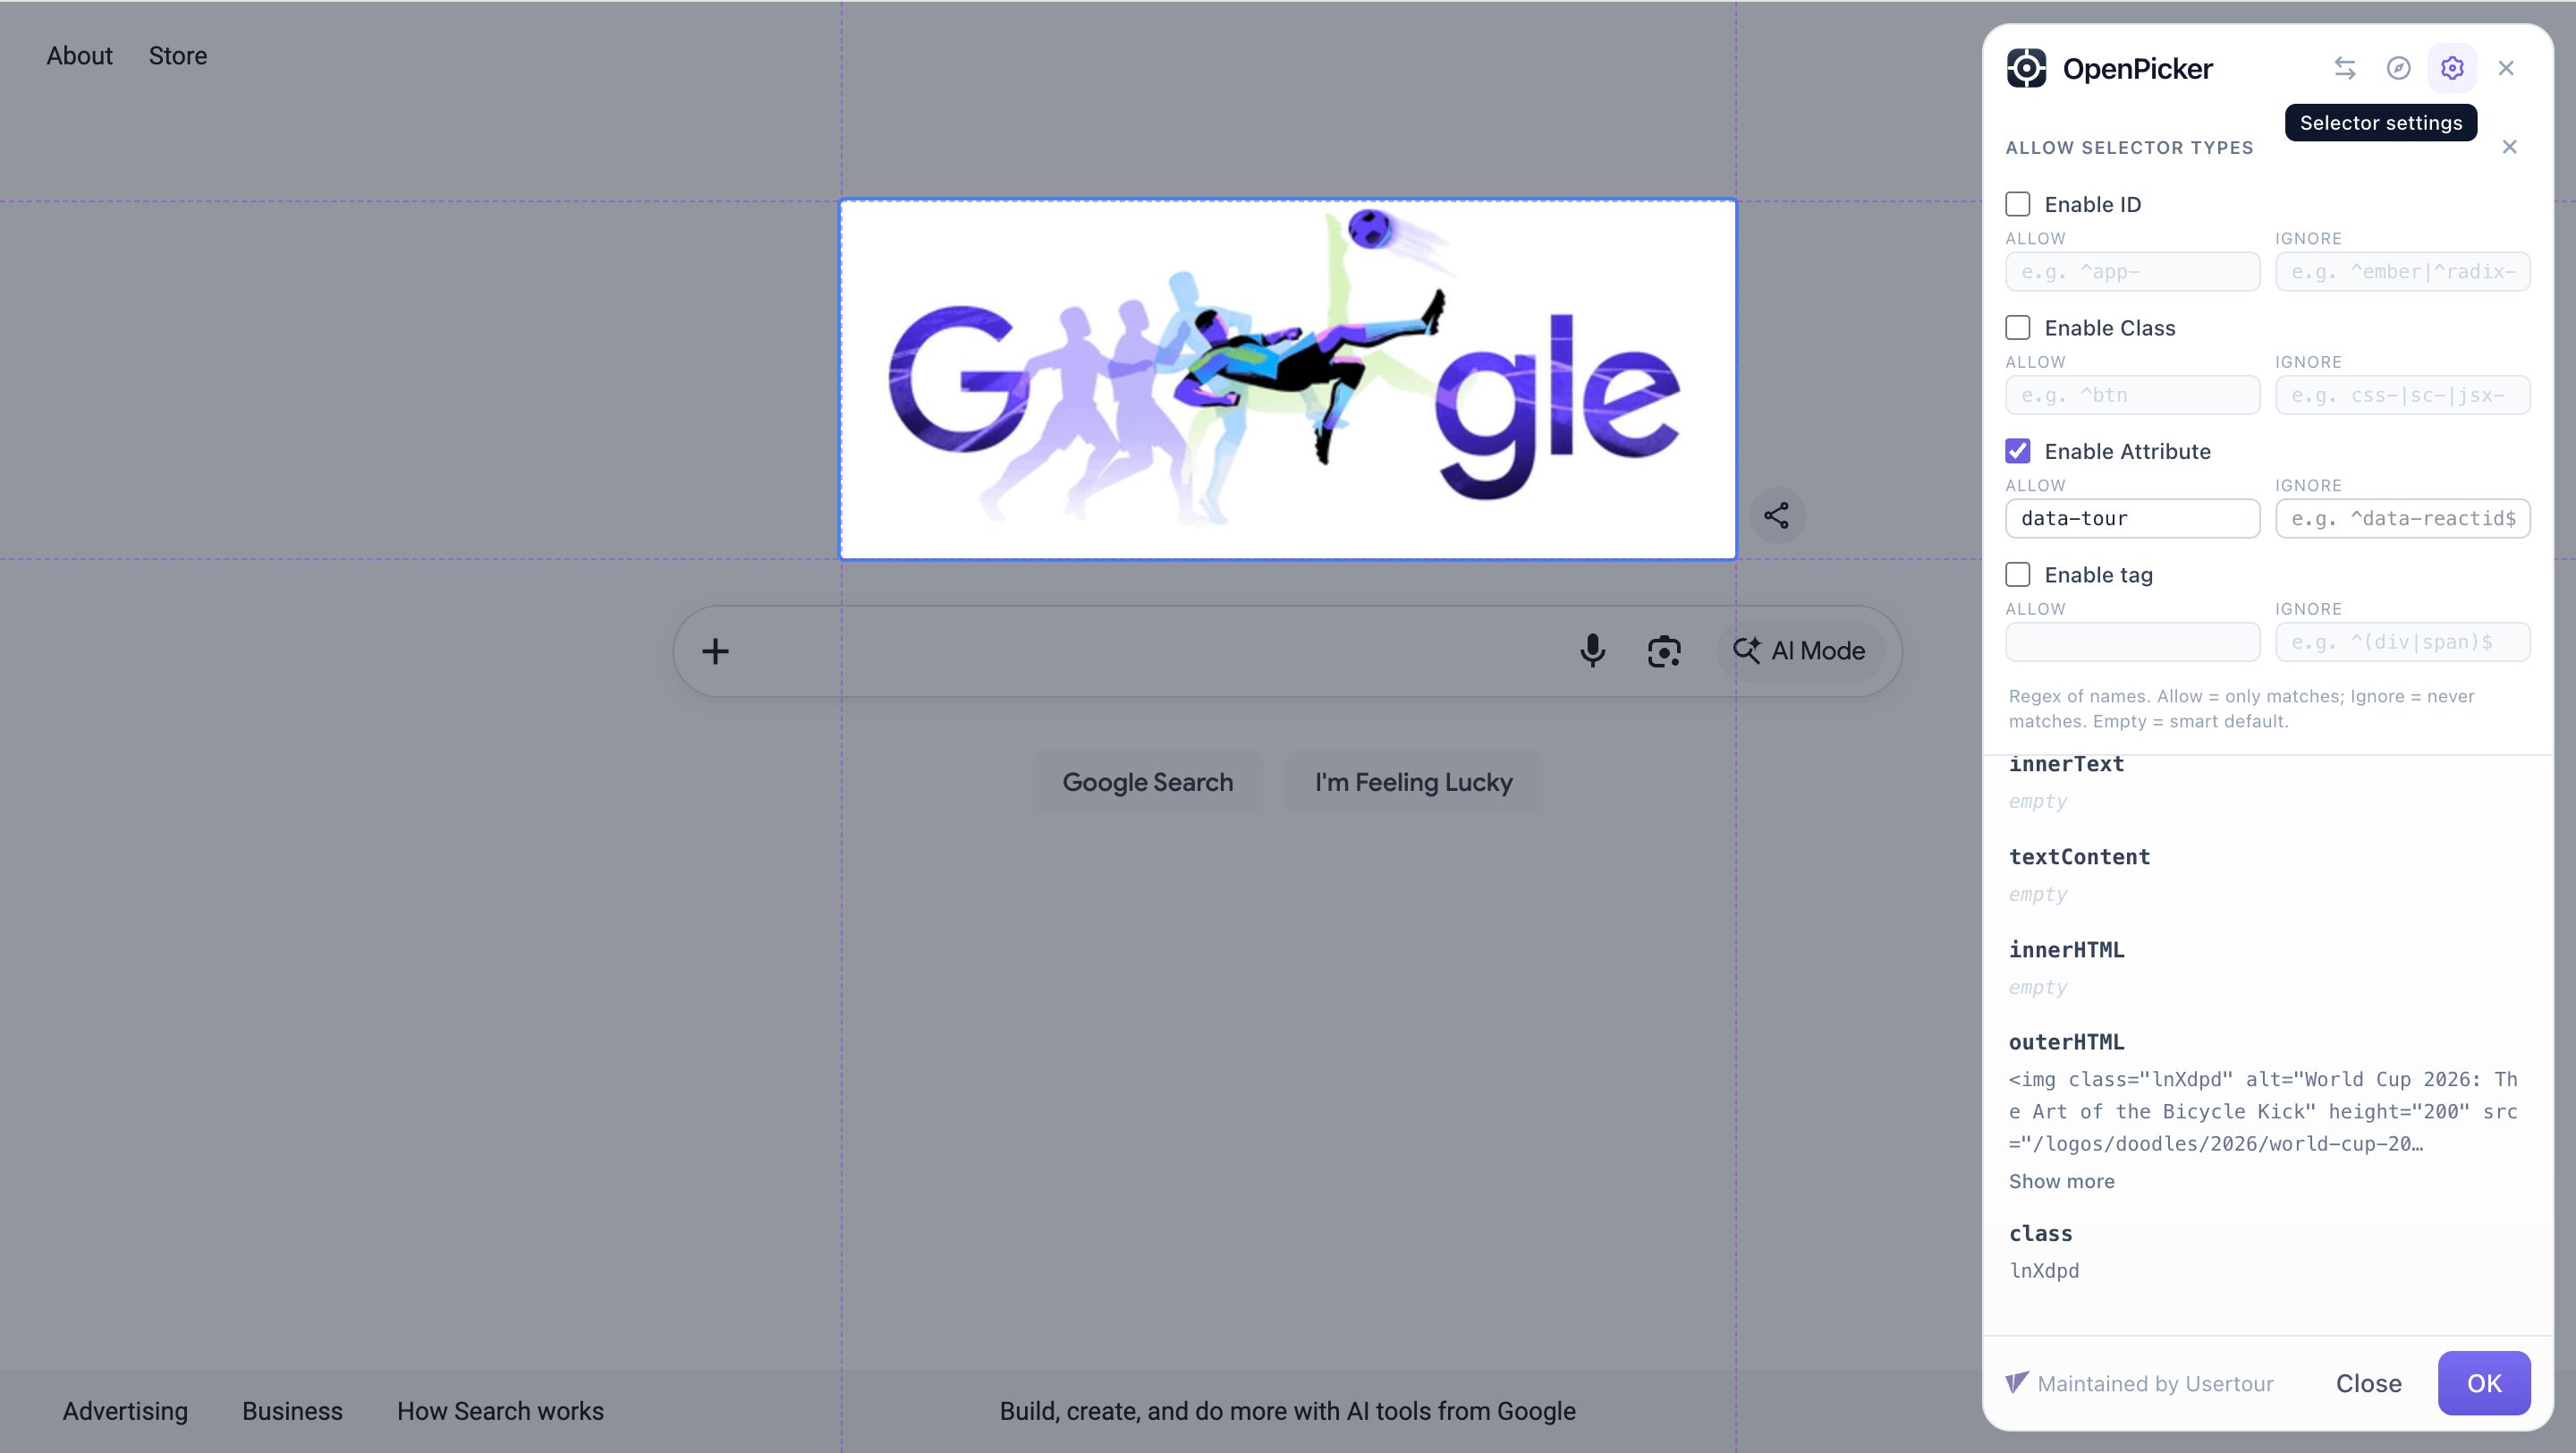
OpenPicker builds selectors from a set of **selector rules**. Each anchor type — **id**, **class**, **attribute**, and **tag** — can be turned on or off, and each has an **Allow** / **Ignore** regex that controls which names it may use. To make every pick come back as `[data-tour="..."]`:
* Enable **Attribute** and set its **Allow** to `^data-tour$`.
* Turn off **id**, **class**, and **tag** if those are auto-generated or hashed in your app.
Now every element you pick comes back as `[data-tour="..."]` instead of a brittle structural path. And if an element doesn't have your attribute yet, that's your cue to ask a developer to add one before you build onboarding on top of it.
### Set your rules once in the extension's Settings
You can adjust these rules mid-pick from the sidebar **gear** button, but that only applies to the site you're currently picking on — so you'd repeat it on every site, and it's easy to forget. To set a default that **every pick reuses automatically**, configure it once in the extension's **Settings** (its options page):
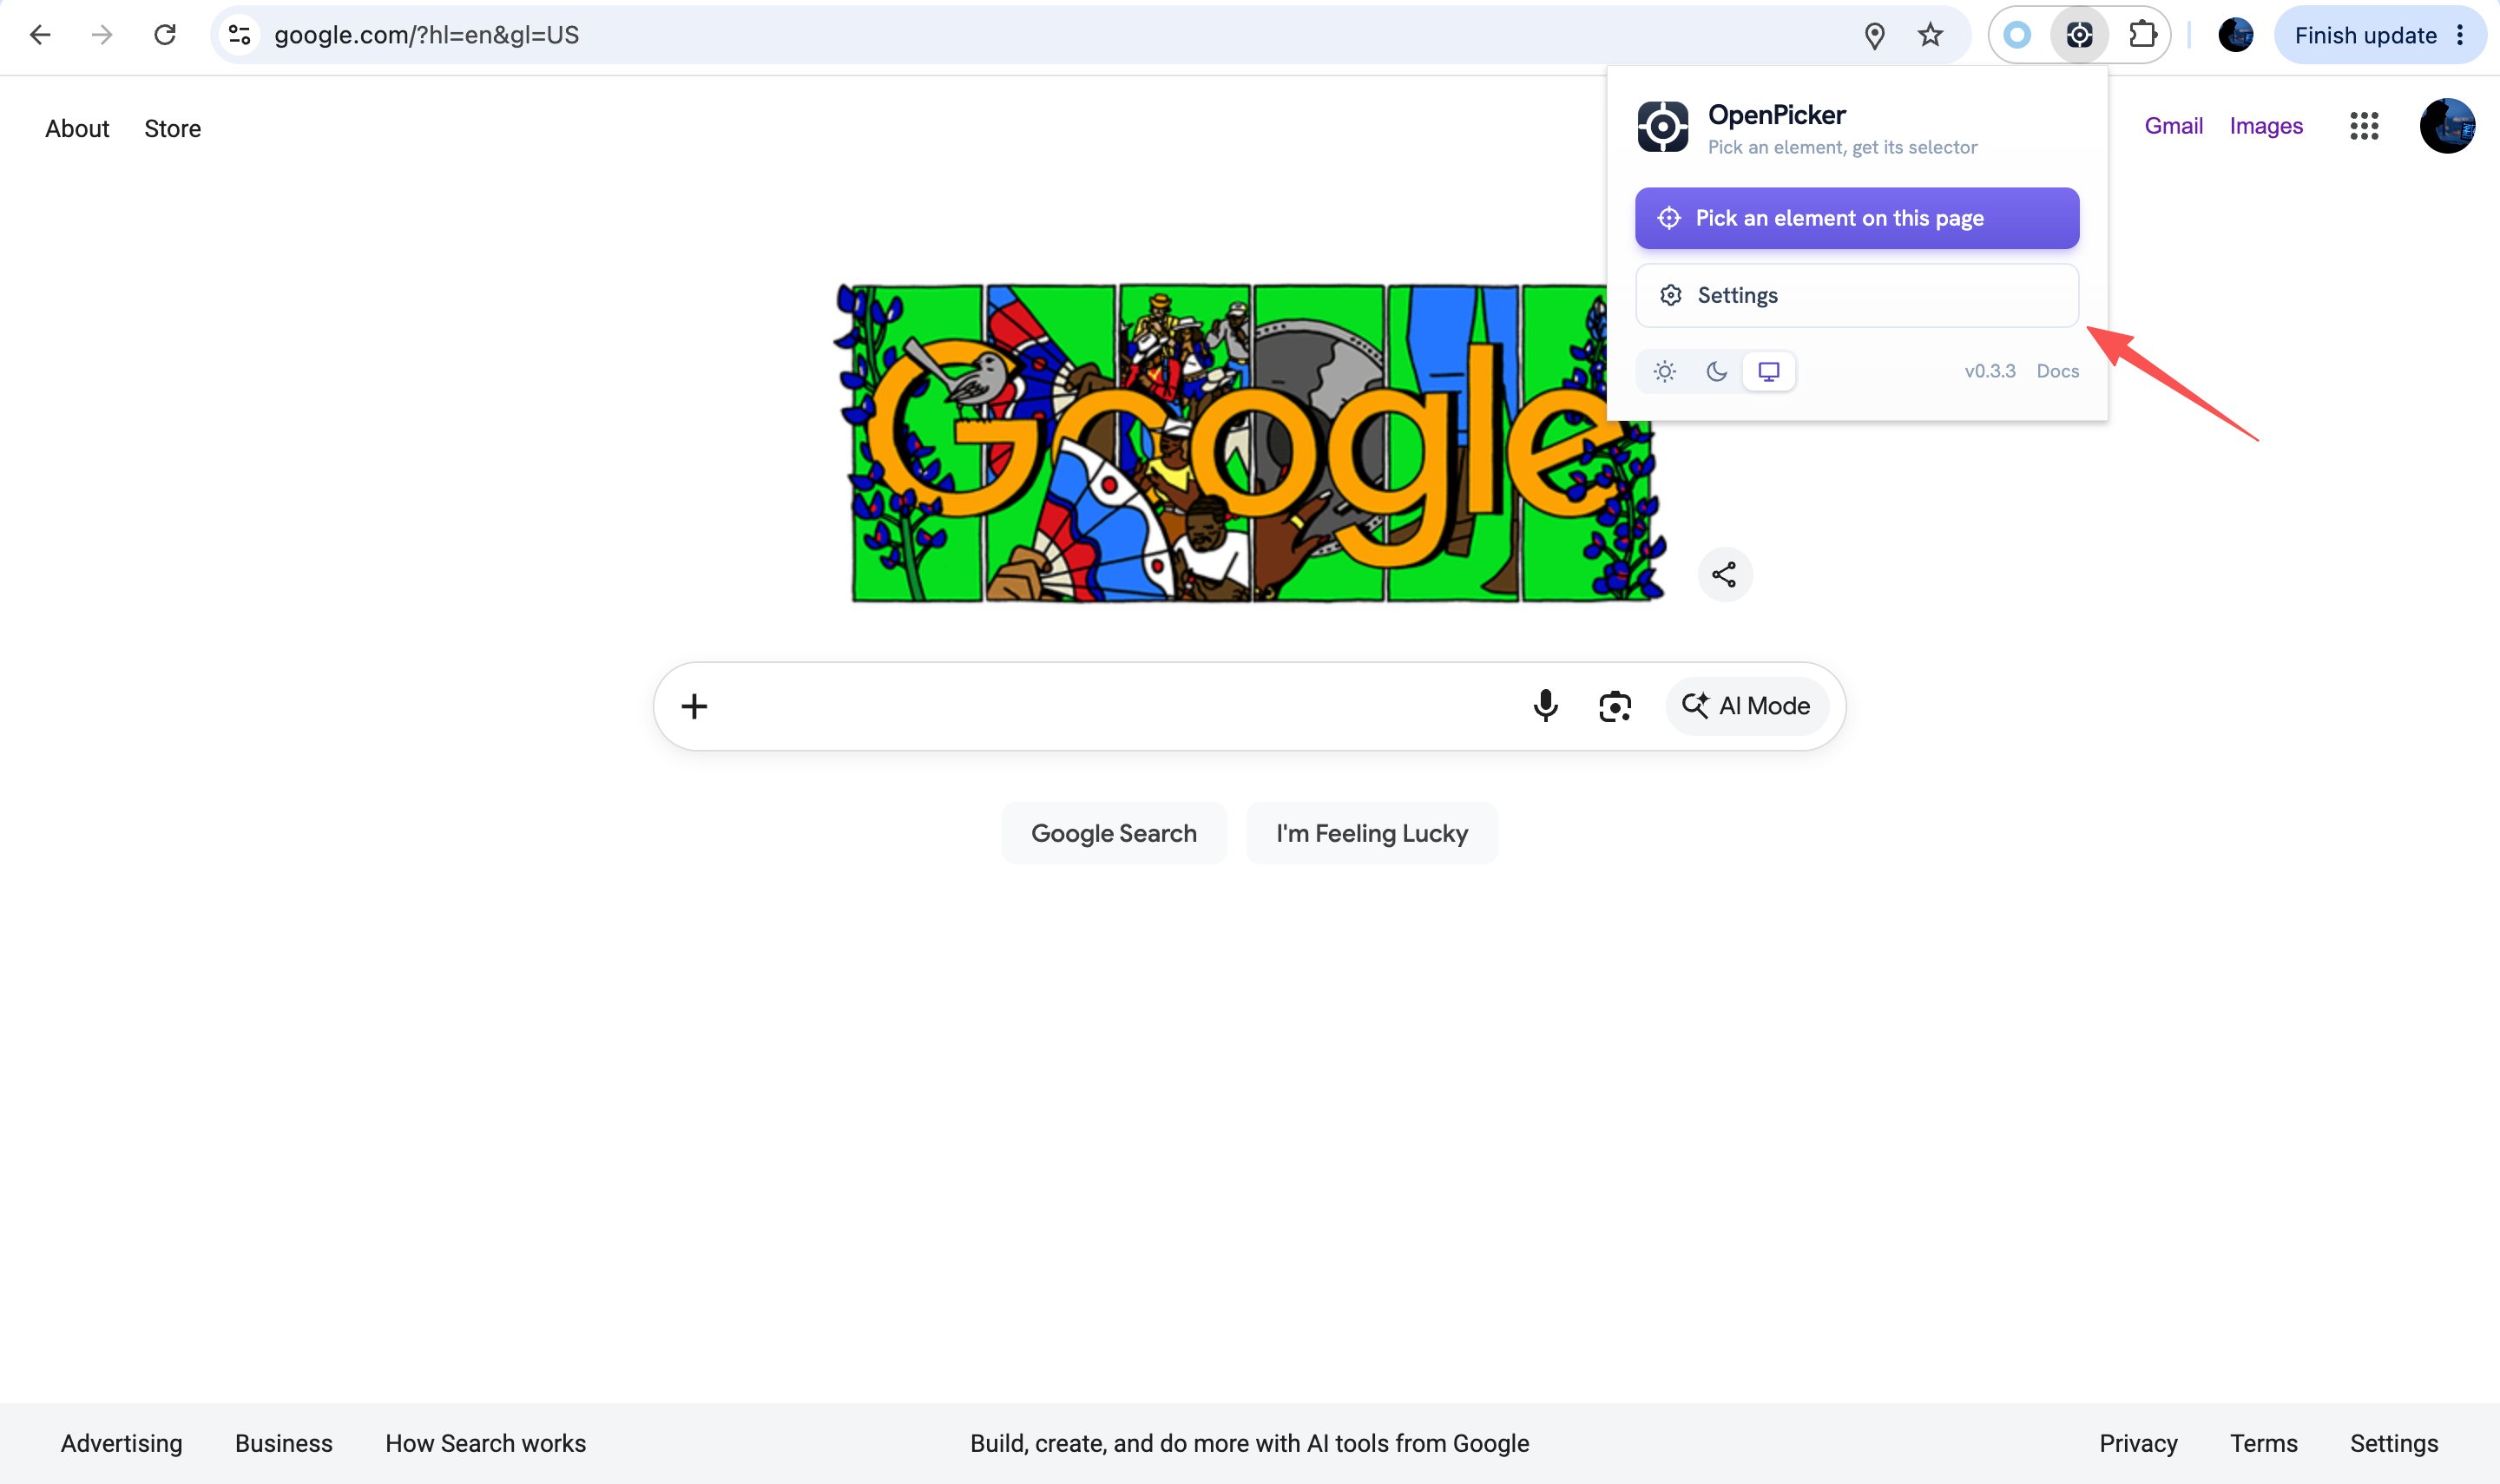
1. Click the **OpenPicker** icon in your browser's toolbar, then choose **Settings** (or right-click the icon and choose **Options**).
2. In the **Selector rules** section, the **Global default** applies to every site you pick on — set your `data-tour` rule here. Use **Per-site rules** to override the default for specific origins, e.g. a different attribute on your production app versus a staging environment.
The rules are saved in your browser, so every pick — from any selector field in Usertour — reuses them without asking again. You configure your `data-tour` rule once and never touch it per pick.
The sidebar gear during a pick and the **Per-site rules** in Settings edit the same per-site configuration. Use Settings to set things up ahead of time; use the gear for a quick one-off tweak while you're picking.
Without stable, agreed-upon selectors, element targeting is fragile — a single front-end change can break a flow even though nothing changed in Usertour. Defining `data-*` hooks up front is the single best thing you can do to keep onboarding reliable.
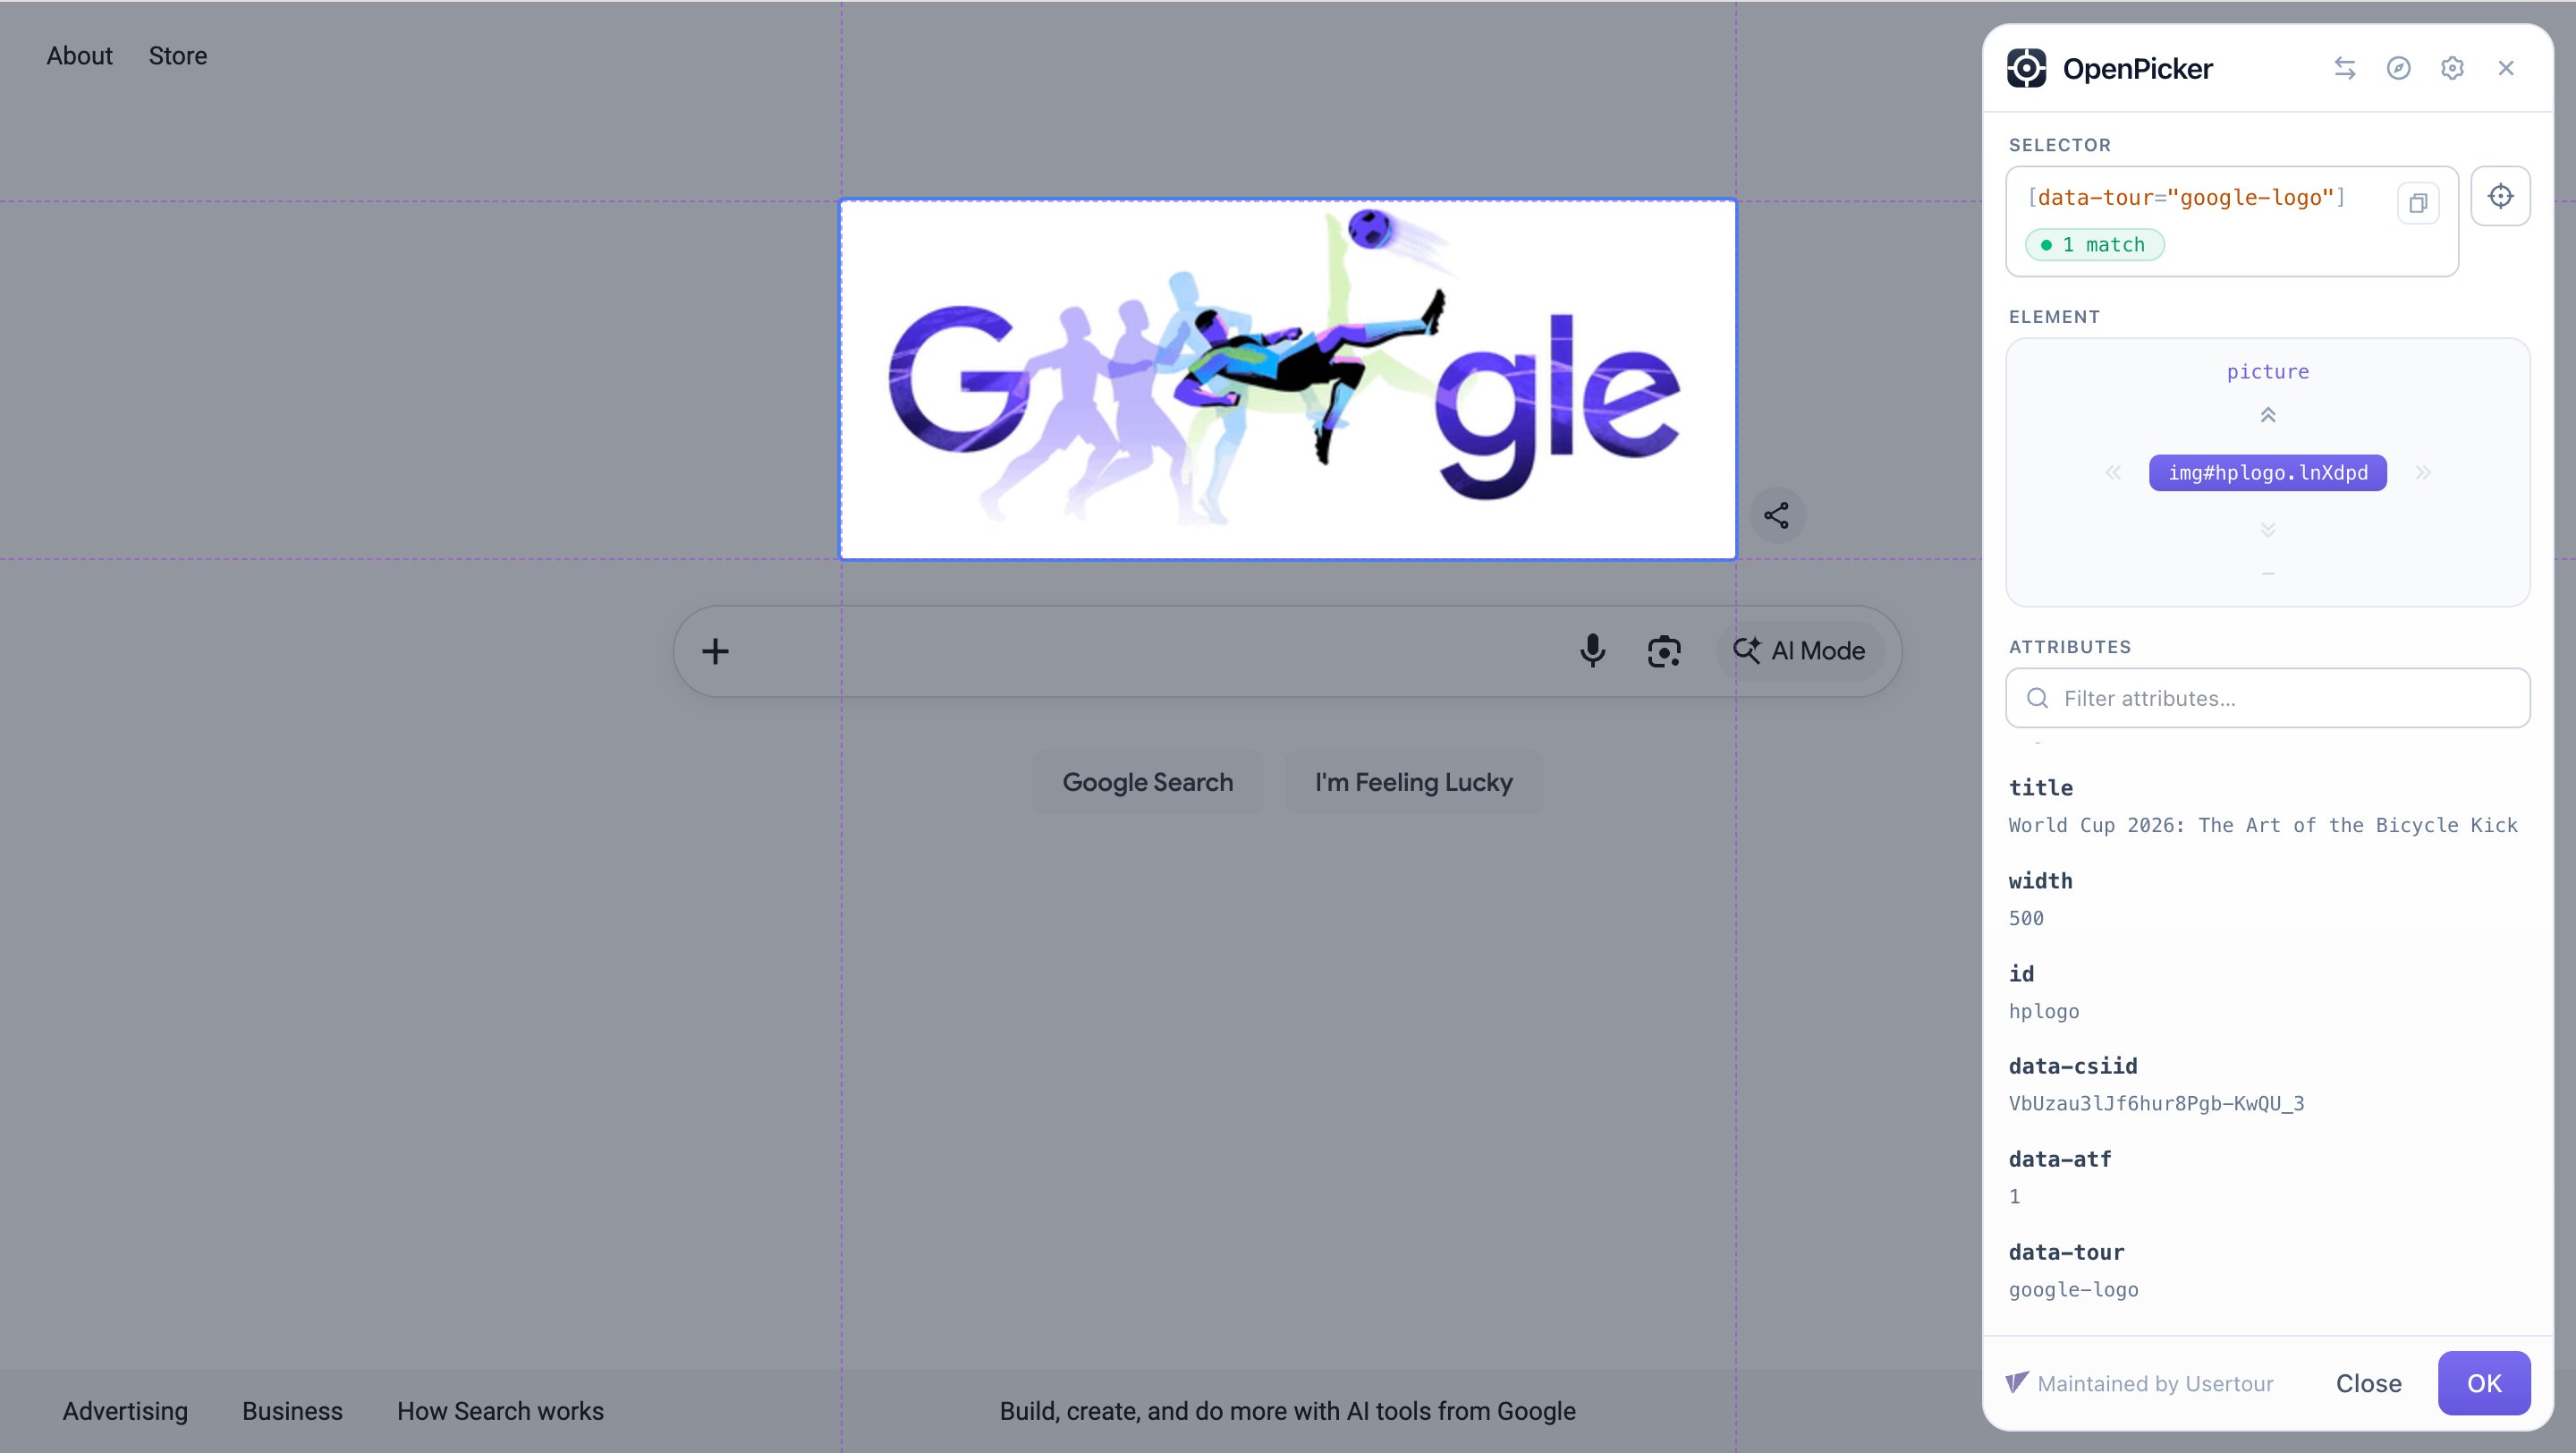 To pick an element:
1. Click the crosshair button next to the selector field.
2. If the OpenPicker extension isn't installed yet, Usertour prompts you to add it from the Chrome Web Store, then continues automatically.
3. Confirm or enter the URL of the page where the element lives — the picker opens that page in a new tab.
4. Hover to highlight the element you want and click it. The picker returns a CSS selector — and how many elements it currently matches — back into the field.
To pick an element:
1. Click the crosshair button next to the selector field.
2. If the OpenPicker extension isn't installed yet, Usertour prompts you to add it from the Chrome Web Store, then continues automatically.
3. Confirm or enter the URL of the page where the element lives — the picker opens that page in a new tab.
4. Hover to highlight the element you want and click it. The picker returns a CSS selector — and how many elements it currently matches — back into the field.
 Now every element you pick comes back as `[data-tour="..."]` instead of a brittle structural path. And if an element doesn't have your attribute yet, that's your cue to ask a developer to add one before you build onboarding on top of it.
### Set your rules once in the extension's Settings
You can adjust these rules mid-pick from the sidebar **gear** button, but that only applies to the site you're currently picking on — so you'd repeat it on every site, and it's easy to forget. To set a default that **every pick reuses automatically**, configure it once in the extension's **Settings** (its options page):
1. Click the **OpenPicker** icon in your browser's toolbar, then choose **Settings** (or right-click the icon and choose **Options**).
Now every element you pick comes back as `[data-tour="..."]` instead of a brittle structural path. And if an element doesn't have your attribute yet, that's your cue to ask a developer to add one before you build onboarding on top of it.
### Set your rules once in the extension's Settings
You can adjust these rules mid-pick from the sidebar **gear** button, but that only applies to the site you're currently picking on — so you'd repeat it on every site, and it's easy to forget. To set a default that **every pick reuses automatically**, configure it once in the extension's **Settings** (its options page):
1. Click the **OpenPicker** icon in your browser's toolbar, then choose **Settings** (or right-click the icon and choose **Options**).
 2. In the **Selector rules** section, the **Global default** applies to every site you pick on — set your `data-tour` rule here. Use **Per-site rules** to override the default for specific origins, e.g. a different attribute on your production app versus a staging environment.
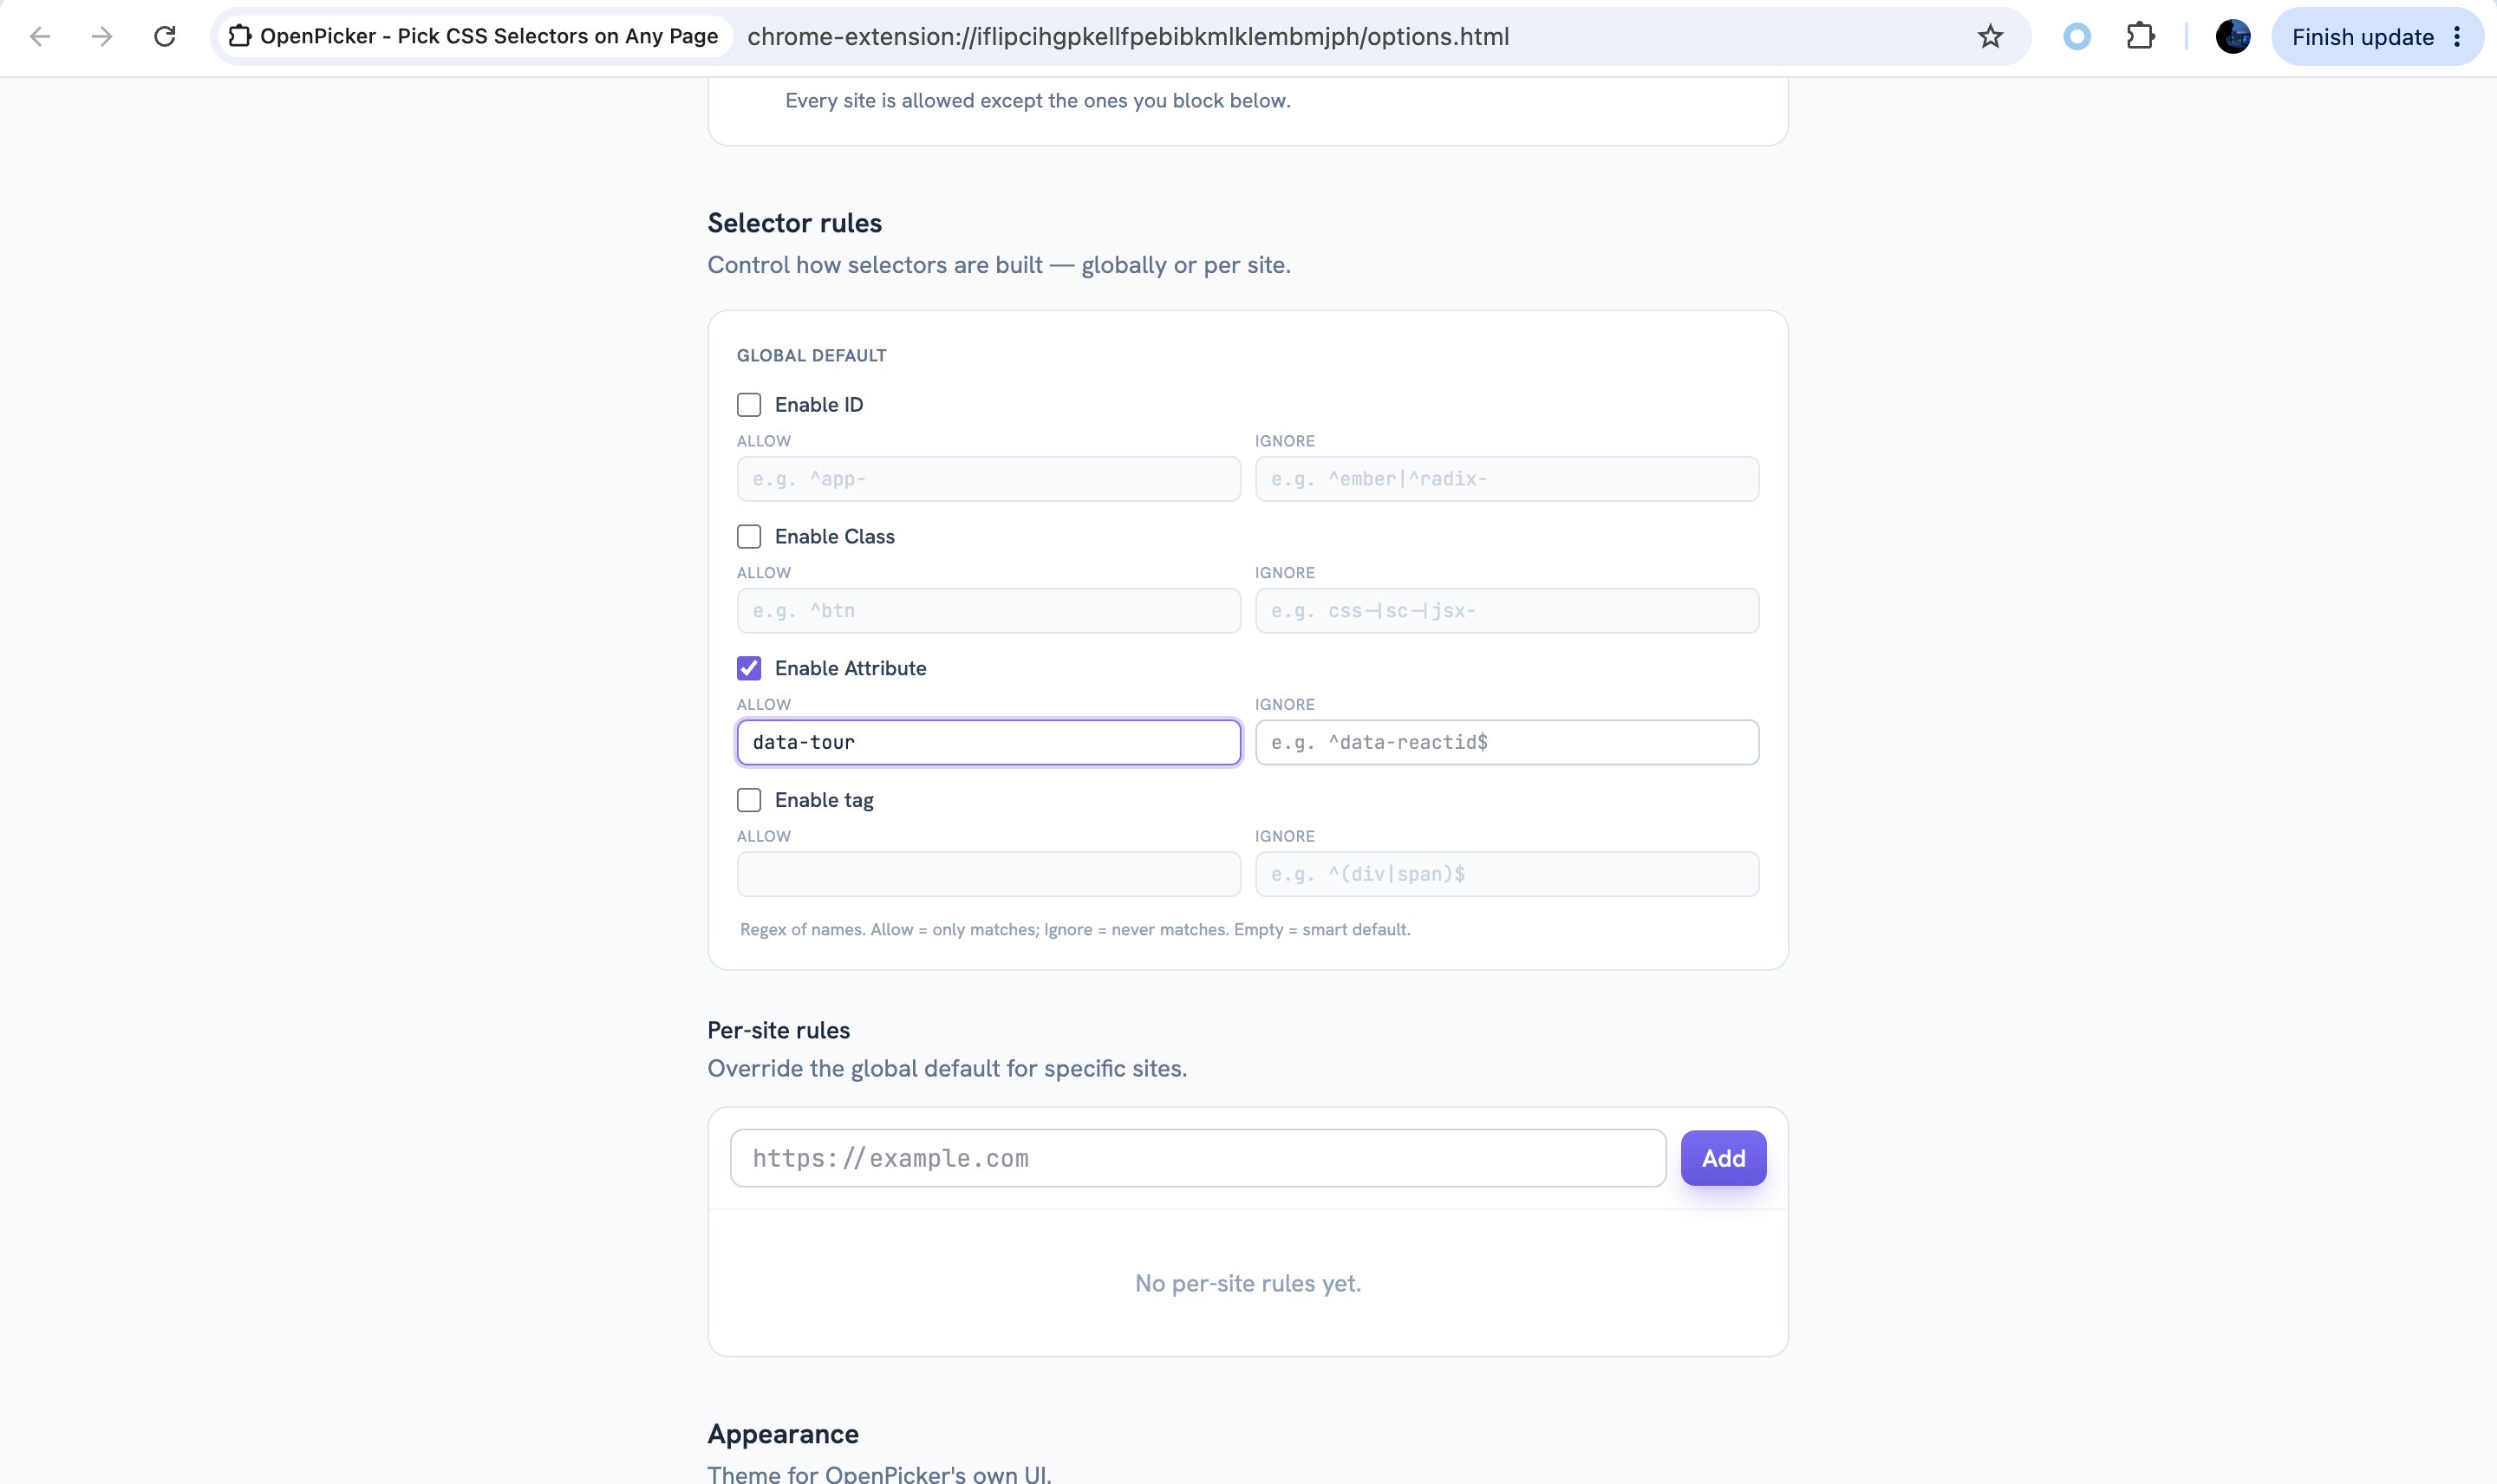 The rules are saved in your browser, so every pick — from any selector field in Usertour — reuses them without asking again. You configure your `data-tour` rule once and never touch it per pick.