> ## Documentation Index
> Fetch the complete documentation index at: https://docs.usertour.io/llms.txt
> Use this file to discover all available pages before exploring further.
# Single Sign-On (SSO)
> Let your team sign in through your own OIDC identity provider — Okta, Google Workspace, Microsoft Entra ID, Auth0, Keycloak, and more.
Single Sign-On lets your team sign in to Usertour through your own identity provider (IdP) instead of a Usertour password. Usertour supports any OIDC-compliant provider — Okta, Google Workspace, Microsoft Entra ID, Auth0, OneLogin, Authentik, Keycloak, and others.
SSO is configured **per project** by a project **Owner**, under **Settings → SSO**. It requires a **Business** plan (cloud) or an **active license** (self-hosted). Without it, the SSO settings page shows an upgrade prompt.
## How it works
1. You register Usertour as an OIDC application in your IdP.
2. Usertour **auto-discovers** the IdP's endpoints from a single **Issuer URL** — you never enter authorization, token, or userinfo URLs by hand.
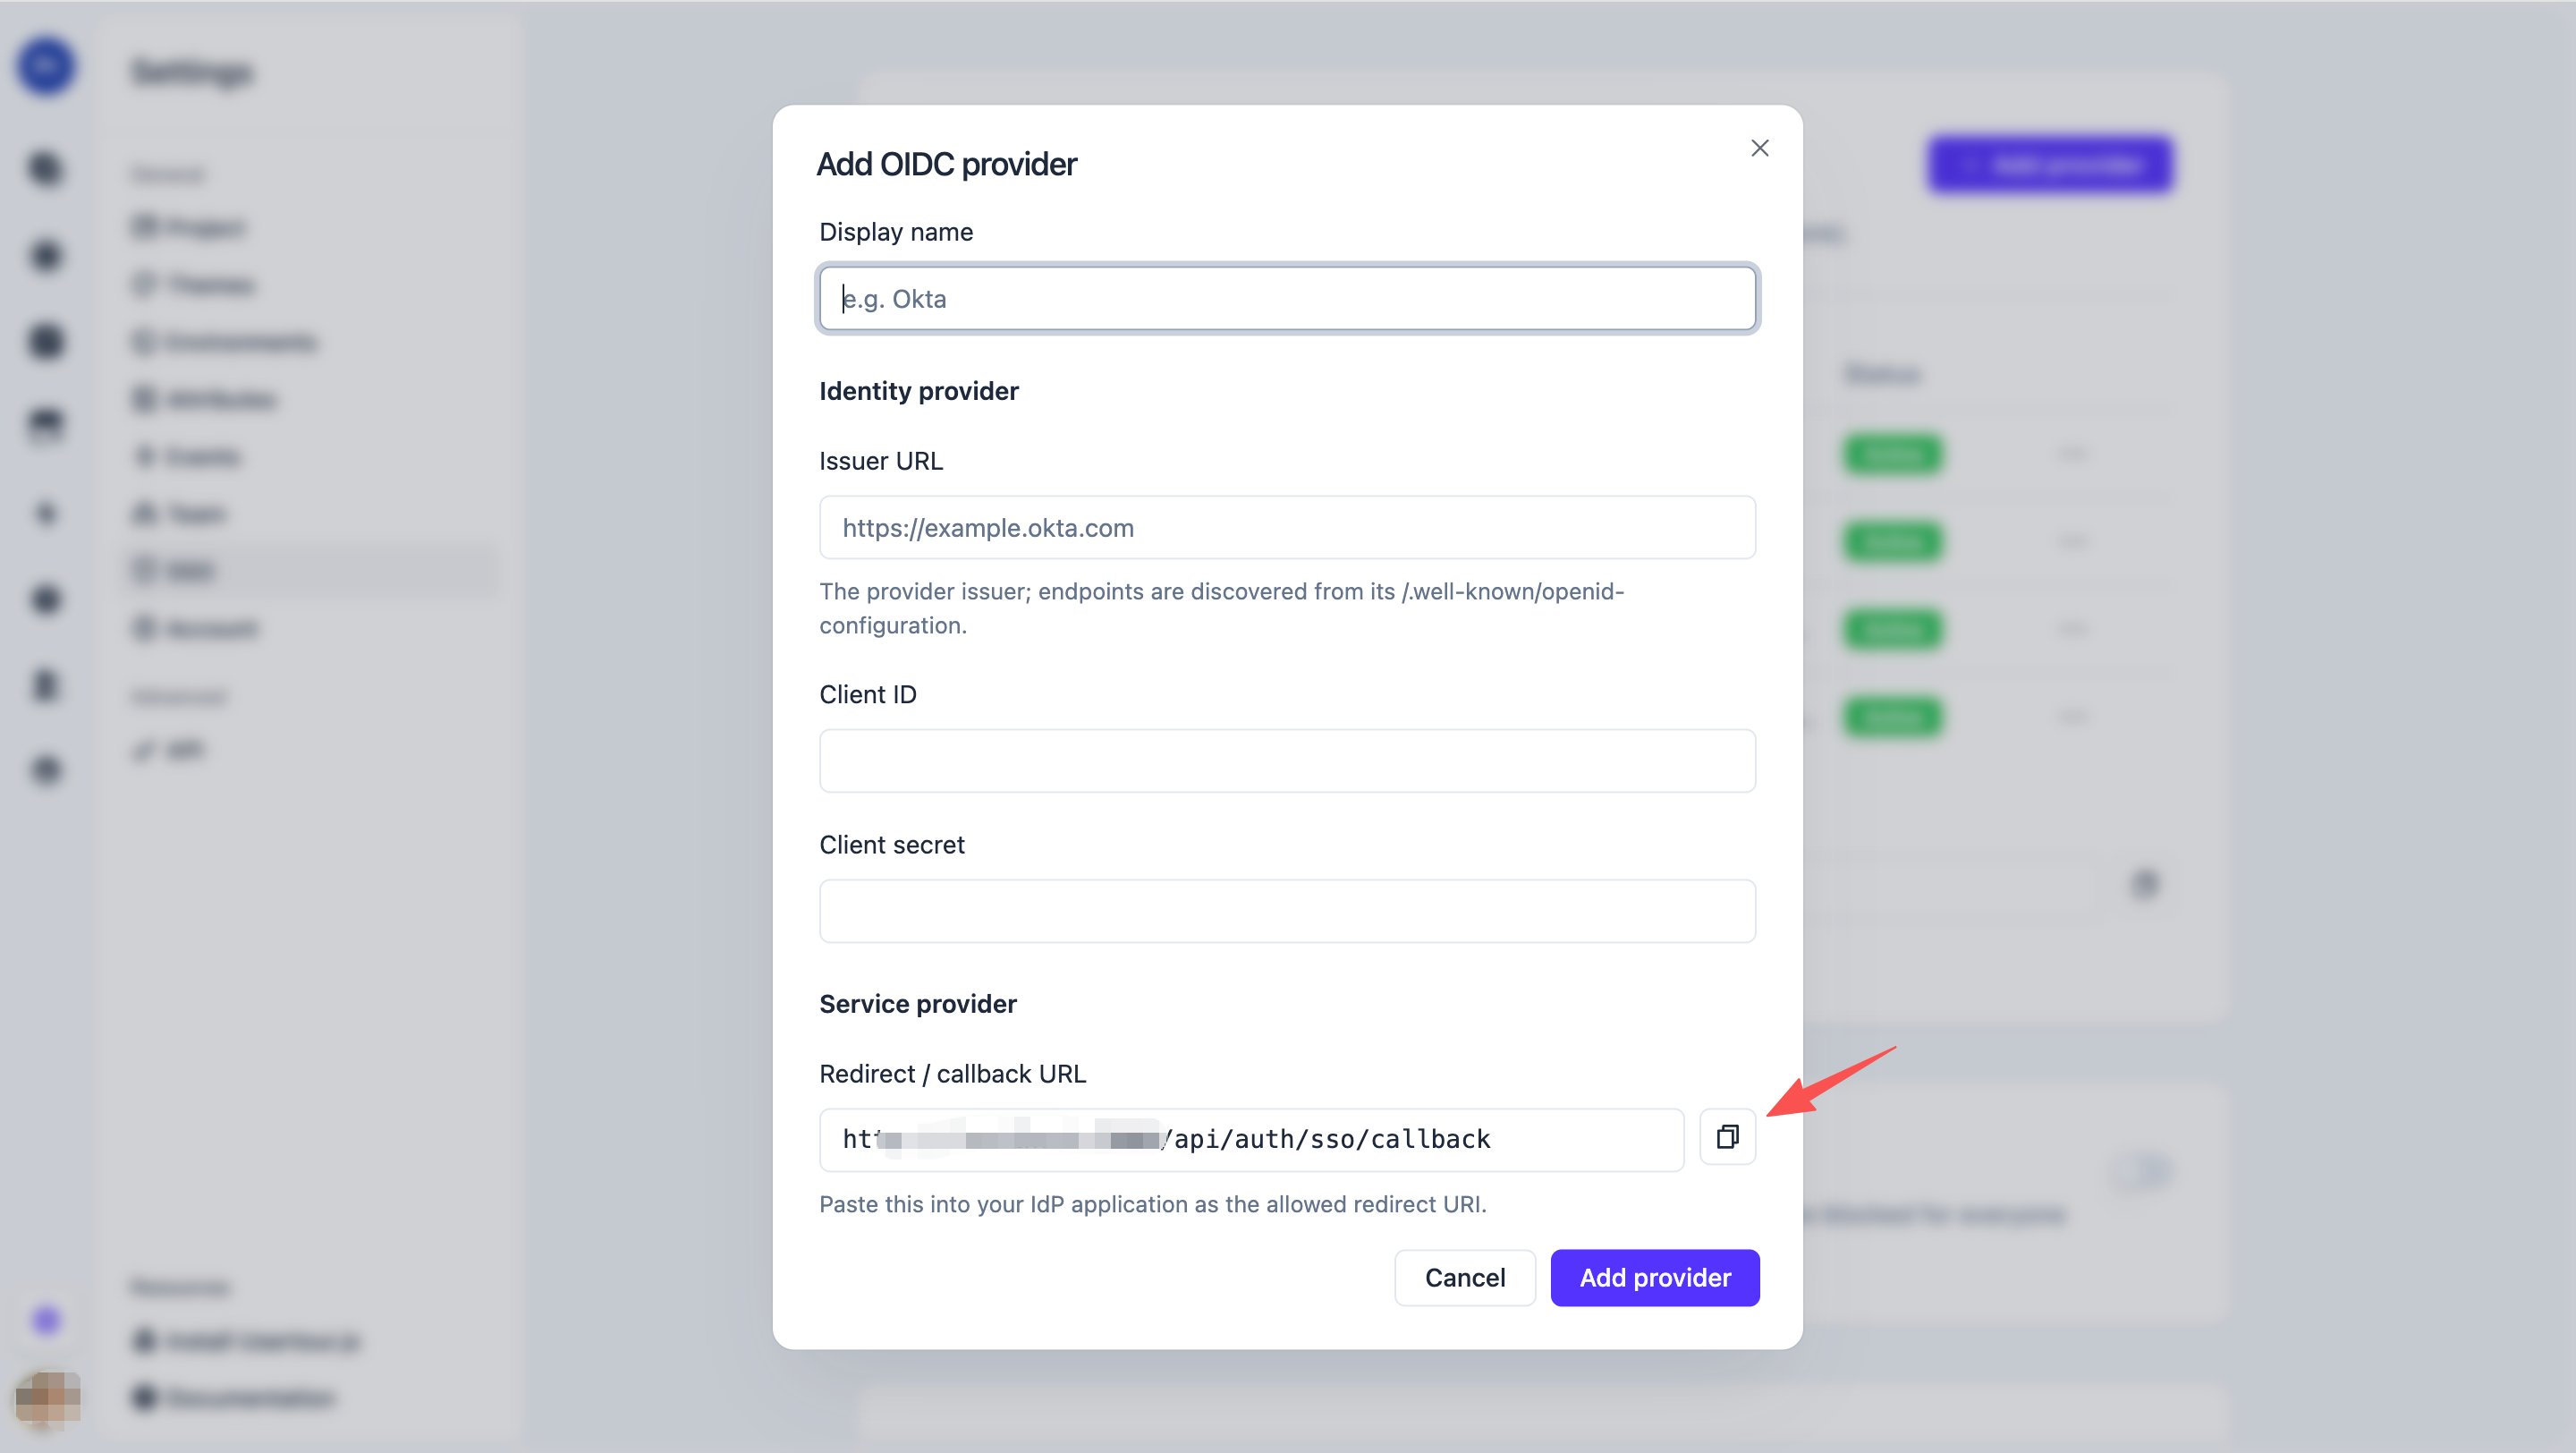
3. Every provider shares **one fixed Redirect URI**: `https:///api/auth/sso/callback`. The exact value is shown in the New Provider dialog — always copy it from there.
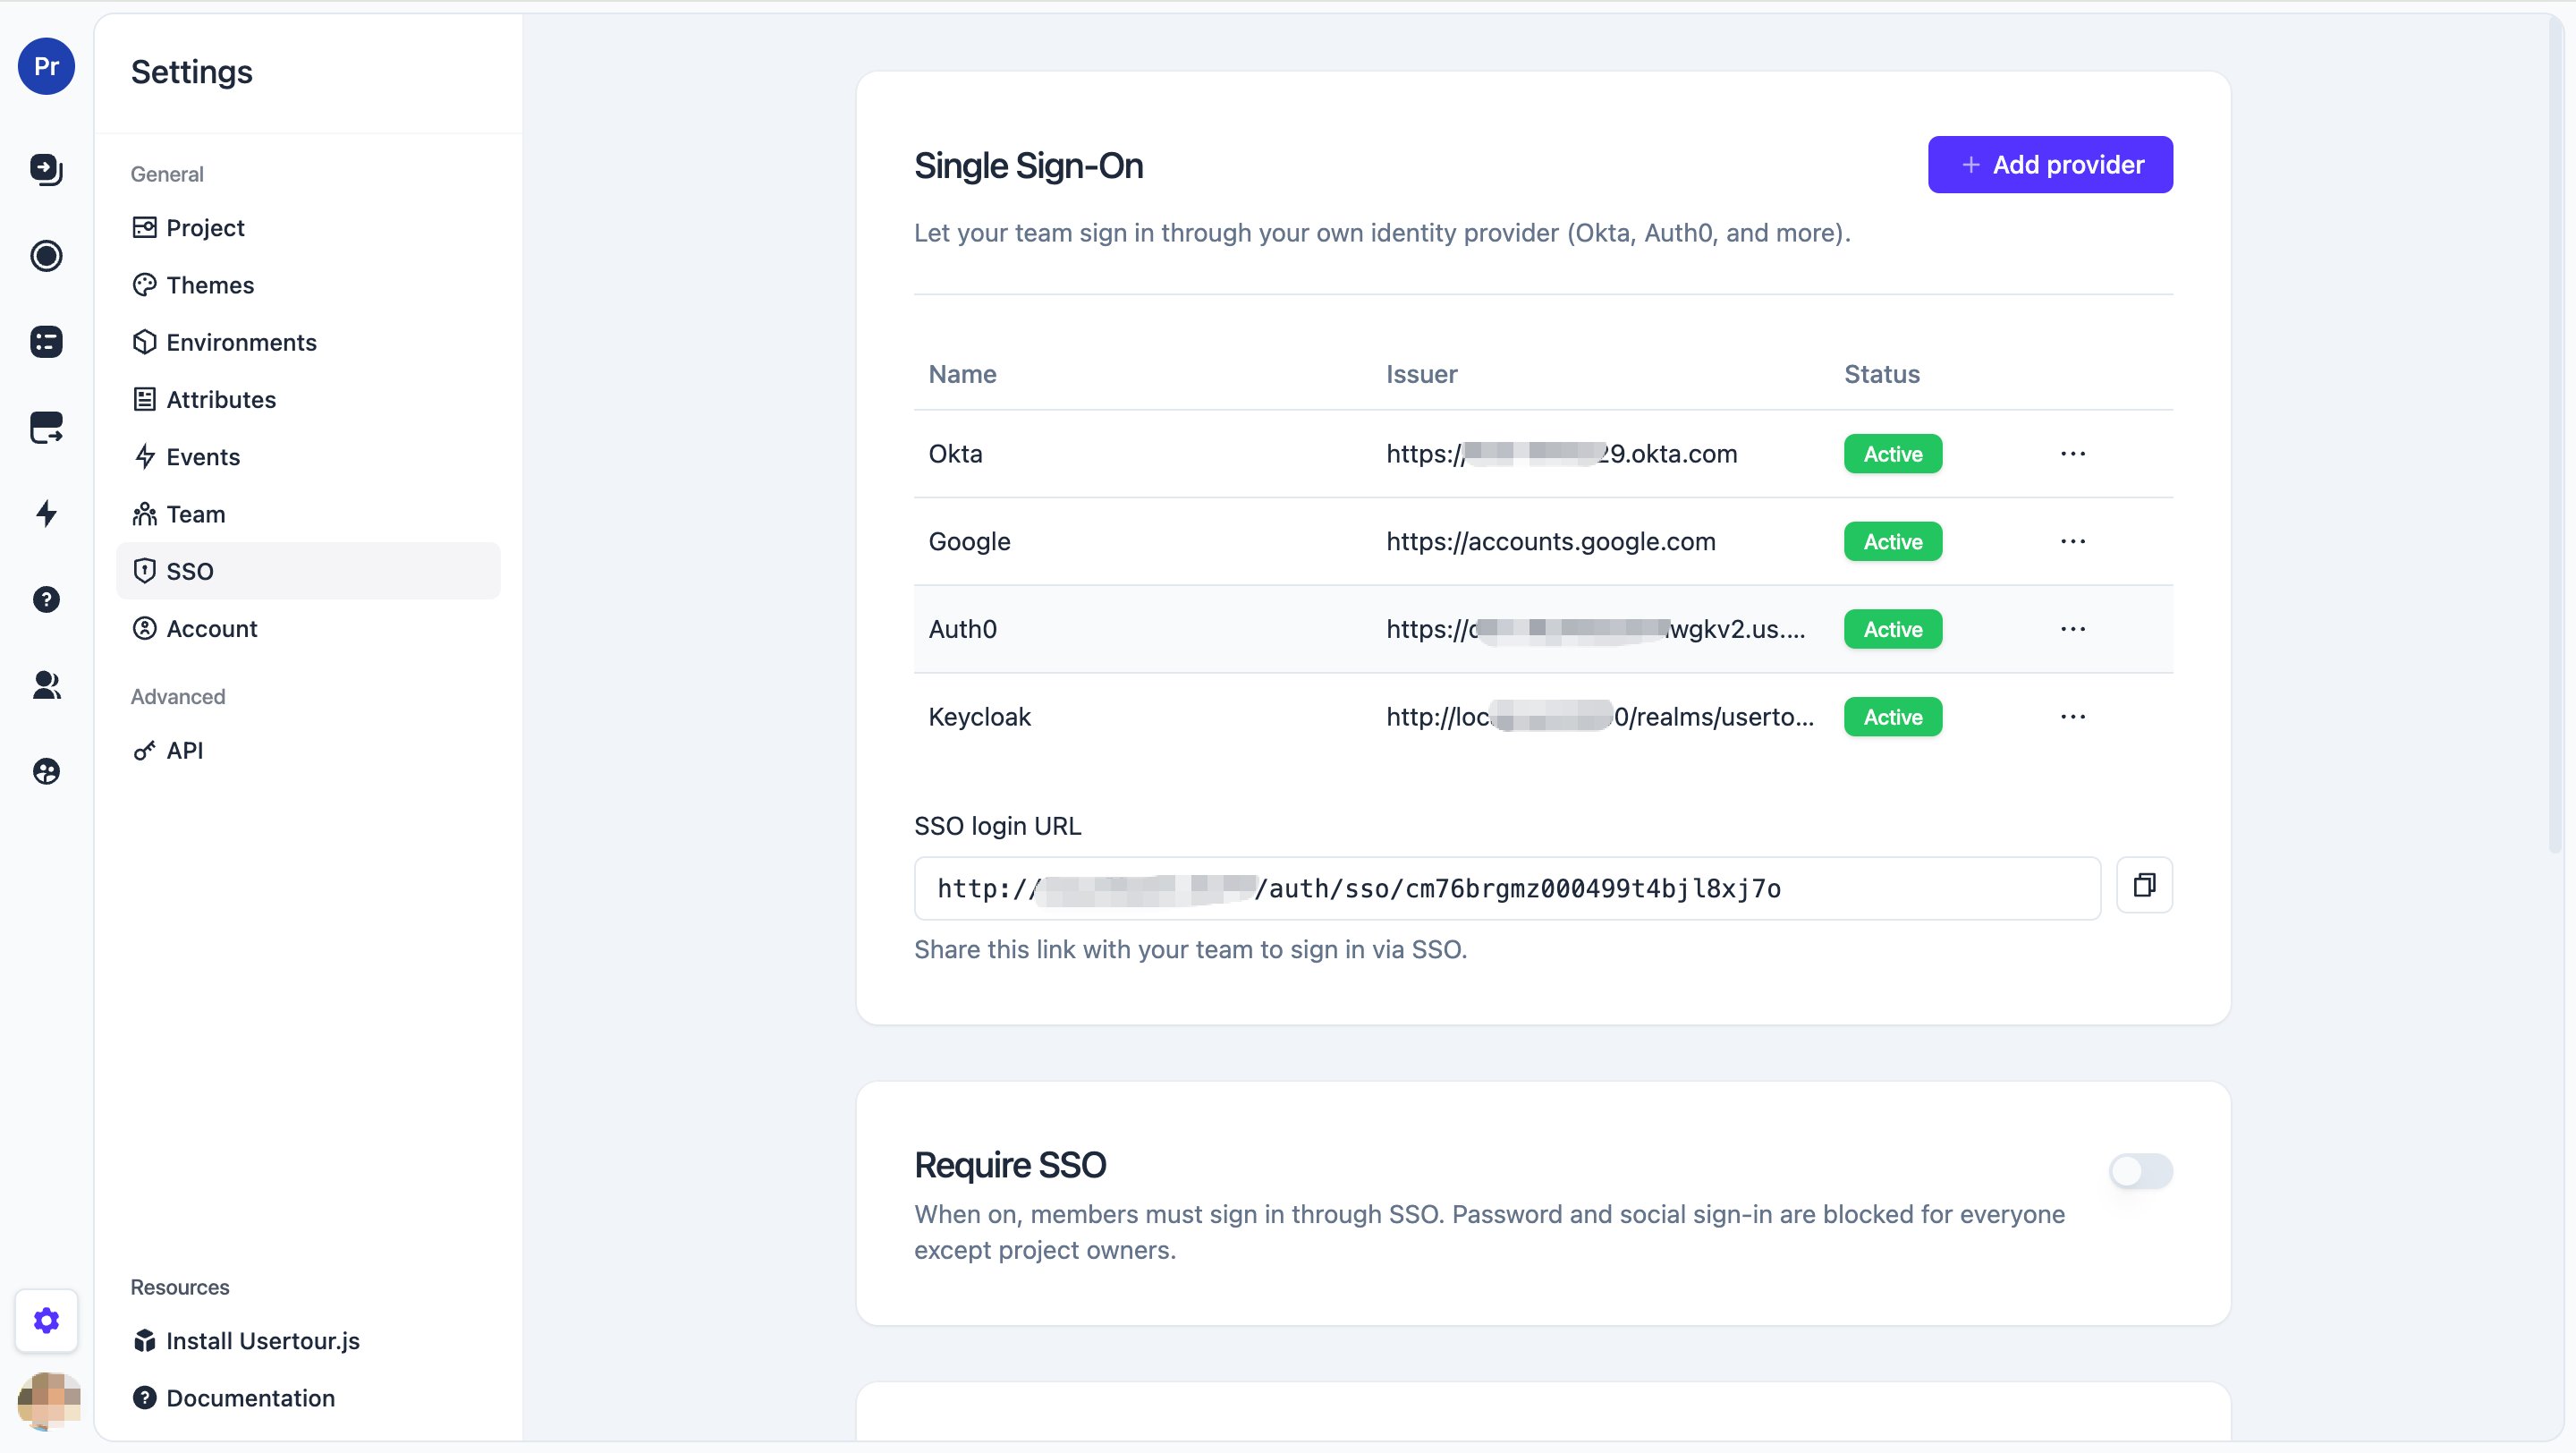
4. Your team signs in at a **per-project link**, shown on the SSO settings page: `https:///auth/sso/`.
## Step 1 — Copy your Redirect URI
Go to **Settings → SSO → New provider**. The dialog shows a read-only **Redirect (callback) URL**. Copy it — you'll paste it into your IdP in the next step.
 ## Step 2 — Register Usertour in your IdP
Create an OIDC **Web** application in your IdP and set its redirect/callback URI to the value you just copied. Then collect three values:
| Value | What it is |
| ----------------- | ------------------------------------------------------------------- |
| **Issuer URL** | Your IdP's OIDC issuer — Usertour discovers everything else from it |
| **Client ID** | The application's client identifier |
| **Client Secret** | The application's secret |
Make sure the app is allowed to request the `openid`, `email`, and `profile` scopes — Usertour requests these.
See [Provider setup](#provider-setup) below for Okta, Google Workspace, Microsoft Entra ID, and Keycloak.
## Step 3 — Add the provider in Usertour
Back in **Settings → SSO → New provider**, fill in:
* **Name** — a label for this connection (for example, "Okta").
* **Issuer URL**, **Client ID**, **Client Secret** — from Step 2.
Save. The provider appears in the list with an **Active** status.
## Step 2 — Register Usertour in your IdP
Create an OIDC **Web** application in your IdP and set its redirect/callback URI to the value you just copied. Then collect three values:
| Value | What it is |
| ----------------- | ------------------------------------------------------------------- |
| **Issuer URL** | Your IdP's OIDC issuer — Usertour discovers everything else from it |
| **Client ID** | The application's client identifier |
| **Client Secret** | The application's secret |
Make sure the app is allowed to request the `openid`, `email`, and `profile` scopes — Usertour requests these.
See [Provider setup](#provider-setup) below for Okta, Google Workspace, Microsoft Entra ID, and Keycloak.
## Step 3 — Add the provider in Usertour
Back in **Settings → SSO → New provider**, fill in:
* **Name** — a label for this connection (for example, "Okta").
* **Issuer URL**, **Client ID**, **Client Secret** — from Step 2.
Save. The provider appears in the list with an **Active** status.
 ## Step 4 — Share the sign-in link
Copy the **per-project SSO login URL** shown on the SSO page and share it with your team. That's the one link they use to sign in via SSO.
## Step 5 — Enforce SSO and control new-user access (optional)
* **Require SSO** — once on, members can only sign in through SSO; password and social sign-in stop working for them. Project Owners keep password access as a fallback.
After you turn on **Require SSO**, members who joined with an email that **isn't in your IdP** won't be able to sign in until you add them there. Add those people to your IdP first, or have them use their IdP identity.
* **New user access** — *invite-required* by default: a new person must be invited before they can join, even through SSO. Turn on **Automatically add new users** to provision anyone who authenticates, optionally restricted to specific email domains and assigned a default role.
If you enable **Automatically add new users** without setting an **allowed email domain**, anyone who can authenticate through your IdP can join the project. Set an allowed domain to scope this down.
## Provider setup
### Okta
Okta's own guide: [Create an OIDC app integration](https://help.okta.com/en-us/Content/Topics/Apps/Apps_App_Integration_Wizard_OIDC.htm).
1. Okta Admin Console → **Applications → Create App Integration** → **OIDC - OpenID Connect**, application type **Web Application**.
2. **Sign-in redirect URIs** → paste your Usertour Redirect URI.
3. Assign the app to the users or groups who should have access.
4. From the app's **General** tab, copy the **Client ID** and **Client secret**.
5. **Issuer URL** = your Okta org URL, for example `https://your-org.okta.com`.
### Google Workspace
Google's docs: [OpenID Connect](https://developers.google.com/identity/openid-connect/openid-connect).
1. Google Cloud Console → **APIs & Services → Credentials → Create Credentials → OAuth client ID**, application type **Web application**.
2. **Authorized redirect URIs** → paste your Usertour Redirect URI.
3. Copy the **Client ID** and **Client secret**.
4. **Issuer URL** = `https://accounts.google.com`.
### Microsoft Entra ID (Azure AD)
Microsoft's docs: [Microsoft identity platform and the OpenID Connect protocol](https://learn.microsoft.com/en-us/entra/identity-platform/v2-protocols-oidc).
1. Azure Portal → **Microsoft Entra ID → App registrations → New registration**. Name it, set the **Redirect URI** platform to **Web**, and paste your Usertour Redirect URI.
2. **Certificates & secrets → New client secret** → copy the secret **Value** immediately.
3. **API permissions** → Microsoft Graph (delegated): make sure `openid`, `profile`, and `email` are present.
4. On the app **Overview** page: **Application (client) ID** is your Client ID; note the **Directory (tenant) ID**.
5. **Issuer URL** = `https://login.microsoftonline.com//v2.0`.
Entra ID often omits `email` from the ID token. Usertour handles this automatically — it falls back to the userinfo endpoint and to the `upn` / `preferred_username` claim — so **no extra claim configuration is needed**.
### Auth0
Auth0's docs: [Register Regular Web Applications](https://auth0.com/docs/get-started/auth0-overview/create-applications/regular-web-apps).
1. Auth0 Dashboard → **Applications → Create Application**, select **Regular Web Applications**.
2. On the **Settings** tab → **Application URIs → Allowed Callback URLs** → paste your Usertour Redirect URI.
3. Still on **Settings**, copy the **Domain**, **Client ID**, and **Client Secret**.
4. **Issuer URL** = your Auth0 domain, for example `https://your-tenant.us.auth0.com`.
### Keycloak
Keycloak's docs: [Managing OIDC clients](https://www.keycloak.org/docs/latest/server_admin/#assembly-managing-clients_server_administration_guide).
1. Keycloak Admin Console → your realm → **Clients → Create client** → type **OpenID Connect**. Enable **Client authentication** (a confidential client).
2. In the client's **Settings**, add your Usertour Redirect URI under **Valid redirect URIs**.
3. **Credentials** tab → copy the **Client secret**. The **Client ID** is the name you gave the client.
4. **Issuer URL** = `https:///realms/` (Keycloak 17+). Older WildFly-based versions use `https:///auth/realms/`.
Keycloak announces its issuer based on its **hostname configuration** (`KC_HOSTNAME`). If that's misconfigured, the issuer in `/.well-known/openid-configuration` can come back as an internal address like `http://localhost:8080/...`, and discovery or token validation will fail. Confirm the issuer by opening `https:///realms//.well-known/openid-configuration` and using the exact `"issuer"` value it returns.
If your Keycloak runs on an internal network or `localhost`, a self-hosted Usertour refuses to reach it until you set `ALLOW_PRIVATE_NETWORK_EGRESS=true` — by default Usertour makes outbound SSO requests to public HTTPS addresses only (an SSRF safeguard). See [Environment Variables](/open-source/env).
## Troubleshooting
**"Invalid parameter: redirect\_uri" on the IdP's page.** The Redirect URI registered in your IdP must match the value Usertour shows **exactly** — scheme, host, port, and path. Re-copy it from the New Provider dialog and add it to the IdP's allowed redirect URIs.
**"You don't have access to this project" after a successful IdP login.** The person isn't a project member and *Automatically add new users* is off (invite-required). Invite them first, or enable auto-provisioning (optionally with an allowed domain).
**The login fails with an "email not verified" error.** Usertour rejects a sign-in when the IdP explicitly marks the email as unverified. In your IdP, mark the user's email as verified (in Keycloak: **Users → the user → Email verified → On**), then try again.
**A self-hosted IdP on `localhost` or an internal hostname.** Supported, but the server only makes outbound SSO requests to public HTTPS addresses by default (an SSRF safeguard), so an internal issuer is refused until you set `ALLOW_PRIVATE_NETWORK_EGRESS=true` (see [Environment Variables](/open-source/env)). With that set, use the issuer exactly as it appears in the IdP's `/.well-known/openid-configuration`.
**A teammate can't sign in after you turned on Require SSO.** They likely joined with an email that isn't in your IdP. Add them in the IdP, or have them use their IdP identity.
**The SSO page shows an upgrade / license prompt.** SSO is a paid feature — upgrade to a Business plan (cloud) or activate a license (self-hosted). See [Two-factor authentication](/how-to-guides/two-factor-authentication) and [Team](/how-to-guides/team) for related account settings.
## Step 4 — Share the sign-in link
Copy the **per-project SSO login URL** shown on the SSO page and share it with your team. That's the one link they use to sign in via SSO.
## Step 5 — Enforce SSO and control new-user access (optional)
* **Require SSO** — once on, members can only sign in through SSO; password and social sign-in stop working for them. Project Owners keep password access as a fallback.
After you turn on **Require SSO**, members who joined with an email that **isn't in your IdP** won't be able to sign in until you add them there. Add those people to your IdP first, or have them use their IdP identity.
* **New user access** — *invite-required* by default: a new person must be invited before they can join, even through SSO. Turn on **Automatically add new users** to provision anyone who authenticates, optionally restricted to specific email domains and assigned a default role.
If you enable **Automatically add new users** without setting an **allowed email domain**, anyone who can authenticate through your IdP can join the project. Set an allowed domain to scope this down.
## Provider setup
### Okta
Okta's own guide: [Create an OIDC app integration](https://help.okta.com/en-us/Content/Topics/Apps/Apps_App_Integration_Wizard_OIDC.htm).
1. Okta Admin Console → **Applications → Create App Integration** → **OIDC - OpenID Connect**, application type **Web Application**.
2. **Sign-in redirect URIs** → paste your Usertour Redirect URI.
3. Assign the app to the users or groups who should have access.
4. From the app's **General** tab, copy the **Client ID** and **Client secret**.
5. **Issuer URL** = your Okta org URL, for example `https://your-org.okta.com`.
### Google Workspace
Google's docs: [OpenID Connect](https://developers.google.com/identity/openid-connect/openid-connect).
1. Google Cloud Console → **APIs & Services → Credentials → Create Credentials → OAuth client ID**, application type **Web application**.
2. **Authorized redirect URIs** → paste your Usertour Redirect URI.
3. Copy the **Client ID** and **Client secret**.
4. **Issuer URL** = `https://accounts.google.com`.
### Microsoft Entra ID (Azure AD)
Microsoft's docs: [Microsoft identity platform and the OpenID Connect protocol](https://learn.microsoft.com/en-us/entra/identity-platform/v2-protocols-oidc).
1. Azure Portal → **Microsoft Entra ID → App registrations → New registration**. Name it, set the **Redirect URI** platform to **Web**, and paste your Usertour Redirect URI.
2. **Certificates & secrets → New client secret** → copy the secret **Value** immediately.
3. **API permissions** → Microsoft Graph (delegated): make sure `openid`, `profile`, and `email` are present.
4. On the app **Overview** page: **Application (client) ID** is your Client ID; note the **Directory (tenant) ID**.
5. **Issuer URL** = `https://login.microsoftonline.com//v2.0`.
Entra ID often omits `email` from the ID token. Usertour handles this automatically — it falls back to the userinfo endpoint and to the `upn` / `preferred_username` claim — so **no extra claim configuration is needed**.
### Auth0
Auth0's docs: [Register Regular Web Applications](https://auth0.com/docs/get-started/auth0-overview/create-applications/regular-web-apps).
1. Auth0 Dashboard → **Applications → Create Application**, select **Regular Web Applications**.
2. On the **Settings** tab → **Application URIs → Allowed Callback URLs** → paste your Usertour Redirect URI.
3. Still on **Settings**, copy the **Domain**, **Client ID**, and **Client Secret**.
4. **Issuer URL** = your Auth0 domain, for example `https://your-tenant.us.auth0.com`.
### Keycloak
Keycloak's docs: [Managing OIDC clients](https://www.keycloak.org/docs/latest/server_admin/#assembly-managing-clients_server_administration_guide).
1. Keycloak Admin Console → your realm → **Clients → Create client** → type **OpenID Connect**. Enable **Client authentication** (a confidential client).
2. In the client's **Settings**, add your Usertour Redirect URI under **Valid redirect URIs**.
3. **Credentials** tab → copy the **Client secret**. The **Client ID** is the name you gave the client.
4. **Issuer URL** = `https:///realms/` (Keycloak 17+). Older WildFly-based versions use `https:///auth/realms/`.
Keycloak announces its issuer based on its **hostname configuration** (`KC_HOSTNAME`). If that's misconfigured, the issuer in `/.well-known/openid-configuration` can come back as an internal address like `http://localhost:8080/...`, and discovery or token validation will fail. Confirm the issuer by opening `https:///realms//.well-known/openid-configuration` and using the exact `"issuer"` value it returns.
If your Keycloak runs on an internal network or `localhost`, a self-hosted Usertour refuses to reach it until you set `ALLOW_PRIVATE_NETWORK_EGRESS=true` — by default Usertour makes outbound SSO requests to public HTTPS addresses only (an SSRF safeguard). See [Environment Variables](/open-source/env).
## Troubleshooting
**"Invalid parameter: redirect\_uri" on the IdP's page.** The Redirect URI registered in your IdP must match the value Usertour shows **exactly** — scheme, host, port, and path. Re-copy it from the New Provider dialog and add it to the IdP's allowed redirect URIs.
**"You don't have access to this project" after a successful IdP login.** The person isn't a project member and *Automatically add new users* is off (invite-required). Invite them first, or enable auto-provisioning (optionally with an allowed domain).
**The login fails with an "email not verified" error.** Usertour rejects a sign-in when the IdP explicitly marks the email as unverified. In your IdP, mark the user's email as verified (in Keycloak: **Users → the user → Email verified → On**), then try again.
**A self-hosted IdP on `localhost` or an internal hostname.** Supported, but the server only makes outbound SSO requests to public HTTPS addresses by default (an SSRF safeguard), so an internal issuer is refused until you set `ALLOW_PRIVATE_NETWORK_EGRESS=true` (see [Environment Variables](/open-source/env)). With that set, use the issuer exactly as it appears in the IdP's `/.well-known/openid-configuration`.
**A teammate can't sign in after you turned on Require SSO.** They likely joined with an email that isn't in your IdP. Add them in the IdP, or have them use their IdP identity.
**The SSO page shows an upgrade / license prompt.** SSO is a paid feature — upgrade to a Business plan (cloud) or activate a license (self-hosted). See [Two-factor authentication](/how-to-guides/two-factor-authentication) and [Team](/how-to-guides/team) for related account settings.