> ## Documentation Index
> Fetch the complete documentation index at: https://docs.usertour.io/llms.txt
> Use this file to discover all available pages before exploring further.
# Starting Content
> Learn how to trigger flows or checklists automatically or manually in your application
## Start Automatically
To start a flow or checklist automatically, enable auto-start conditions in the detail page's left panel.
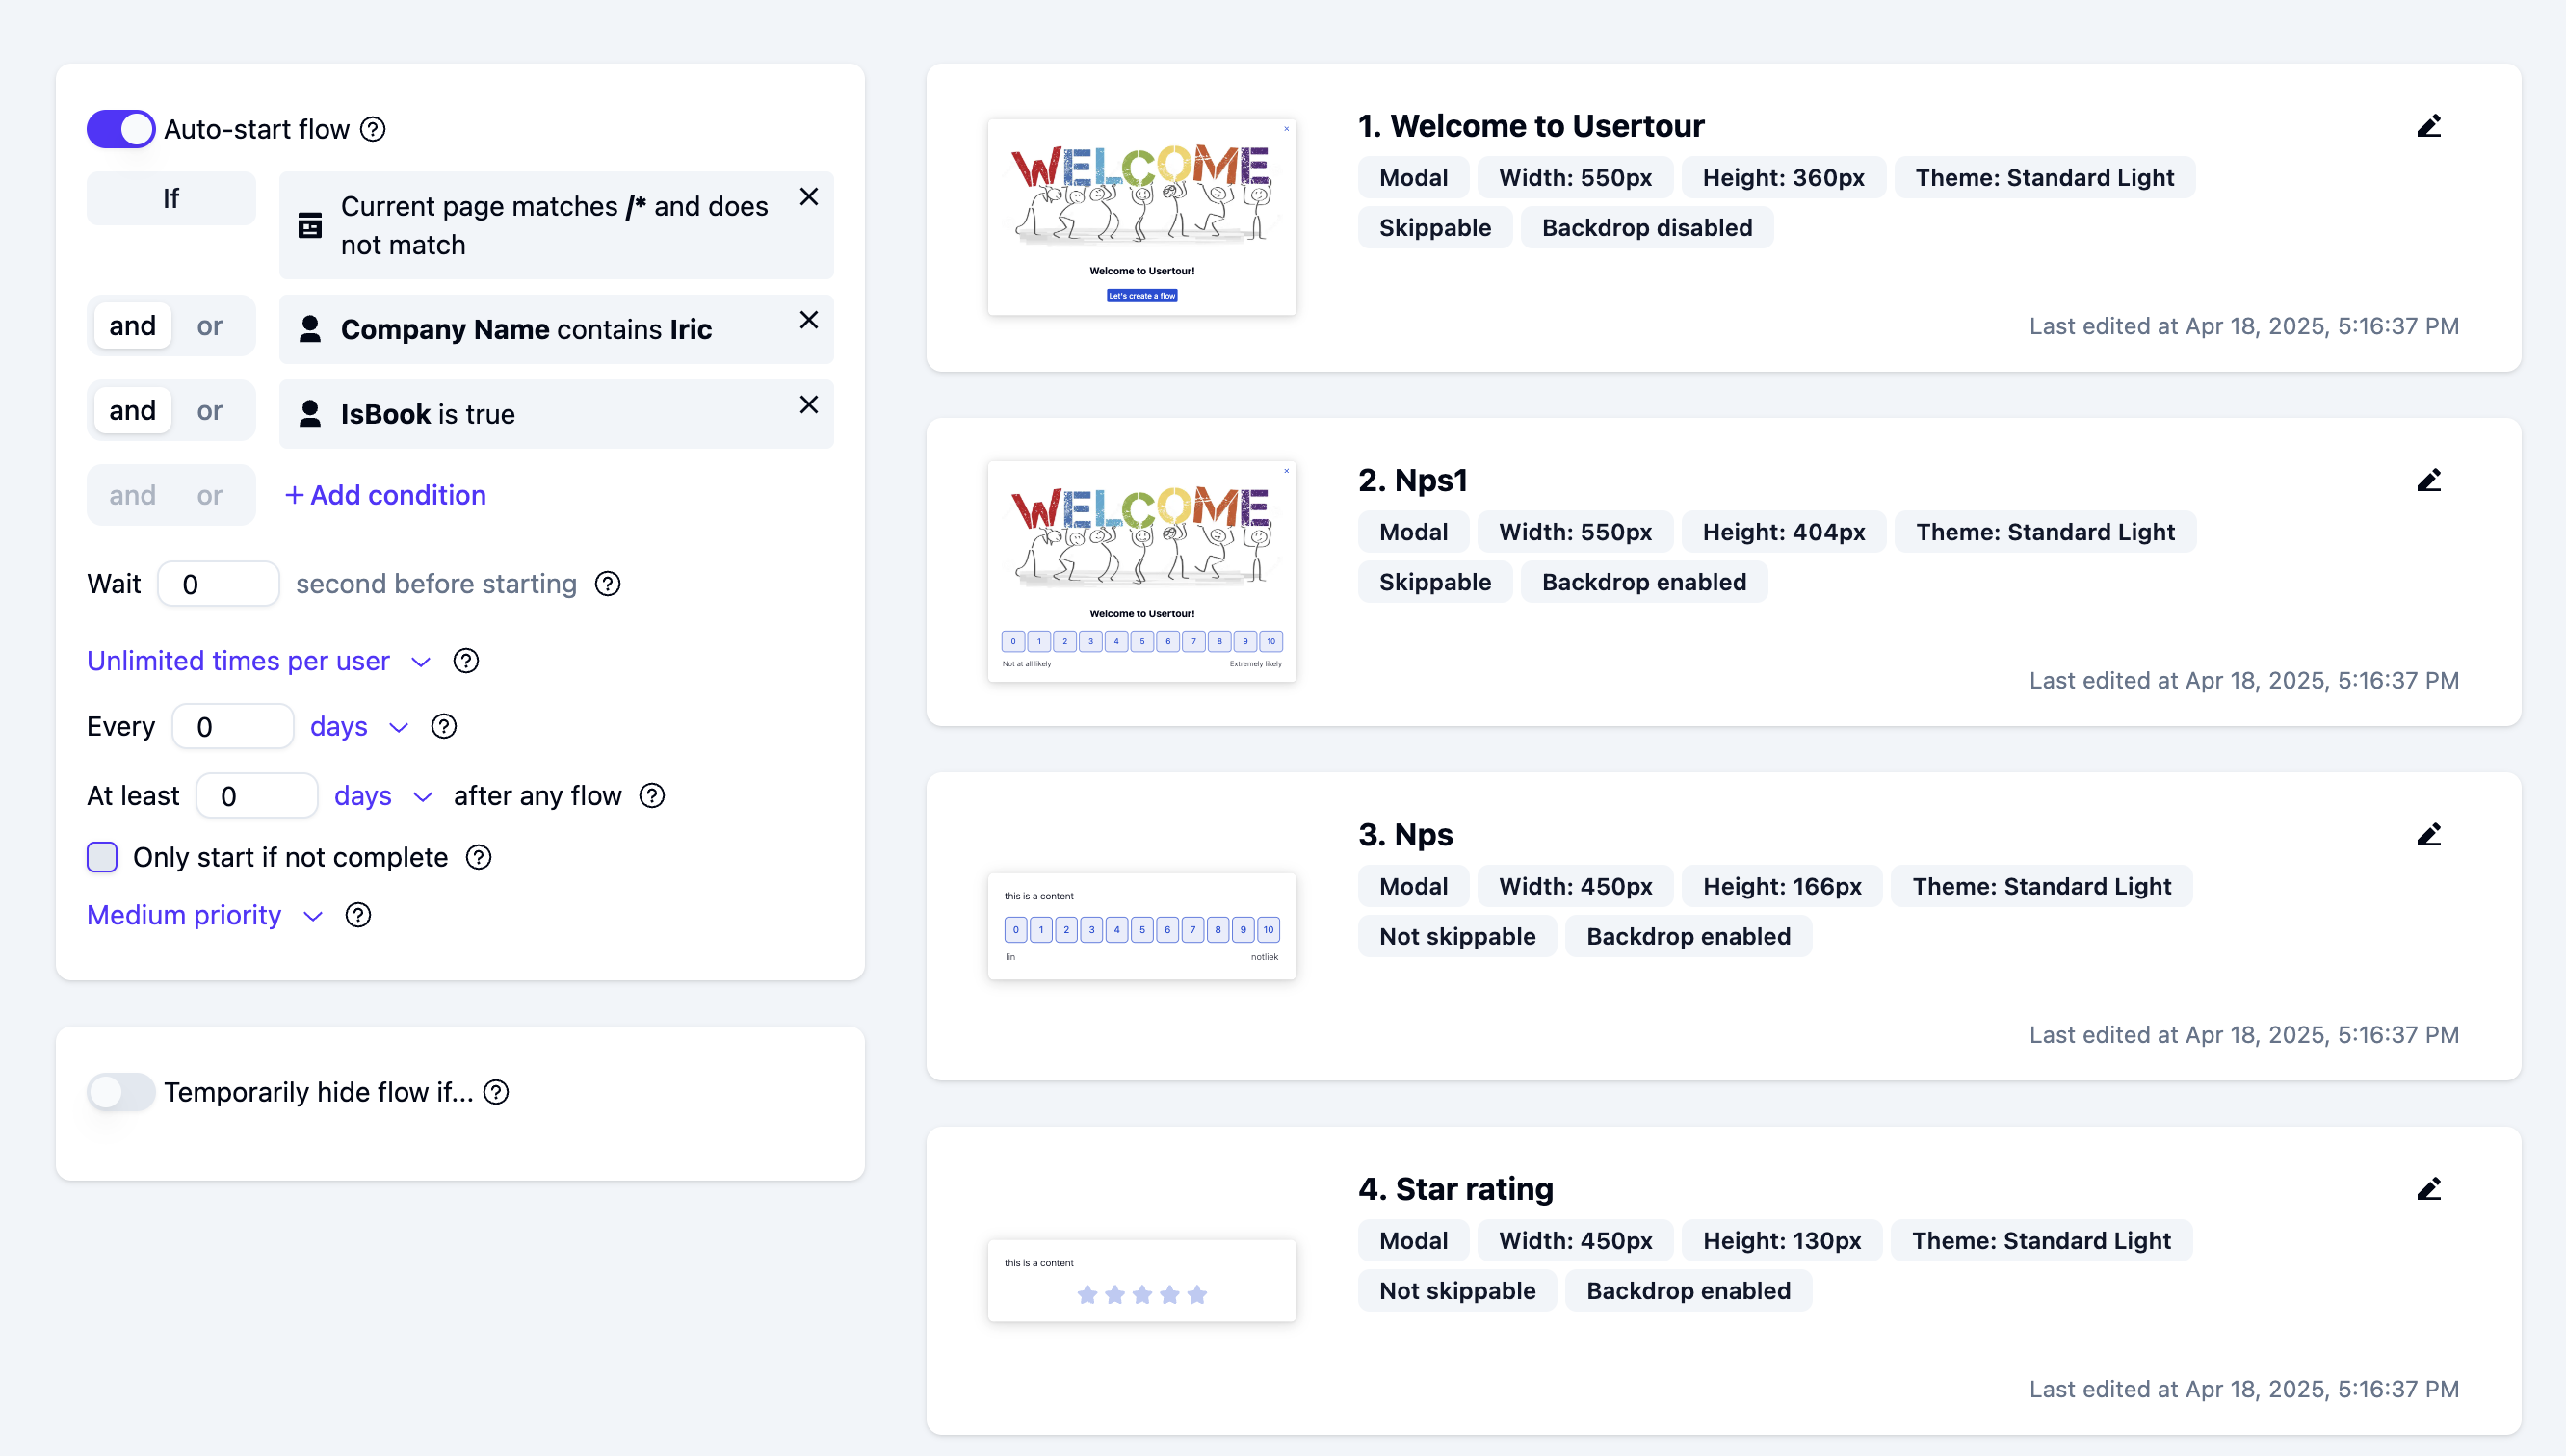 You can start and segment flows and checklists using these conditions:
* **User attribute** - Execute the trigger's action when a user possesses specific attributes, enabling personalized flow progression.
* **Current page is** - Execute the trigger's action when users navigate to a designated page, ensuring context-aware flow delivery.
* Flow/Checklist - Start the flow/checklist if another flow/checklist is completed/seen.
* **Element is present/clicked/disabled** - Execute the trigger's action based on UI element states. Particularly useful for handling asynchronous content loading scenarios.
* **Text input value is** - Execute the trigger's action when users enter specific values in designated input fields, enabling precise form-based flow control.
* **User fills in input** - Execute the trigger's action upon any user input in specified fields, facilitating real-time flow progression.
* **Current time** - Execute the trigger's action at designated times, allowing for time-sensitive content delivery within specific time periods.
- You can combine multiple conditions using AND/OR logic groups to create complex conditions
- Checklists will stay on screen until manually dismissed
- Flows start once per user by default, but you can change it to multiple times or unlimited starts
- Use the Wait condition to add a delay before starting the flow
## Start from Actions
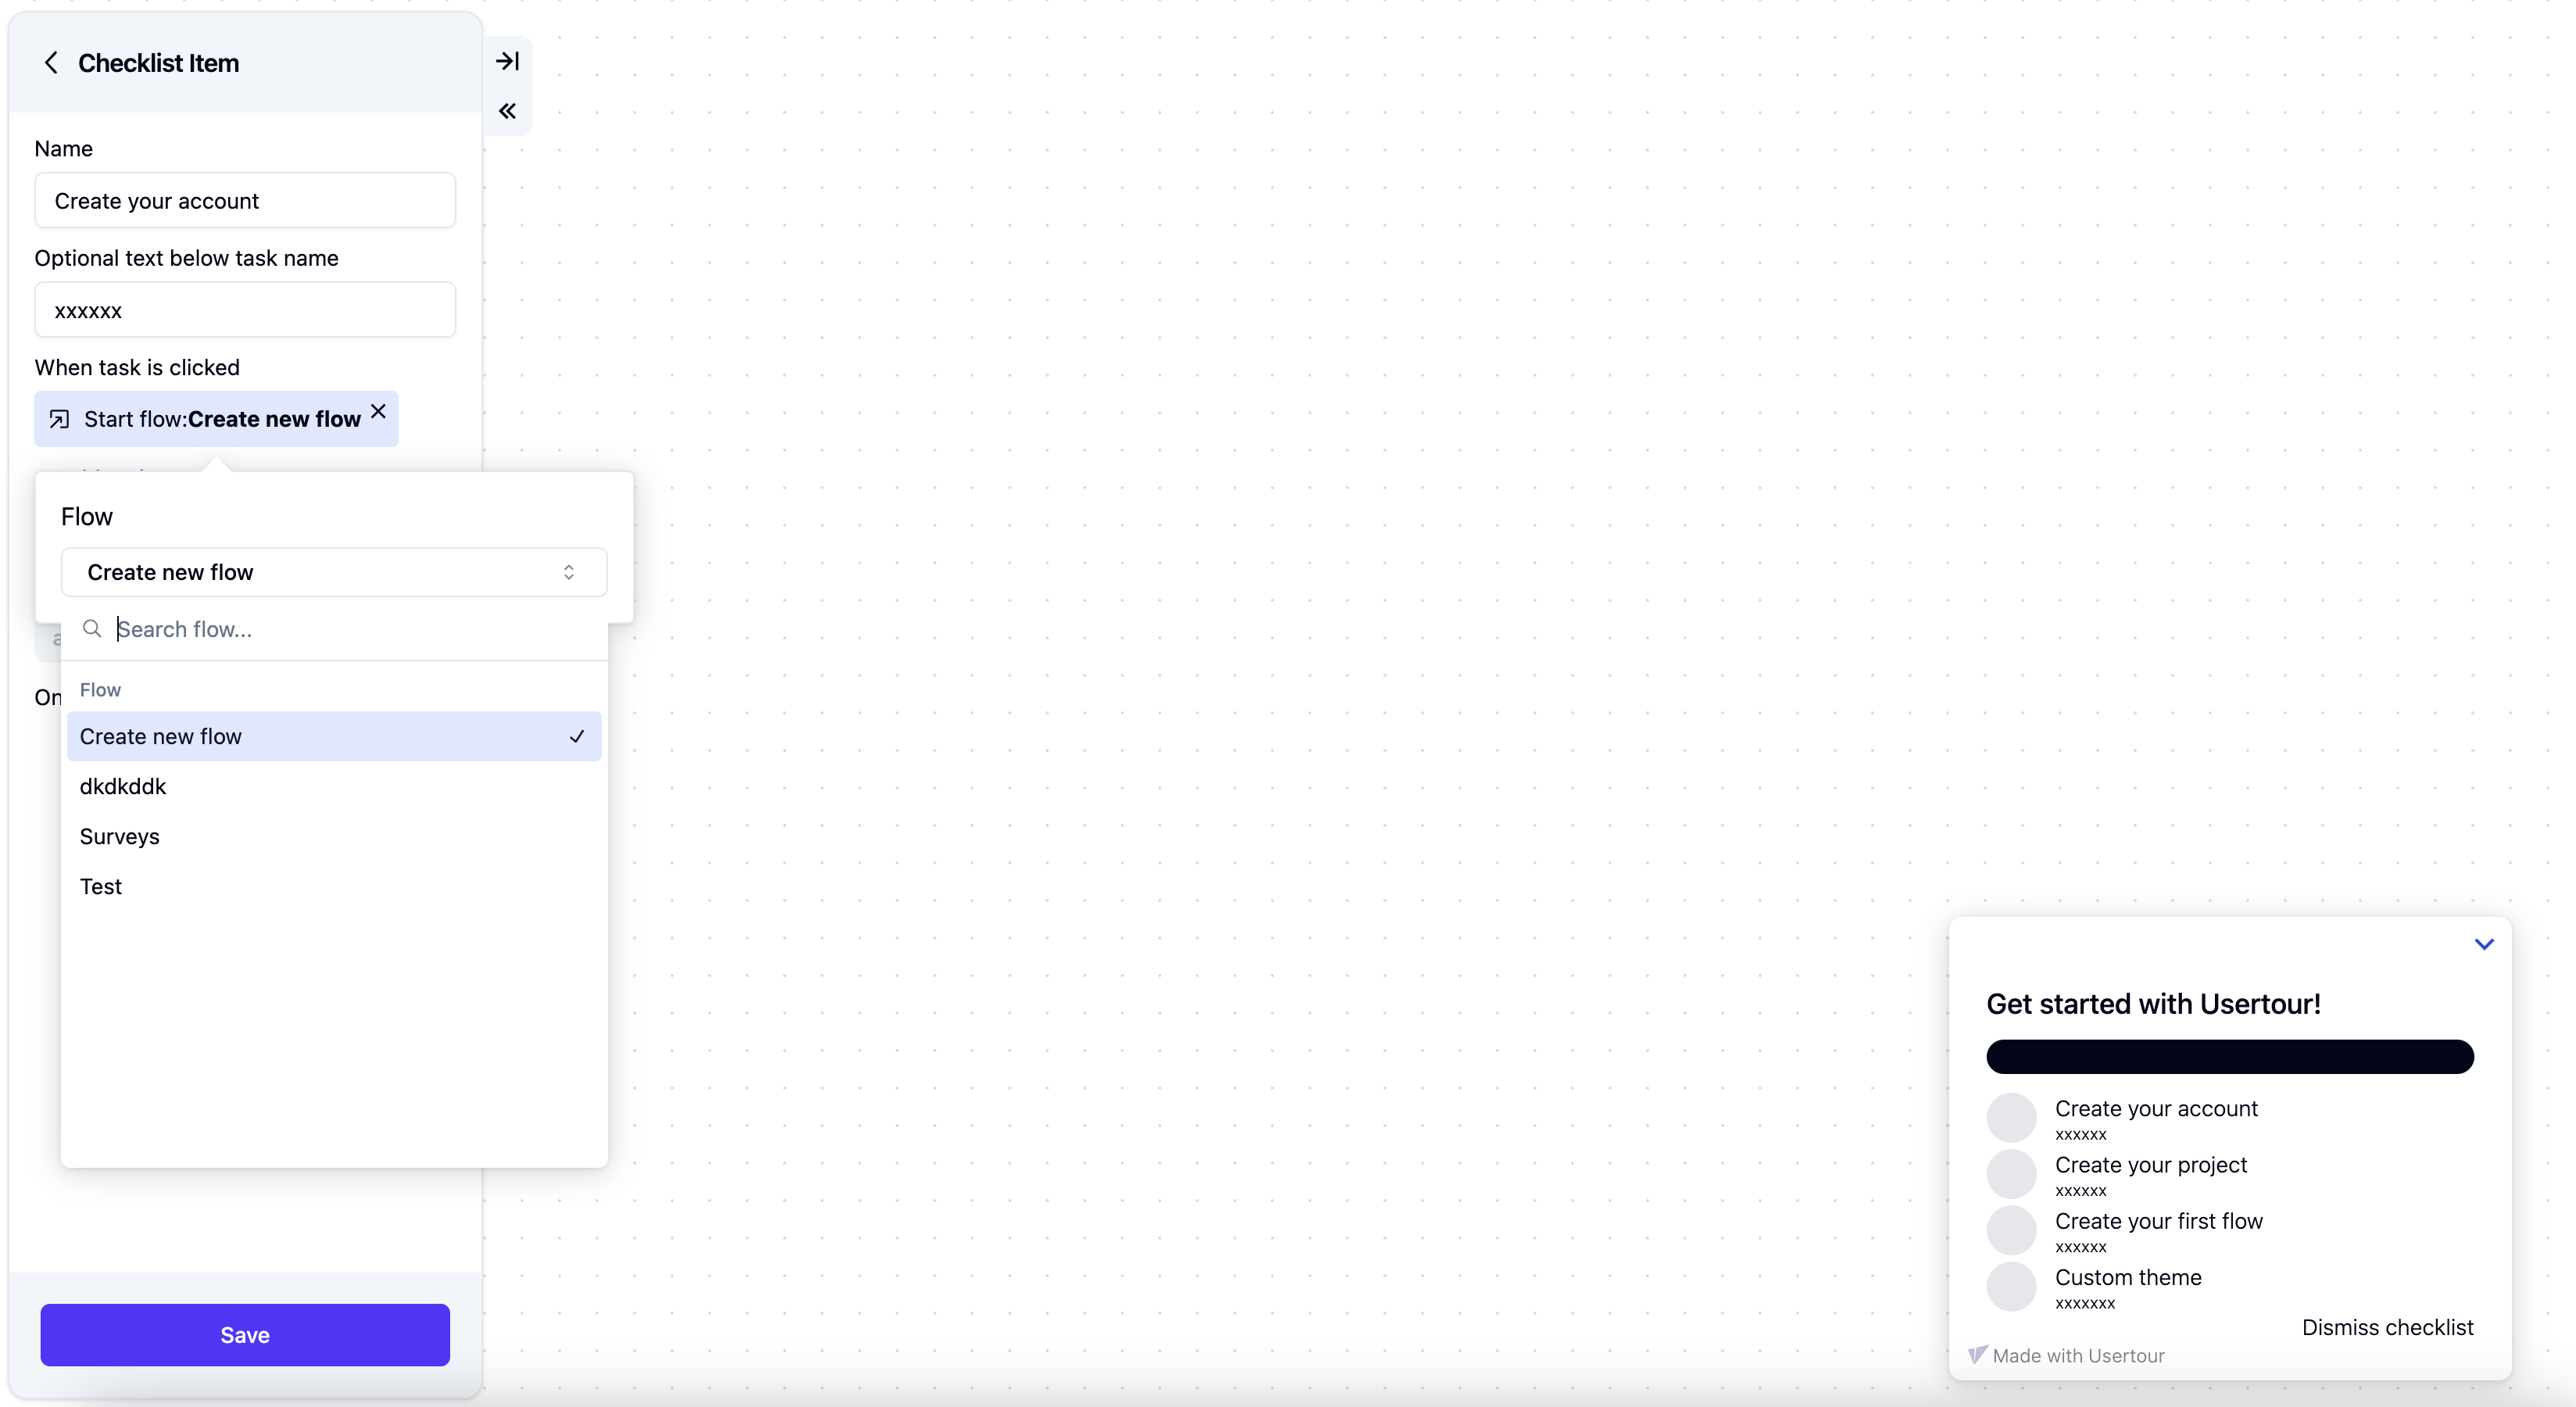
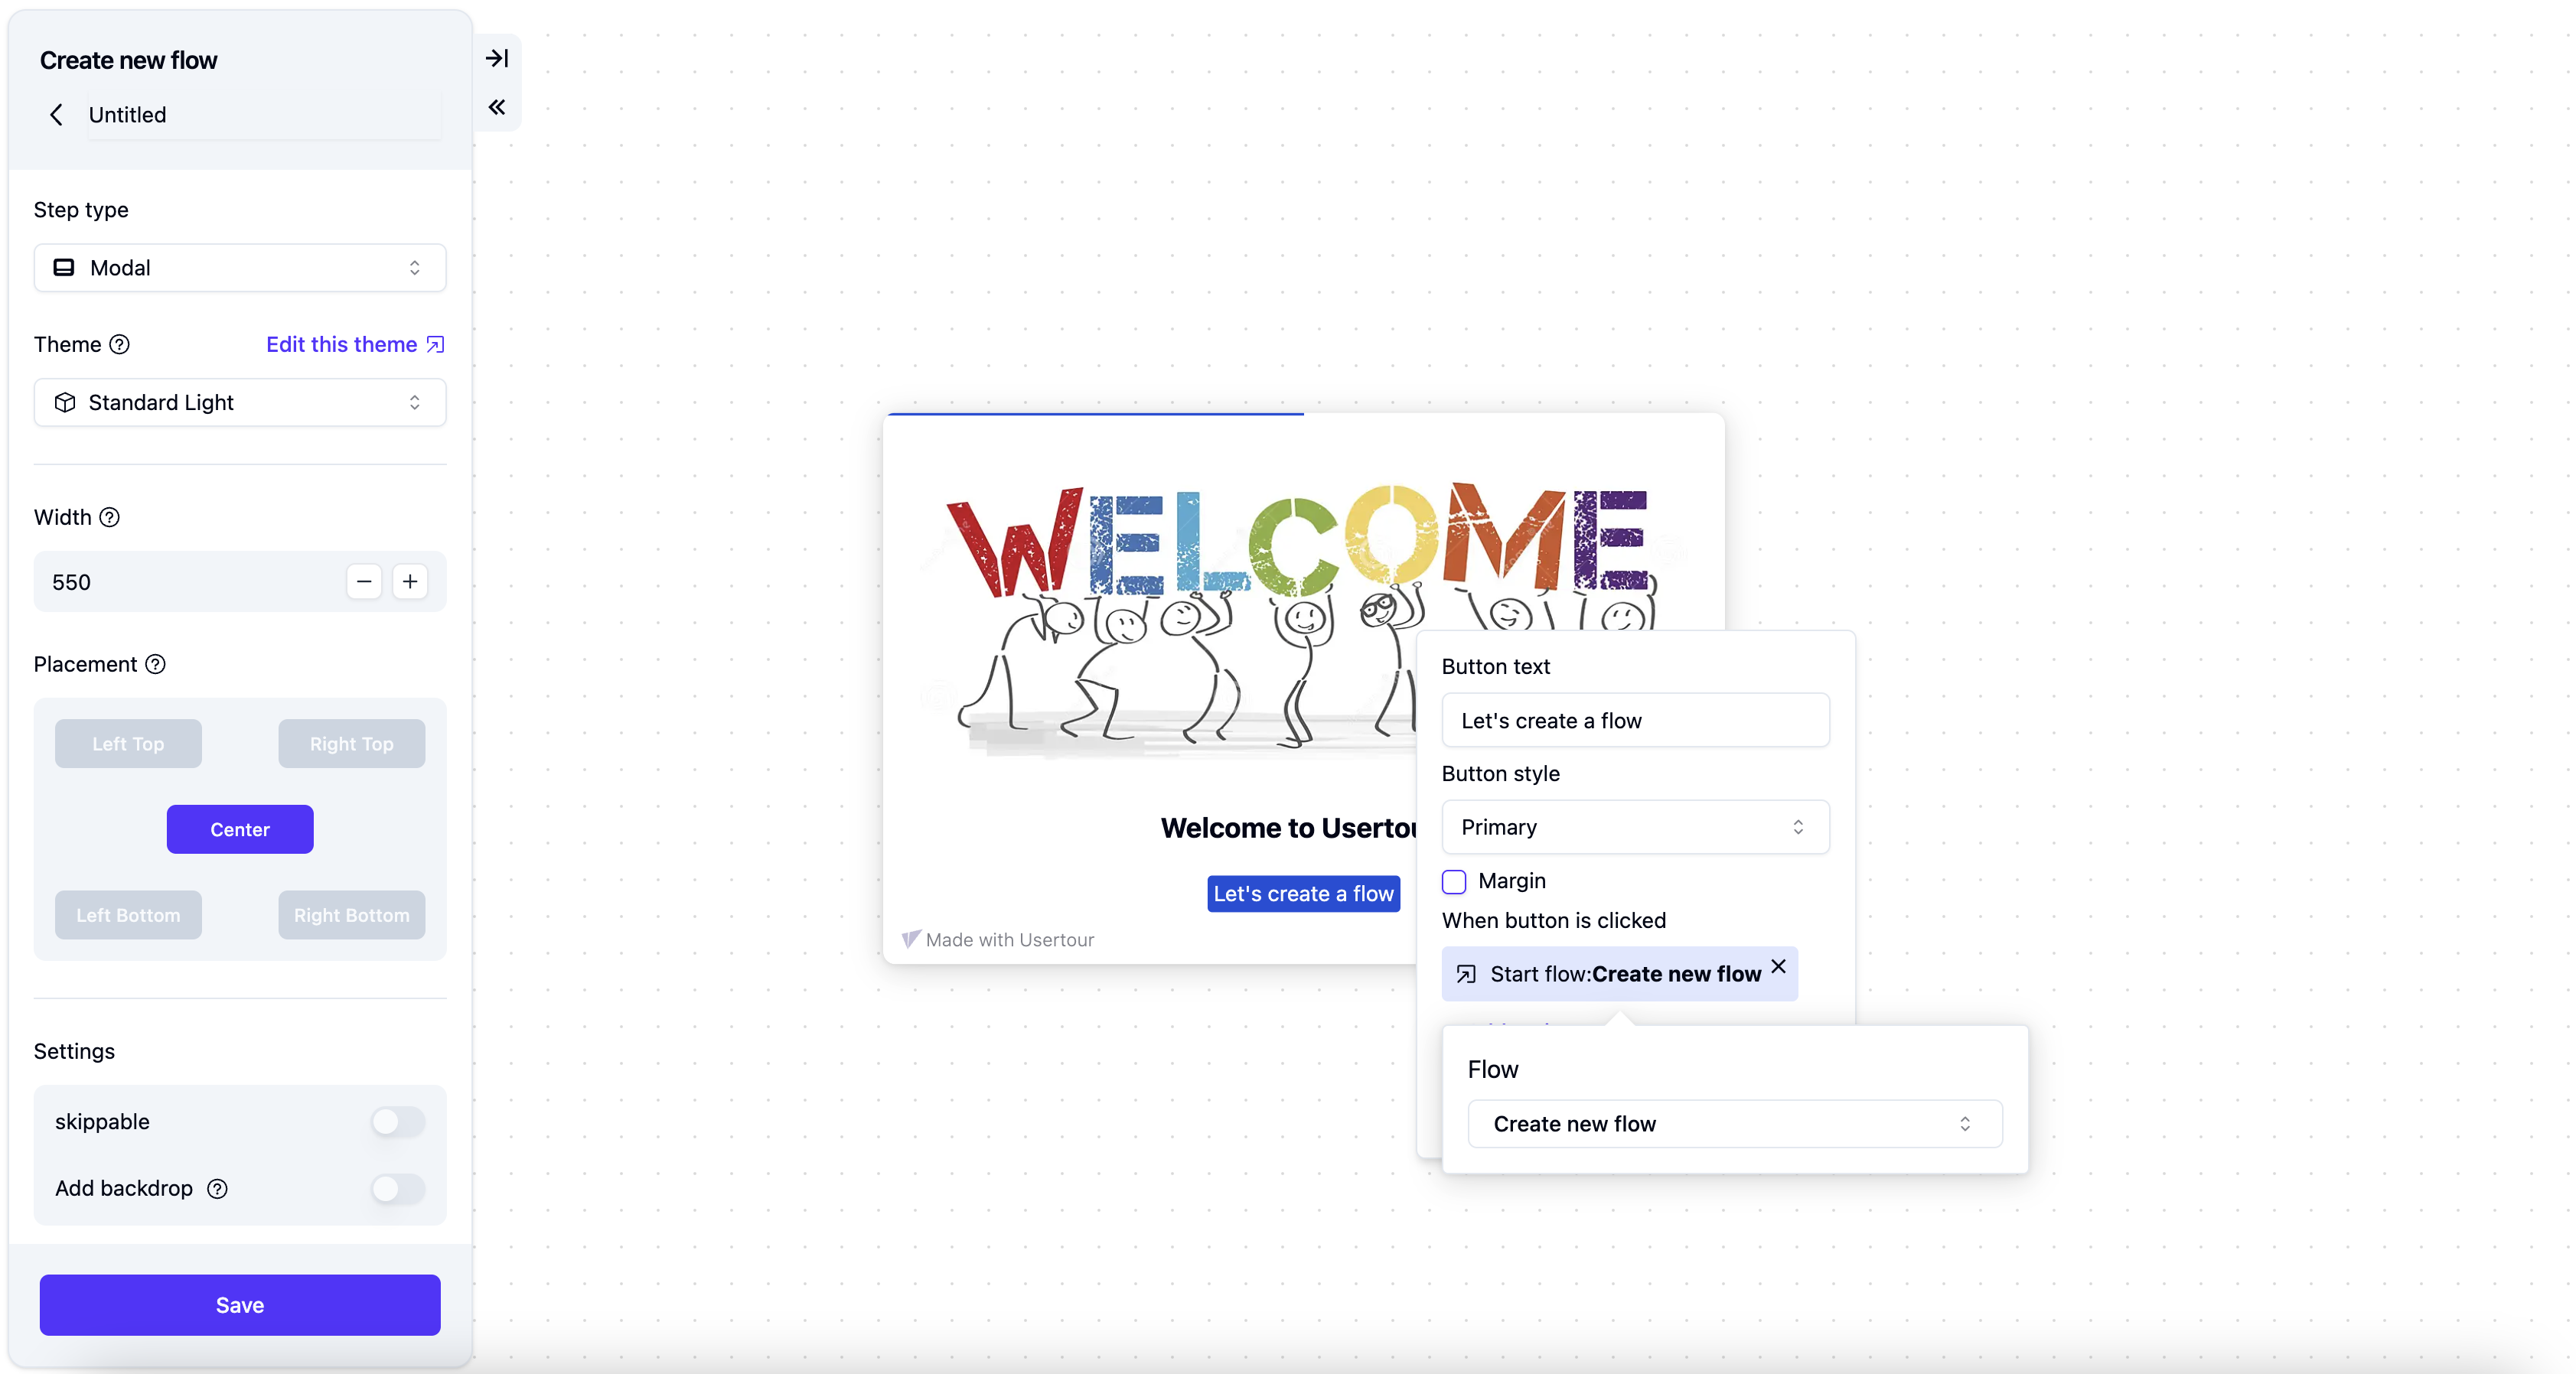
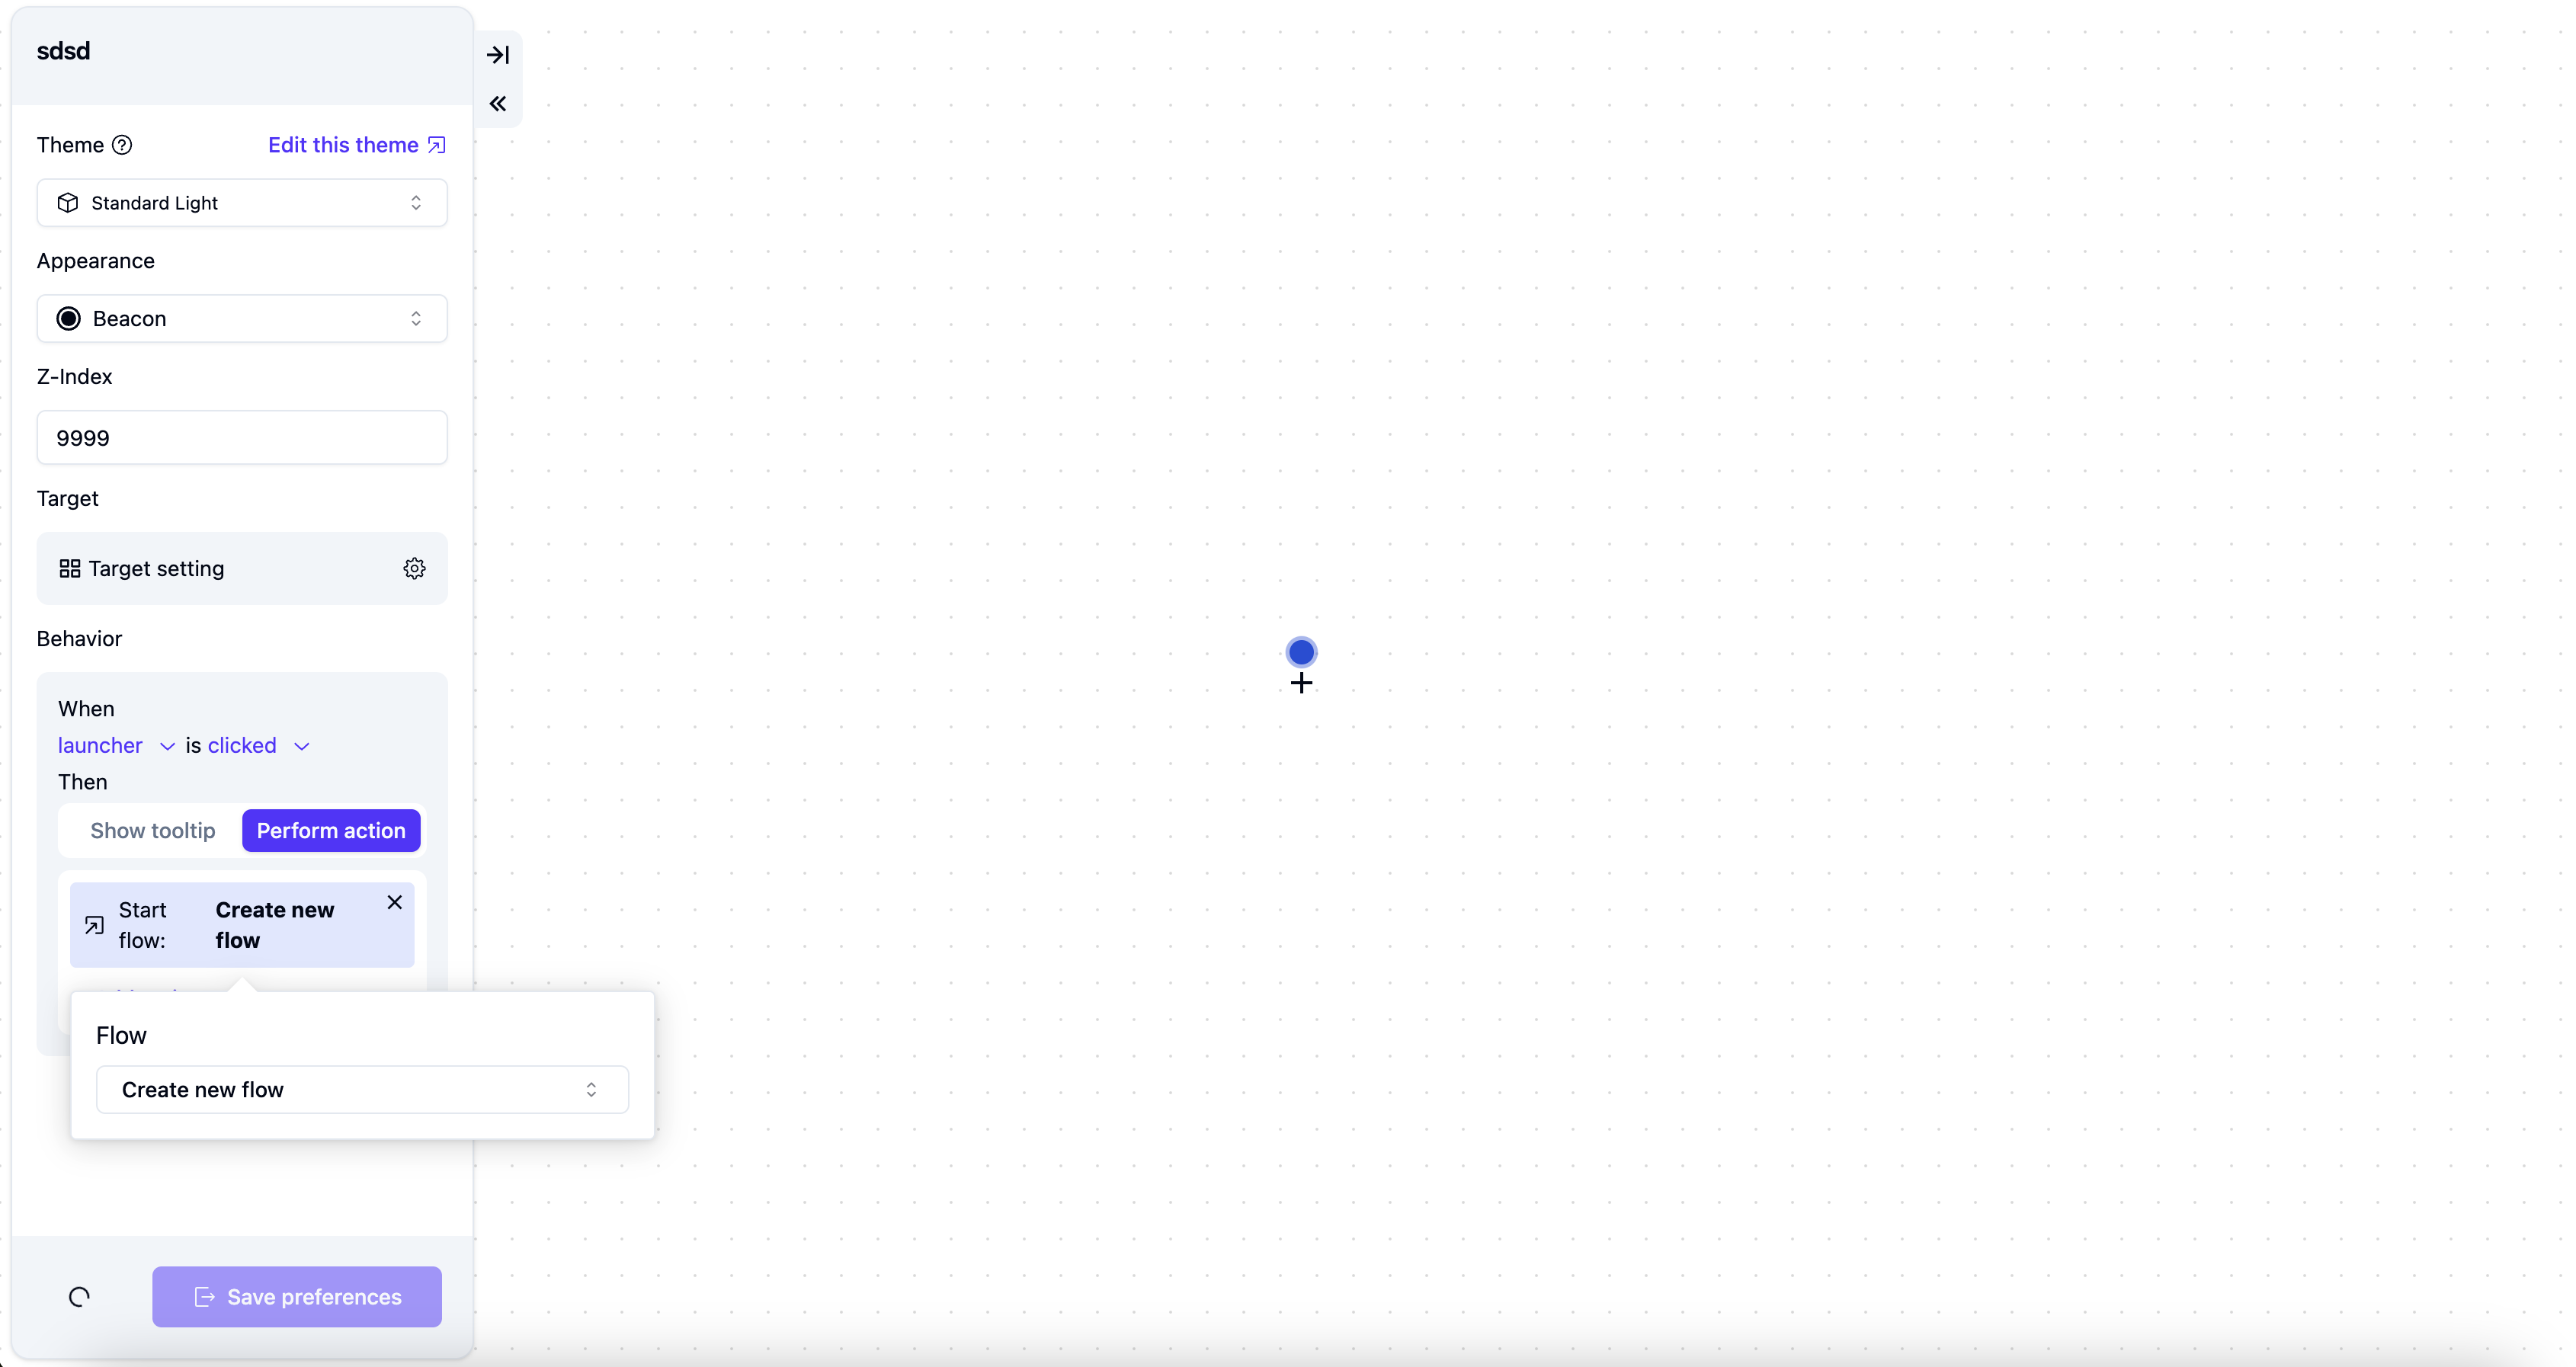
You can start a flow or checklist by adding an action to another checklist, launcher, or flow. Here are examples for each type:
Checklist task action
Flow button/trigger action
Launcher action
## Start from a Link
You can start a flow or checklist by adding a link or button to your app.
To start a flow or checklist via URL, add the flow ID to your link like this:
```
https://www.usertour.io/flows/?usertour=your_flow_id
```
For example, if your flow ID is "cmaw8v1ch013s147h0uw8aha5", the URL would be:
```
https://www.usertour.io/flows/?usertour=cmaw8v1ch013s147h0uw8aha5
```
## Start from Code
You can start a flow by adding a button to your app or using the `usertour.start()`. For detailed implementation, check out our [Usertour.js Reference](/developers/usertourjs-reference/content/start).
## How to find the ID
To use `usertour.start()`, you'll need the content ID (flow ID or checklist ID). You can find this ID in the URL of the detail page: `/env/{envId}/{contentType}/{contentId}/detail`
For example, in this URL:
```
https://app.usertour.io/env/1/flows/cmaw8v1ch013s147h0uw8aha5/detail
```
The content ID is `cmaw8v1ch013s147h0uw8aha5`
You can start and segment flows and checklists using these conditions:
* **User attribute** - Execute the trigger's action when a user possesses specific attributes, enabling personalized flow progression.
* **Current page is** - Execute the trigger's action when users navigate to a designated page, ensuring context-aware flow delivery.
* Flow/Checklist - Start the flow/checklist if another flow/checklist is completed/seen.
* **Element is present/clicked/disabled** - Execute the trigger's action based on UI element states. Particularly useful for handling asynchronous content loading scenarios.
* **Text input value is** - Execute the trigger's action when users enter specific values in designated input fields, enabling precise form-based flow control.
* **User fills in input** - Execute the trigger's action upon any user input in specified fields, facilitating real-time flow progression.
* **Current time** - Execute the trigger's action at designated times, allowing for time-sensitive content delivery within specific time periods.
- You can combine multiple conditions using AND/OR logic groups to create complex conditions
- Checklists will stay on screen until manually dismissed
- Flows start once per user by default, but you can change it to multiple times or unlimited starts
- Use the Wait condition to add a delay before starting the flow
## Start from Actions
You can start a flow or checklist by adding an action to another checklist, launcher, or flow. Here are examples for each type:
Checklist task action

Flow button/trigger action

Launcher action

## Start from a Link
You can start a flow or checklist by adding a link or button to your app.
To start a flow or checklist via URL, add the flow ID to your link like this:
```
https://www.usertour.io/flows/?usertour=your_flow_id
```
For example, if your flow ID is "cmaw8v1ch013s147h0uw8aha5", the URL would be:
```
https://www.usertour.io/flows/?usertour=cmaw8v1ch013s147h0uw8aha5
```
## Start from Code
You can start a flow by adding a button to your app or using the `usertour.start()`. For detailed implementation, check out our [Usertour.js Reference](/developers/usertourjs-reference/content/start).
## How to find the ID
To use `usertour.start()`, you'll need the content ID (flow ID or checklist ID). You can find this ID in the URL of the detail page: `/env/{envId}/{contentType}/{contentId}/detail`
For example, in this URL:
```
https://app.usertour.io/env/1/flows/cmaw8v1ch013s147h0uw8aha5/detail
```
The content ID is `cmaw8v1ch013s147h0uw8aha5`