> ## Documentation Index
> Fetch the complete documentation index at: https://docs.usertour.io/llms.txt
> Use this file to discover all available pages before exploring further.
# HubSpot
> Keep HubSpot contacts and companies in step with Usertour users and companies — sync CRM properties in as targeting attributes, and write onboarding data back to HubSpot.
The HubSpot integration links the records both systems hold for the same
customer — a HubSpot contact and a Usertour user, a HubSpot company and a
Usertour company — and keeps the fields you choose in step, in both
directions:
* **Properties in.** HubSpot properties such as lifecycle stage, plan, or
industry become Usertour attributes you can target content with, kept
current as they change in HubSpot.
* **Properties out.** Usertour attributes — onboarding progress, last seen,
anything your app sets — are written back to a dedicated **Usertour**
property group in HubSpot, where sales and success teams see them on the
record.
**Availability.** On Usertour Cloud the integration is included from the
**Growth** plan. Self-hosted instances are not gated, but they register their
own HubSpot app first — see [self-hosted setup](#self-hosted-setup).
## How records are matched
Usertour never creates a HubSpot record, and HubSpot never creates a
Usertour user or company. Records are **linked** only when both exist,
matched by one of:
* **Email address** (contacts only) — the contact's email equals the user's
`email` attribute.
* **A HubSpot property holding the Usertour ID** — a contact or company
property that contains the same ID your app passes to
`usertour.identify()` (users) or `usertour.group()` (companies). Use this
when emails differ between the two systems, or for companies, which have
no email.
Unlinked records on either side are simply counted — a CRM holds leads that
never signed up, and a product holds users the CRM has never heard of —
and are re-checked on every sync round, so a link forms as soon as the
missing side appears.
## Connect
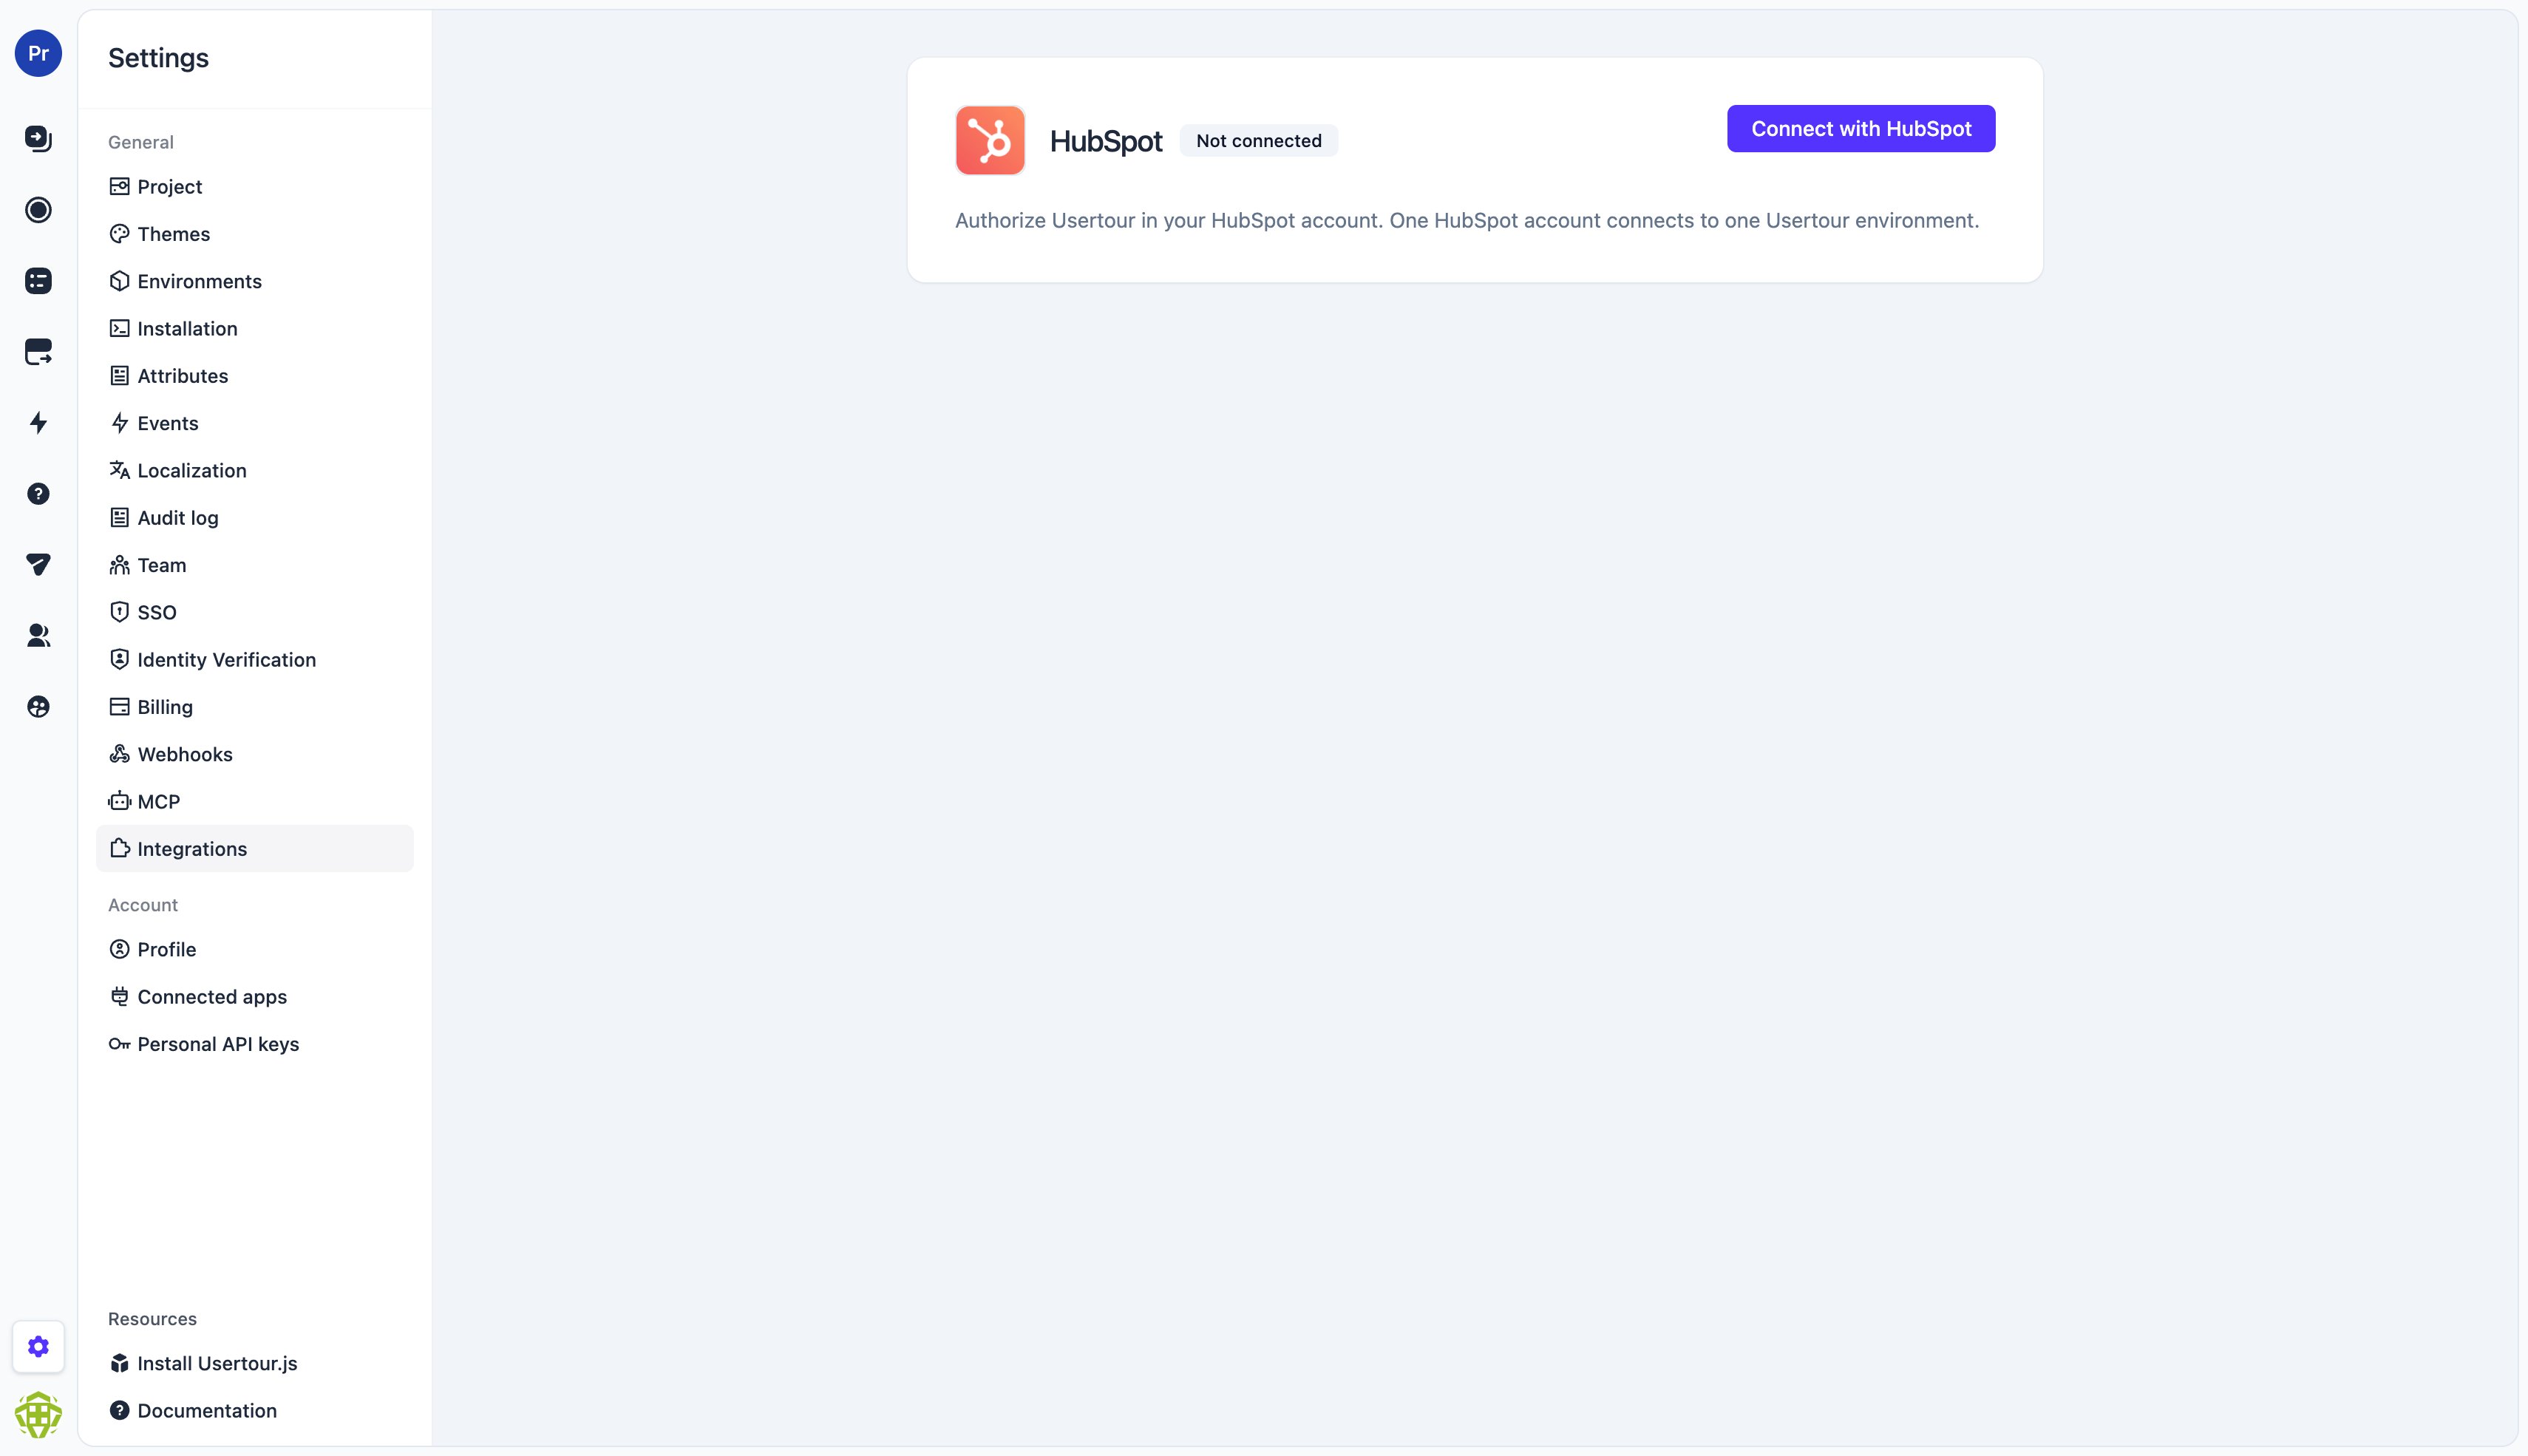
Go to **Settings → Integrations → HubSpot** (pick the environment first —
one HubSpot account connects to one Usertour environment) and click
**Connect with HubSpot**. HubSpot asks you to choose an account and approve
the permissions, then returns you to Usertour.
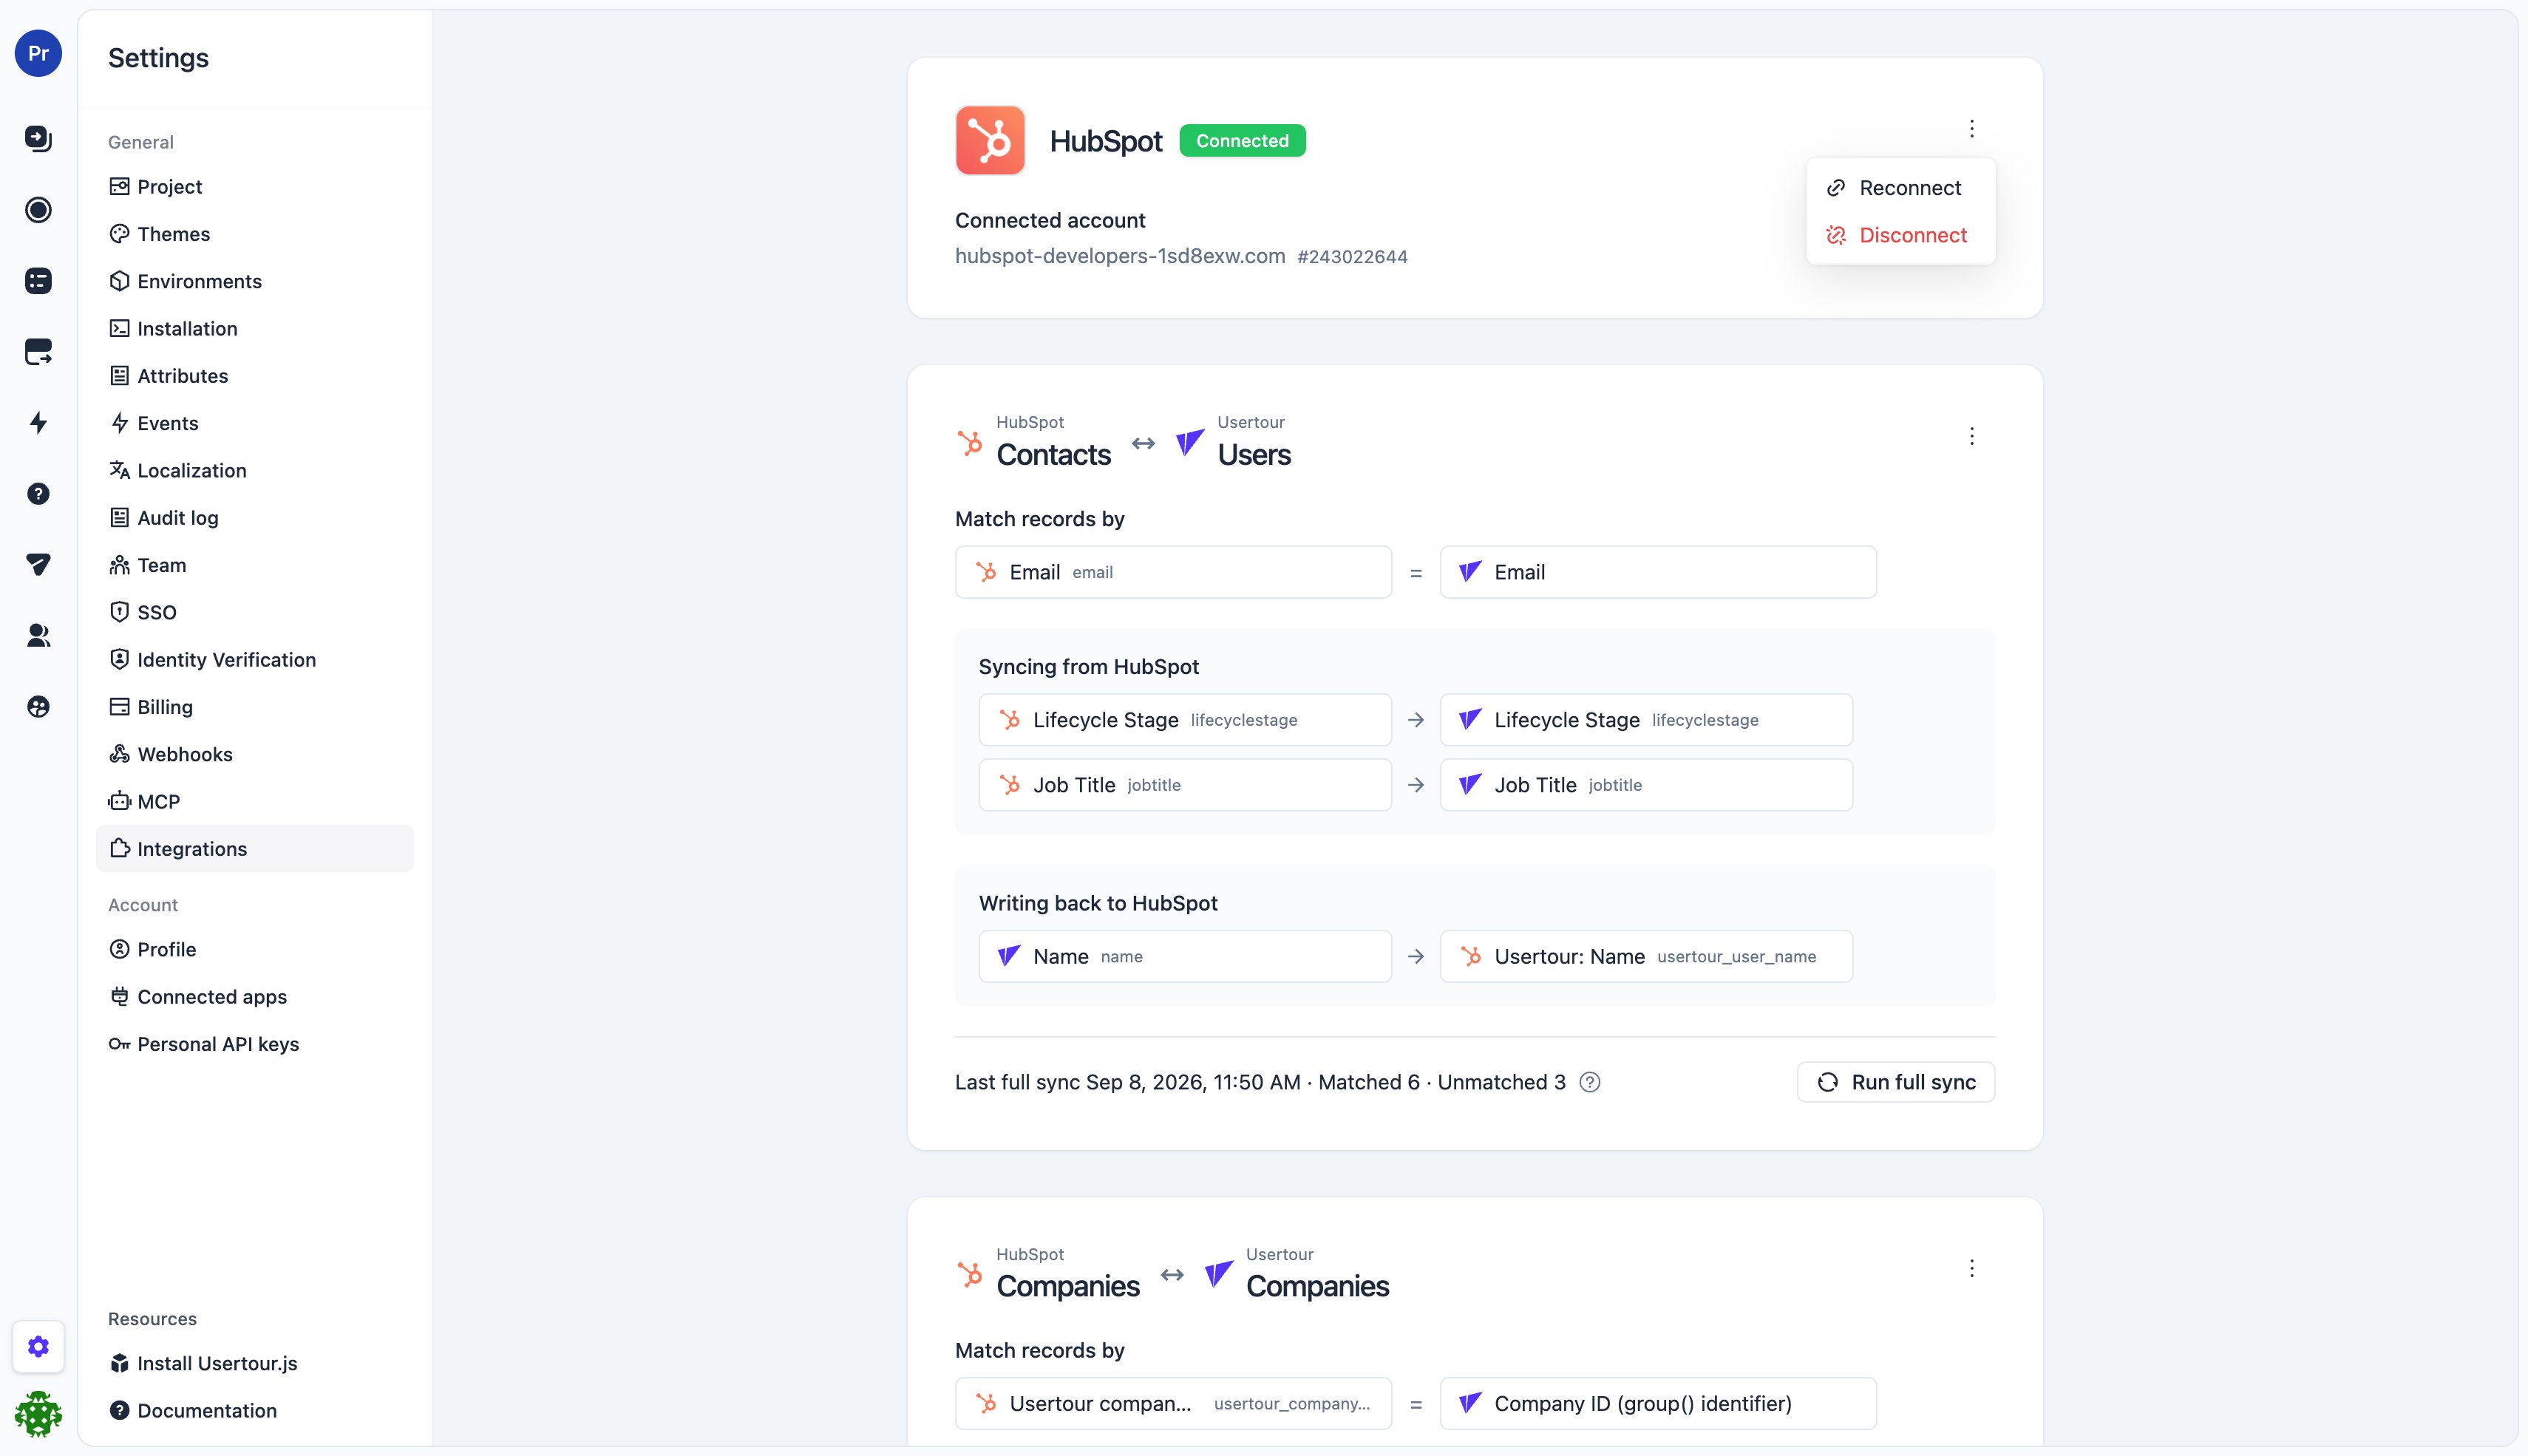
 The card then shows the connected account. The menu next to it offers
**Reconnect** — re-authorize when HubSpot revoked the access, or when a
new version of the integration asks for more permissions — and
**Disconnect**, which revokes Usertour's access in HubSpot and stops
syncing; mappings and the message log are kept, so reconnecting picks up
where you left off. Reconnecting with a *different* HubSpot account clears
the existing links and starts syncing from scratch against the new one.
The card then shows the connected account. The menu next to it offers
**Reconnect** — re-authorize when HubSpot revoked the access, or when a
new version of the integration asks for more permissions — and
**Disconnect**, which revokes Usertour's access in HubSpot and stops
syncing; mappings and the message log are kept, so reconnecting picks up
where you left off. Reconnecting with a *different* HubSpot account clears
the existing links and starts syncing from scratch against the new one.
 ## Set up a mapping
Below the connection are two mapping cards: **Contacts ↔ Users** and
**Companies ↔ Companies**. Each one is optional and configured on its own.
Click **Set up mapping** to open the editor.
## Set up a mapping
Below the connection are two mapping cards: **Contacts ↔ Users** and
**Companies ↔ Companies**. Each one is optional and configured on its own.
Click **Set up mapping** to open the editor.
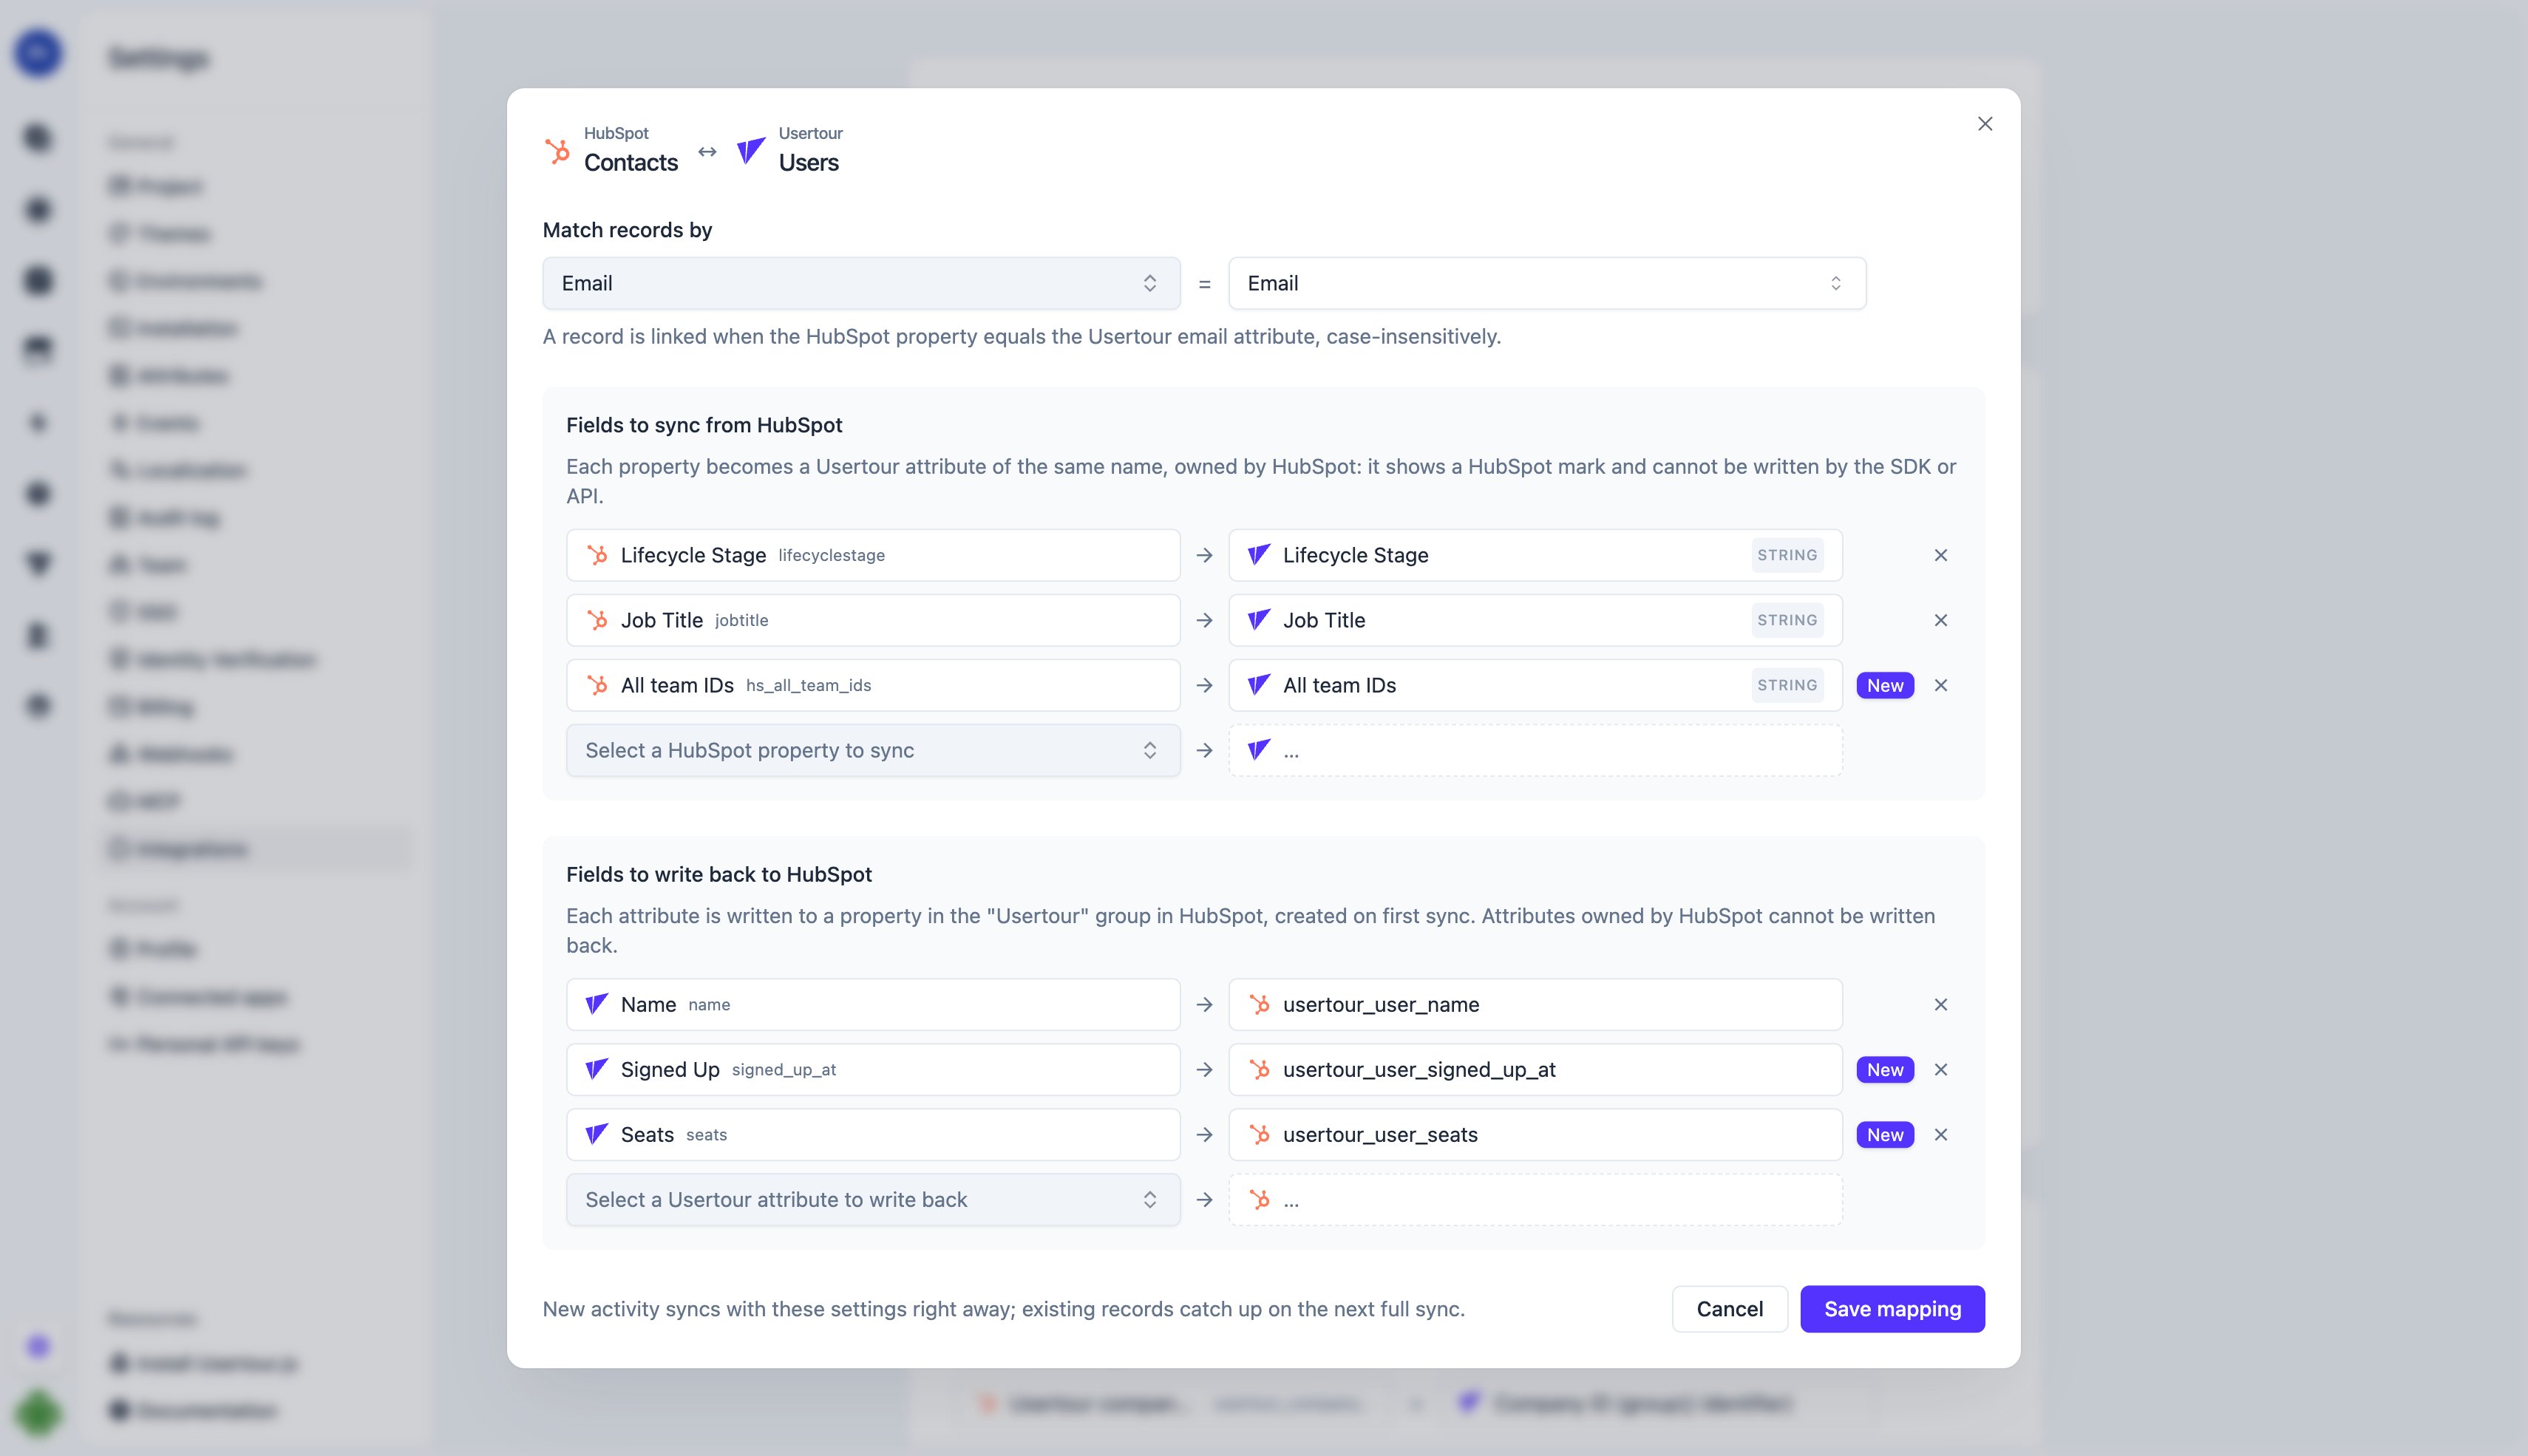 1. **Match records by** — pick the HubSpot property on the left and what it
must equal on the right: the user's **Email**, or the **User ID** your
app passes to `usertour.identify()` (companies: the **Company ID** from
`usertour.group()`).
2. **Fields to sync from HubSpot** — pick a HubSpot property; the row shows
the Usertour attribute it becomes, with the same name and a matching data
type. That attribute is **owned by HubSpot**: it carries a HubSpot mark
wherever attribute names appear, and the SDK and API can no longer write
it — HubSpot is the source of truth. A **New** badge means the attribute
is created on save; **Existing** means an attribute with that code name is
already there and saving hands it over (you confirm first; the data type
must match).
3. **Fields to write back to HubSpot** — pick a Usertour attribute; the row
shows the HubSpot property it becomes, `usertour_user_` or
`usertour_company_` in a **Usertour** property group, created
on first sync. Attributes owned by HubSpot cannot be written back, and a
field never appears in both lists.
4. **Save mapping.** New activity syncs with these settings from now on.
Existing records are linked when you click **Run full sync** on the
card — do that once you are done configuring, since a full sync walks
every record on both sides.
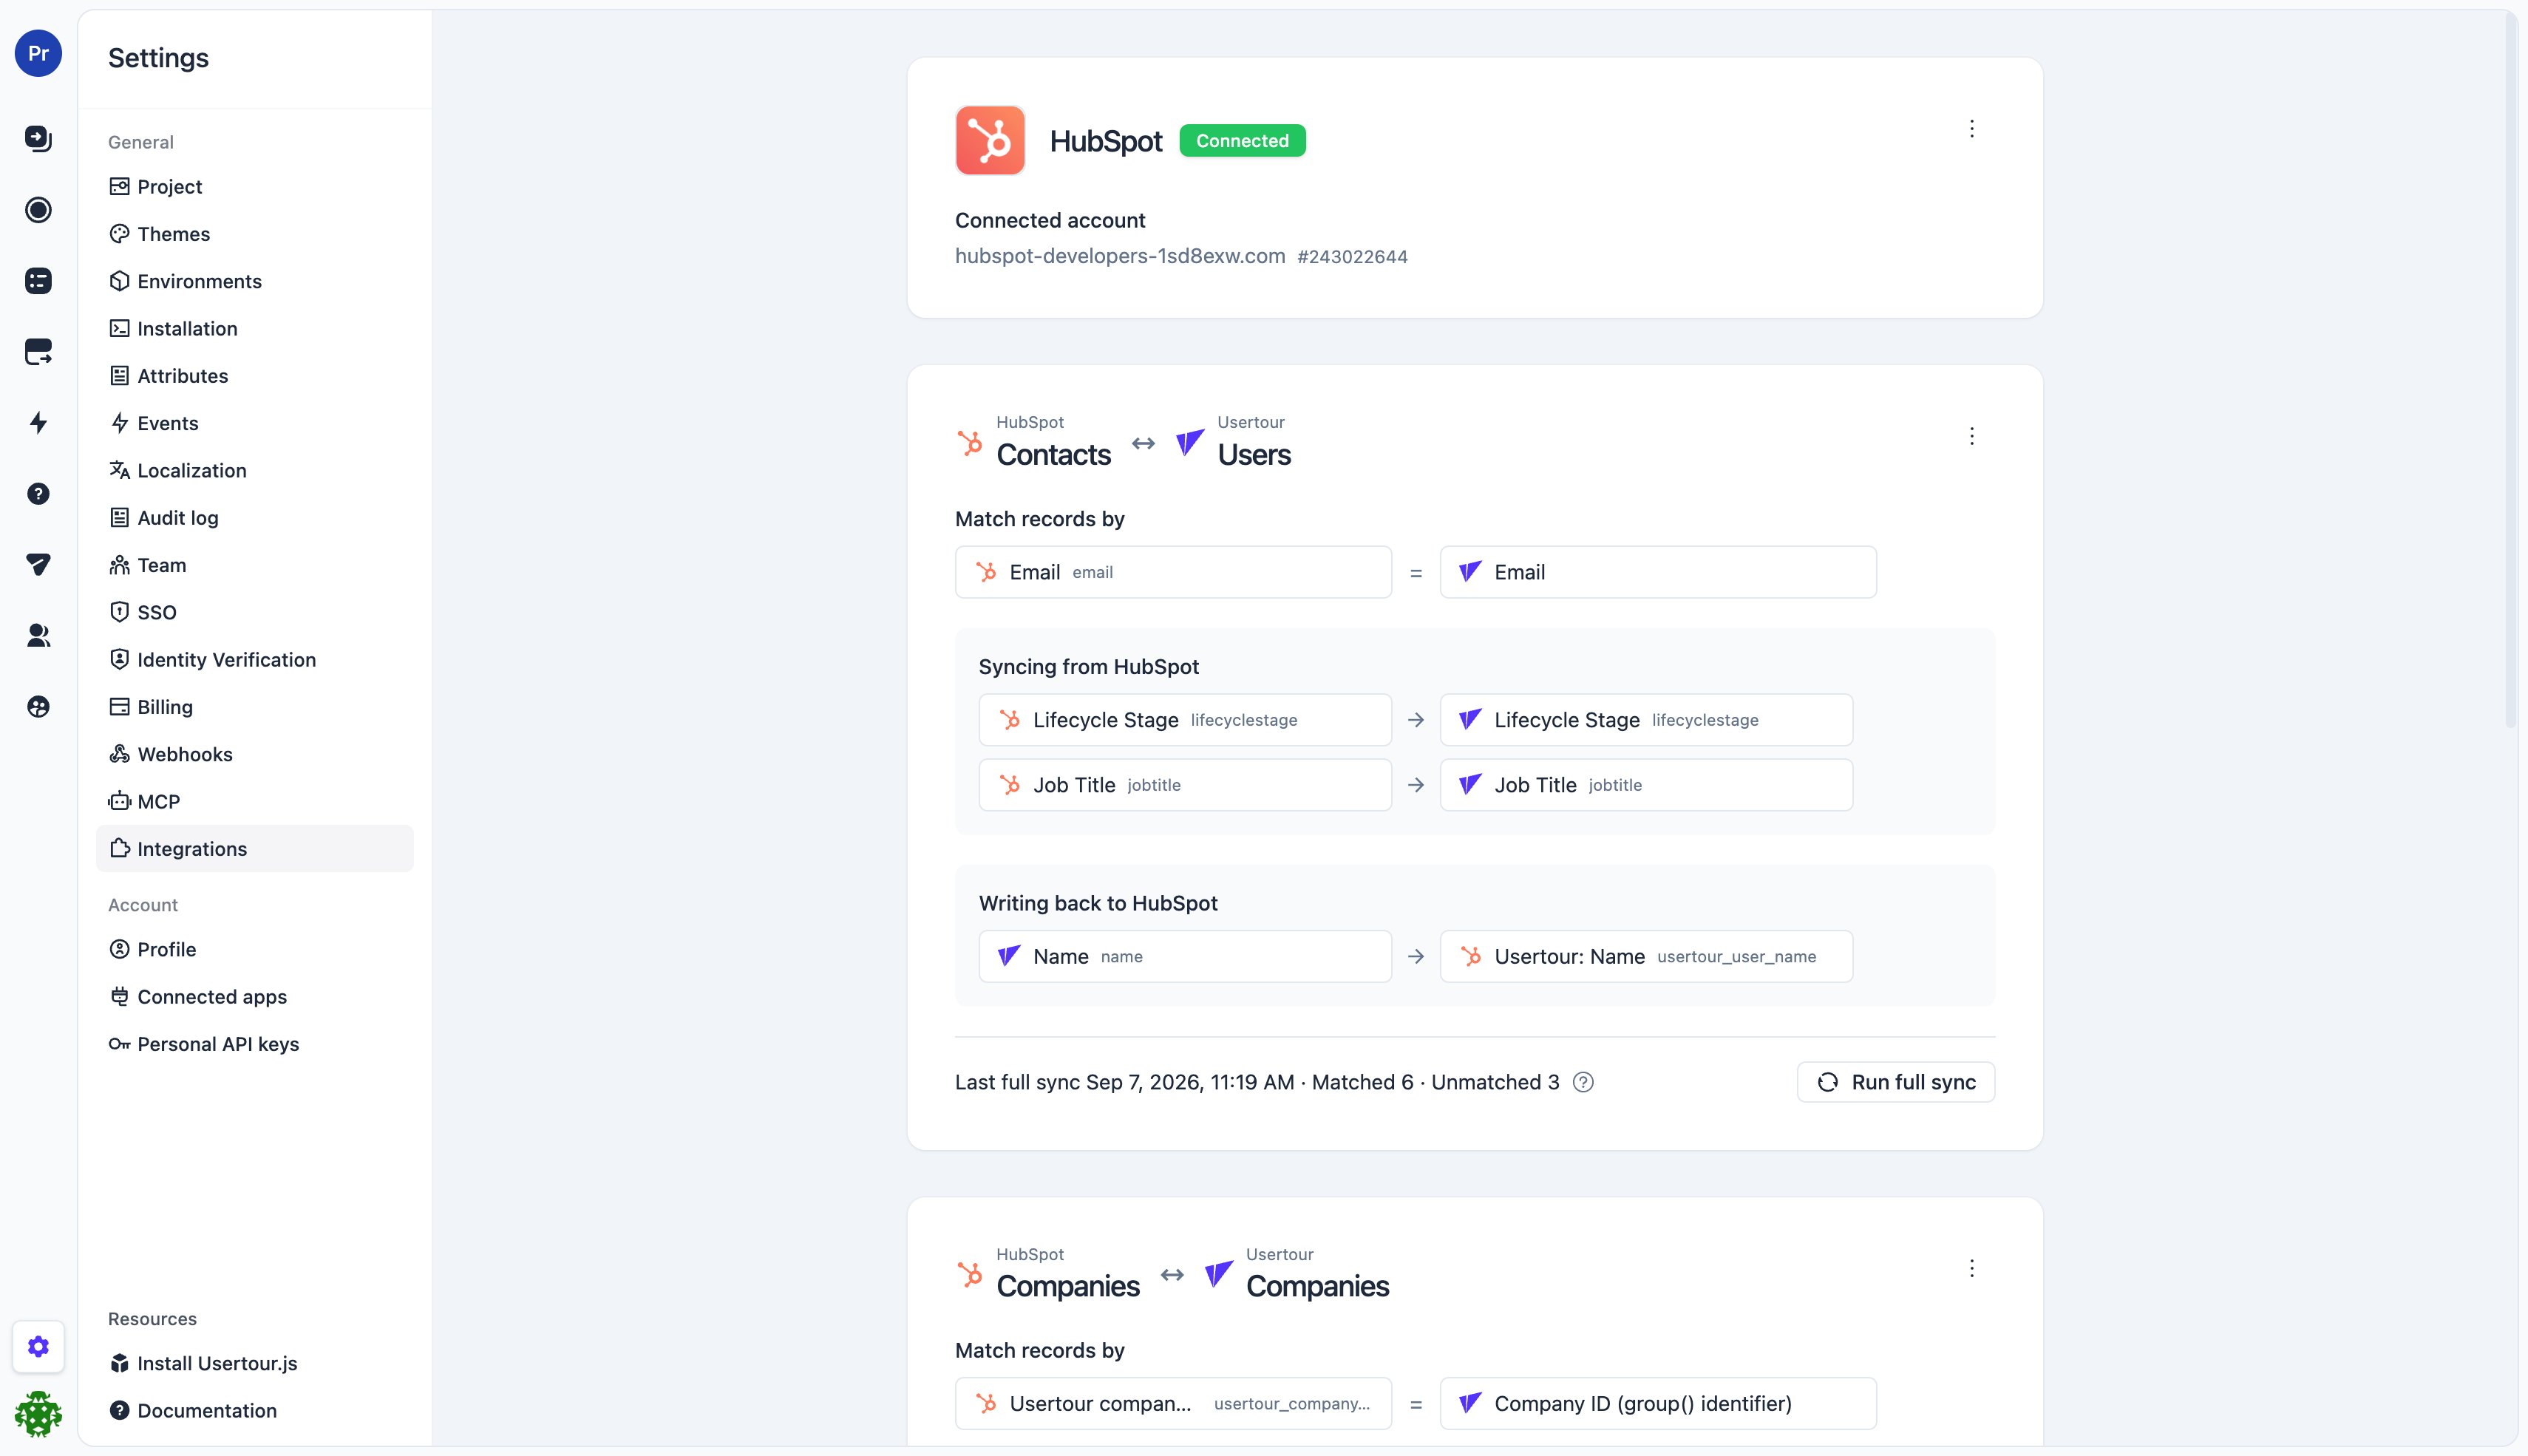
The card then shows the mapping read-only, with the last full sync and the
running **Matched** and **Unmatched** counts, with **Run full sync** next
to them. The card's menu offers **Edit mapping** and **Remove mapping**.
1. **Match records by** — pick the HubSpot property on the left and what it
must equal on the right: the user's **Email**, or the **User ID** your
app passes to `usertour.identify()` (companies: the **Company ID** from
`usertour.group()`).
2. **Fields to sync from HubSpot** — pick a HubSpot property; the row shows
the Usertour attribute it becomes, with the same name and a matching data
type. That attribute is **owned by HubSpot**: it carries a HubSpot mark
wherever attribute names appear, and the SDK and API can no longer write
it — HubSpot is the source of truth. A **New** badge means the attribute
is created on save; **Existing** means an attribute with that code name is
already there and saving hands it over (you confirm first; the data type
must match).
3. **Fields to write back to HubSpot** — pick a Usertour attribute; the row
shows the HubSpot property it becomes, `usertour_user_` or
`usertour_company_` in a **Usertour** property group, created
on first sync. Attributes owned by HubSpot cannot be written back, and a
field never appears in both lists.
4. **Save mapping.** New activity syncs with these settings from now on.
Existing records are linked when you click **Run full sync** on the
card — do that once you are done configuring, since a full sync walks
every record on both sides.
The card then shows the mapping read-only, with the last full sync and the
running **Matched** and **Unmatched** counts, with **Run full sync** next
to them. The card's menu offers **Edit mapping** and **Remove mapping**.
 **Removing a mapping** stops syncing for those records. Attributes that
came from HubSpot keep their current values and become ordinary attributes
again.
### Property types
| HubSpot property | Usertour attribute |
| ---------------------------------------------- | ------------------ |
| Single-line / multi-line text, dropdown, radio | String |
| Number | Number |
| Single checkbox | Boolean |
| Date, date and time | DateTime |
| Multiple checkboxes | List |
Read-only and calculated HubSpot properties can be synced in but not chosen
as write-back targets.
## What syncs, and when
| | Direction | When |
| ---------------------------------- | --------- | -------------------------------------------------------------------------------------------------------------------------- |
| **Full sync** | both | on **Run full sync**, and daily — pages through the HubSpot records, links them, applies the properties in both directions |
| **Property changed in HubSpot** | in | within about half a minute — Usertour reads HubSpot's change journal continuously |
| **Attribute changed in Usertour** | out | immediately — the change is queued and written to the linked record |
| **New user or company identified** | in | on first sight — the record is looked up in HubSpot and linked and filled right away |
The owning side is authoritative: when a synced HubSpot property is cleared,
the Usertour attribute is cleared too, and a write-back attribute that
becomes empty clears the HubSpot property. Deleting a record in HubSpot
does not touch the Usertour record.
The **Sync activity** card lists every full sync and every batch of
changes picked up from HubSpot, with the record counts and, for a failed
run, the reason — the place to look when a sync did not do what you
expected. Write-backs run through the same pipeline as other integrations,
so they are retried on failure and appear under **Write-backs** at the
bottom of the page — see [delivery and reliability](/integrations/overview#delivery-and-reliability).
## Where synced attributes show up
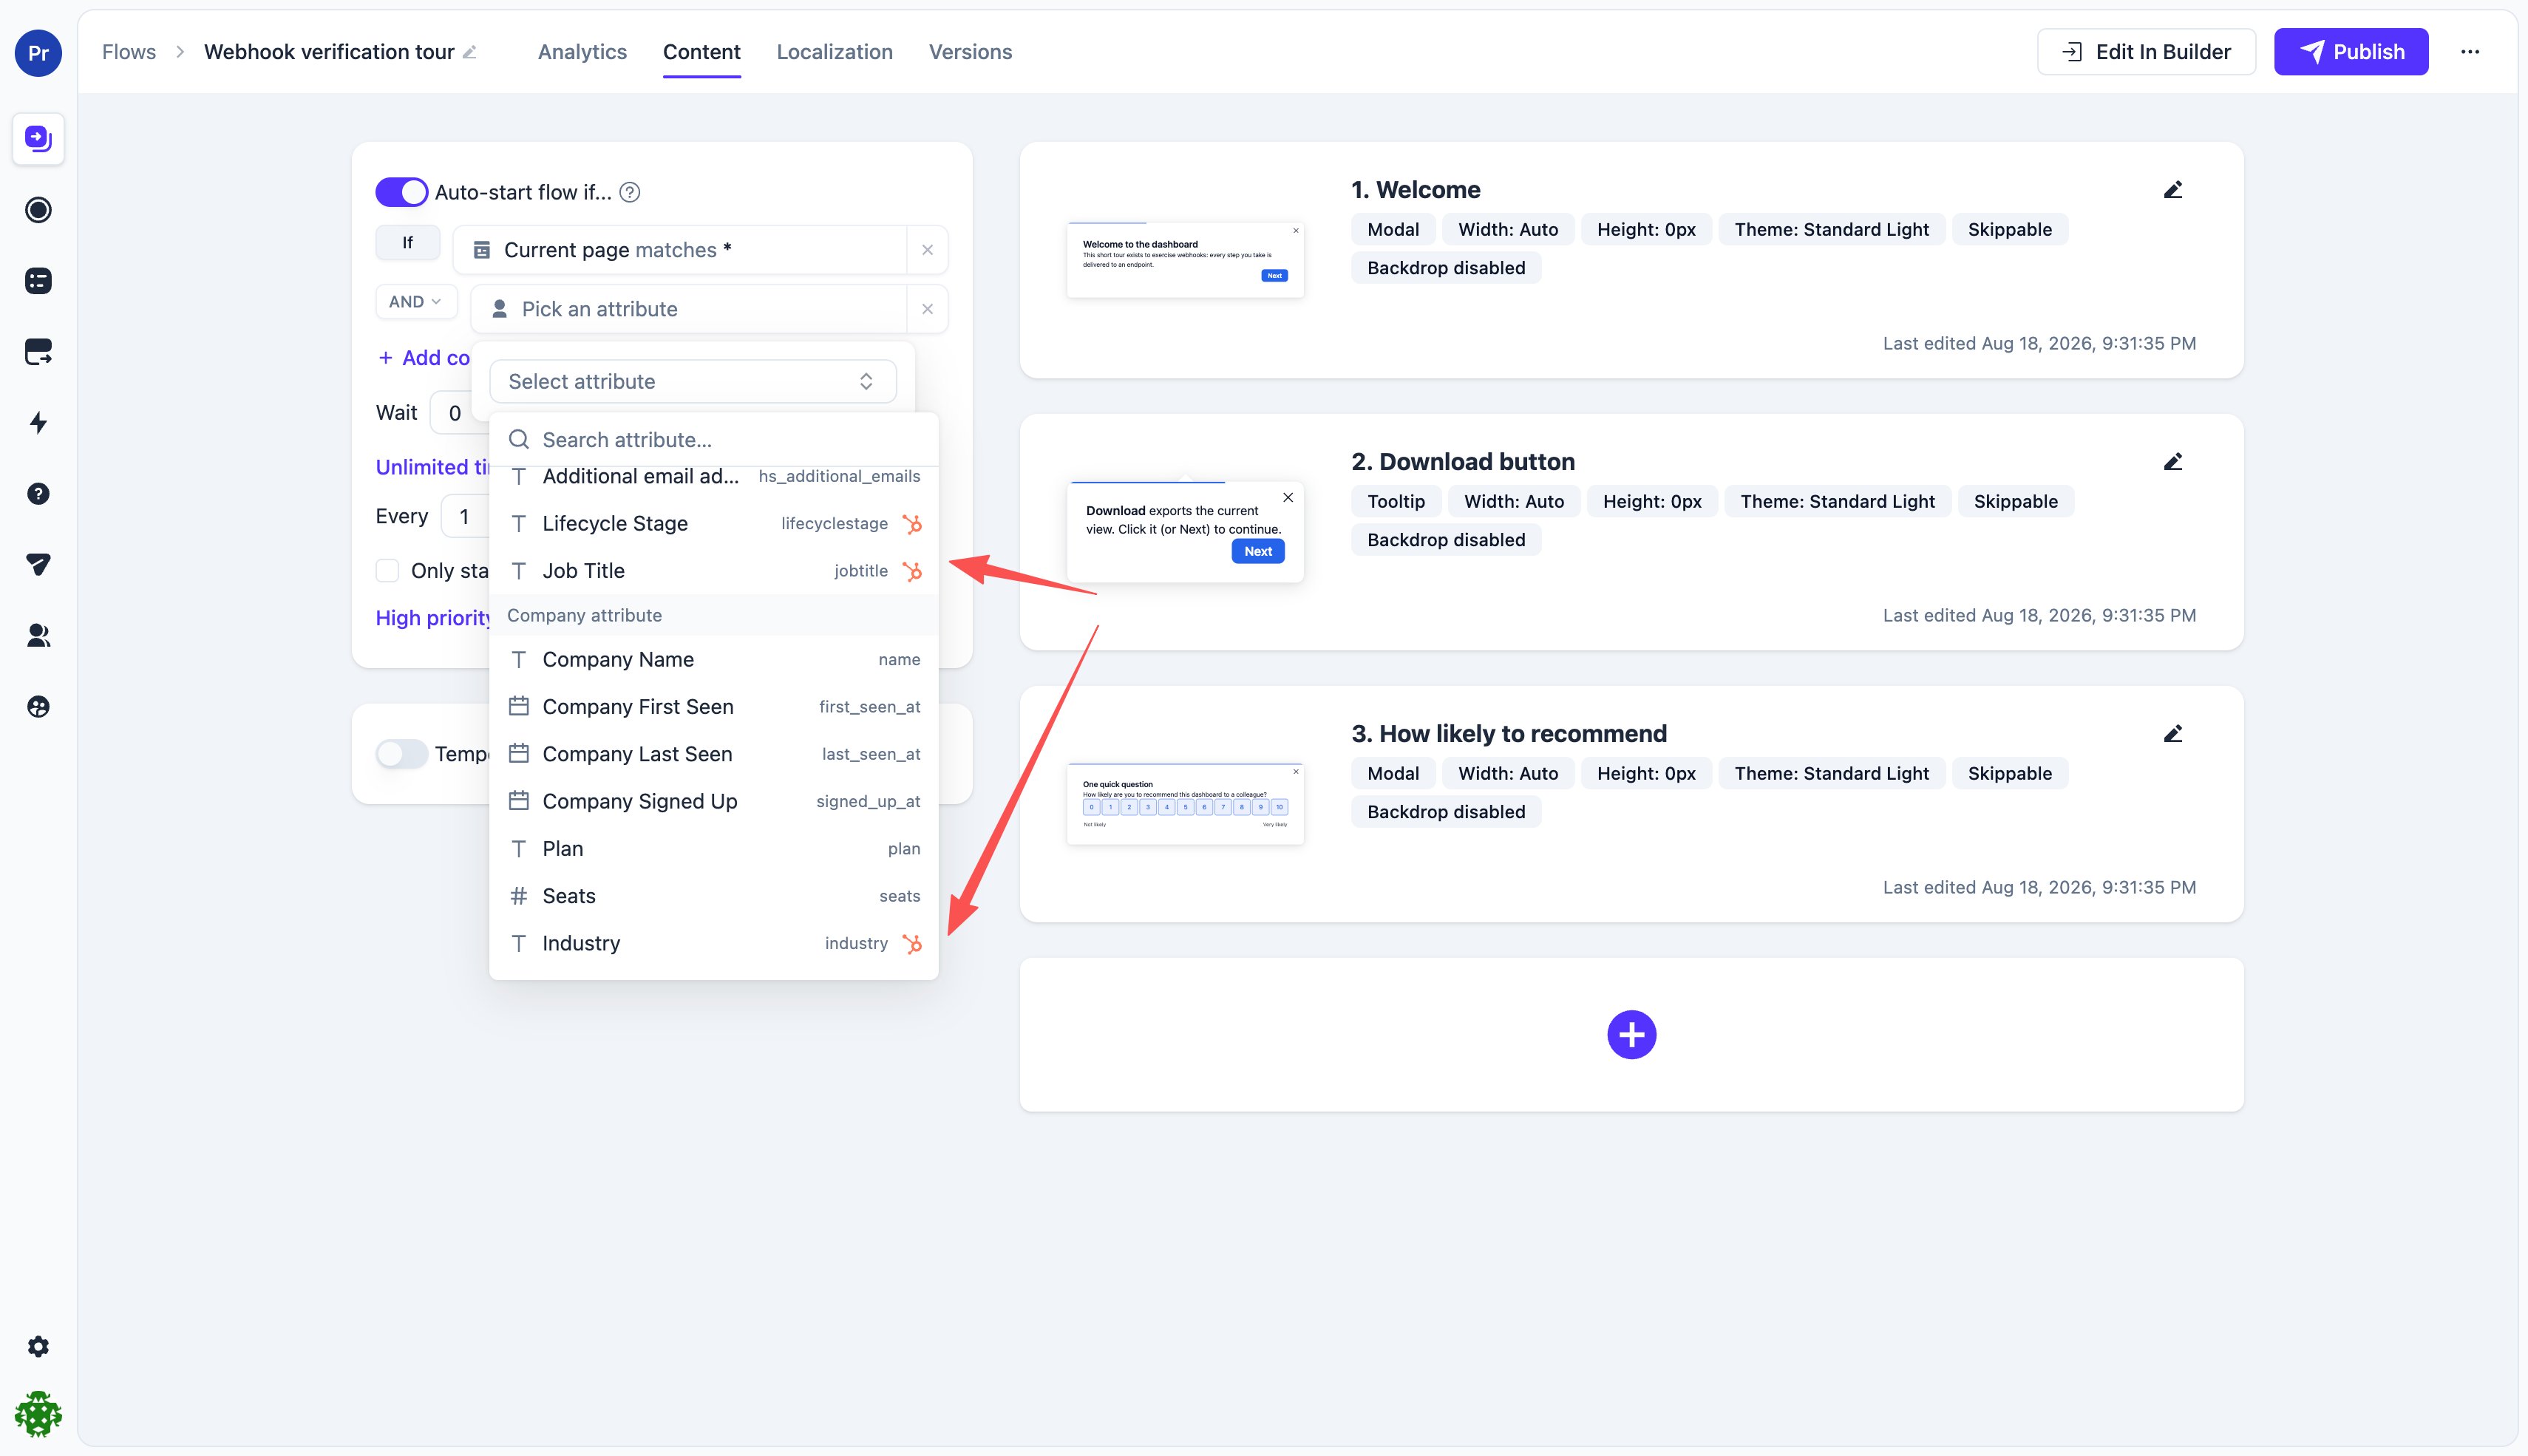
Attributes owned by HubSpot carry the HubSpot mark next to their name in
**Settings → Attributes**, in the attributes panel of a user or company
page, and in the condition builder — so anyone targeting content can see
which values come from the CRM.
**Removing a mapping** stops syncing for those records. Attributes that
came from HubSpot keep their current values and become ordinary attributes
again.
### Property types
| HubSpot property | Usertour attribute |
| ---------------------------------------------- | ------------------ |
| Single-line / multi-line text, dropdown, radio | String |
| Number | Number |
| Single checkbox | Boolean |
| Date, date and time | DateTime |
| Multiple checkboxes | List |
Read-only and calculated HubSpot properties can be synced in but not chosen
as write-back targets.
## What syncs, and when
| | Direction | When |
| ---------------------------------- | --------- | -------------------------------------------------------------------------------------------------------------------------- |
| **Full sync** | both | on **Run full sync**, and daily — pages through the HubSpot records, links them, applies the properties in both directions |
| **Property changed in HubSpot** | in | within about half a minute — Usertour reads HubSpot's change journal continuously |
| **Attribute changed in Usertour** | out | immediately — the change is queued and written to the linked record |
| **New user or company identified** | in | on first sight — the record is looked up in HubSpot and linked and filled right away |
The owning side is authoritative: when a synced HubSpot property is cleared,
the Usertour attribute is cleared too, and a write-back attribute that
becomes empty clears the HubSpot property. Deleting a record in HubSpot
does not touch the Usertour record.
The **Sync activity** card lists every full sync and every batch of
changes picked up from HubSpot, with the record counts and, for a failed
run, the reason — the place to look when a sync did not do what you
expected. Write-backs run through the same pipeline as other integrations,
so they are retried on failure and appear under **Write-backs** at the
bottom of the page — see [delivery and reliability](/integrations/overview#delivery-and-reliability).
## Where synced attributes show up
Attributes owned by HubSpot carry the HubSpot mark next to their name in
**Settings → Attributes**, in the attributes panel of a user or company
page, and in the condition builder — so anyone targeting content can see
which values come from the CRM.
 ## Self-hosted setup
A self-hosted instance cannot use the app deployed for Usertour Cloud —
HubSpot ties an app's redirect URL and secret to one deployment — so you
register your own copy of the app once, in a free HubSpot developer
account. It takes about ten minutes and needs no code changes.
1. Create a [HubSpot developer account](https://app.hubspot.com/signup-hubspot/developers)
and install the HubSpot CLI:
```bash theme={null}
npm install -g @hubspot/cli@latest
hs auth
```
Pick the developer account when prompted.
2. Copy the `integrations/hubspot` directory from the
[Usertour repository](https://github.com/usertour/usertour/tree/main/integrations/hubspot)
and edit `src/app/app-hsmeta.json`: set `distribution` to `"private"`,
and replace the redirect URL with
`https:///api/integrations/hubspot/oauth/callback`. It must be
HTTPS, served by the same host your dashboard sends API requests to, and
reachable by the browser of the person connecting; HubSpot's servers never
call it.
3. Run `hs project upload` in that directory. The first upload creates the
app in your developer account.
4. In the developer account, open the app: under **Distribution**, add the
HubSpot account(s) you will connect to the allowlist (a private app can
be installed in up to 10 accounts); under **Auth**, copy the **Client ID**
and **Client secret**.
5. Add them to the Usertour server environment and restart:
```bash theme={null}
HUBSPOT_CLIENT_ID=...
HUBSPOT_CLIENT_SECRET=...
```
6. In Usertour, go to **Settings → Integrations → HubSpot** and click
**Connect with HubSpot**.
Until the credentials are set, the HubSpot page says the integration is not
set up on this server instead of offering **Connect**. Incoming changes are
read from HubSpot's change journal, so the instance needs no public inbound
URL — it works on a private network as long as it can reach HubSpot.
## Troubleshooting
* **A high Unmatched count:** the records exist on one side only, or the
match field disagrees — different emails in the two systems, or the ID
property empty on the HubSpot record. Fix the data or switch the match
strategy; the next round re-checks everything.
* **"Attributes already exist" when saving:** a Usertour attribute with the
same code name is about to be taken over by HubSpot. Confirm to proceed,
or remove the row. A data type mismatch blocks the save.
* **A warning icon on a write-back row:** that attribute changes on every
visit (for example *Last seen*), so writing it back produces a steady
stream of HubSpot updates. Keep it only if the CRM needs it live.
* **The SDK or API reports a rejected attribute:** the attribute is owned by
HubSpot. Change the value in HubSpot, or remove the property from **Sync
from HubSpot** to hand it back.
* **Auto-disabled after failures:** Usertour's access was most likely
revoked in HubSpot (the app uninstalled, or the authorizing user
removed). Click **Connect with HubSpot** again to re-authorize.
* **"HubSpot isn't set up on this server yet" (self-hosted):** the server
is missing `HUBSPOT_CLIENT_ID` / `HUBSPOT_CLIENT_SECRET` — see
[self-hosted setup](#self-hosted-setup).
## Self-hosted setup
A self-hosted instance cannot use the app deployed for Usertour Cloud —
HubSpot ties an app's redirect URL and secret to one deployment — so you
register your own copy of the app once, in a free HubSpot developer
account. It takes about ten minutes and needs no code changes.
1. Create a [HubSpot developer account](https://app.hubspot.com/signup-hubspot/developers)
and install the HubSpot CLI:
```bash theme={null}
npm install -g @hubspot/cli@latest
hs auth
```
Pick the developer account when prompted.
2. Copy the `integrations/hubspot` directory from the
[Usertour repository](https://github.com/usertour/usertour/tree/main/integrations/hubspot)
and edit `src/app/app-hsmeta.json`: set `distribution` to `"private"`,
and replace the redirect URL with
`https:///api/integrations/hubspot/oauth/callback`. It must be
HTTPS, served by the same host your dashboard sends API requests to, and
reachable by the browser of the person connecting; HubSpot's servers never
call it.
3. Run `hs project upload` in that directory. The first upload creates the
app in your developer account.
4. In the developer account, open the app: under **Distribution**, add the
HubSpot account(s) you will connect to the allowlist (a private app can
be installed in up to 10 accounts); under **Auth**, copy the **Client ID**
and **Client secret**.
5. Add them to the Usertour server environment and restart:
```bash theme={null}
HUBSPOT_CLIENT_ID=...
HUBSPOT_CLIENT_SECRET=...
```
6. In Usertour, go to **Settings → Integrations → HubSpot** and click
**Connect with HubSpot**.
Until the credentials are set, the HubSpot page says the integration is not
set up on this server instead of offering **Connect**. Incoming changes are
read from HubSpot's change journal, so the instance needs no public inbound
URL — it works on a private network as long as it can reach HubSpot.
## Troubleshooting
* **A high Unmatched count:** the records exist on one side only, or the
match field disagrees — different emails in the two systems, or the ID
property empty on the HubSpot record. Fix the data or switch the match
strategy; the next round re-checks everything.
* **"Attributes already exist" when saving:** a Usertour attribute with the
same code name is about to be taken over by HubSpot. Confirm to proceed,
or remove the row. A data type mismatch blocks the save.
* **A warning icon on a write-back row:** that attribute changes on every
visit (for example *Last seen*), so writing it back produces a steady
stream of HubSpot updates. Keep it only if the CRM needs it live.
* **The SDK or API reports a rejected attribute:** the attribute is owned by
HubSpot. Change the value in HubSpot, or remove the property from **Sync
from HubSpot** to hand it back.
* **Auto-disabled after failures:** Usertour's access was most likely
revoked in HubSpot (the app uninstalled, or the authorizing user
removed). Click **Connect with HubSpot** again to re-authorize.
* **"HubSpot isn't set up on this server yet" (self-hosted):** the server
is missing `HUBSPOT_CLIENT_ID` / `HUBSPOT_CLIENT_SECRET` — see
[self-hosted setup](#self-hosted-setup).