Overview
Starting from version 0.6.0, self-hosted deployments include a dedicated System Admin area.
Think of it as the place where you manage things that belong to the whole instance, not just a single project. That includes:
- Instance metadata and policies
- Authentication behavior
- Instance-level subscription and licensing
- Global user management
- Global project management
Open System Admin from the account menu in the bottom-left corner of the app.

First-time setup
On a fresh self-hosted deployment, the first person who opens the site will be asked to set up the first admin account.
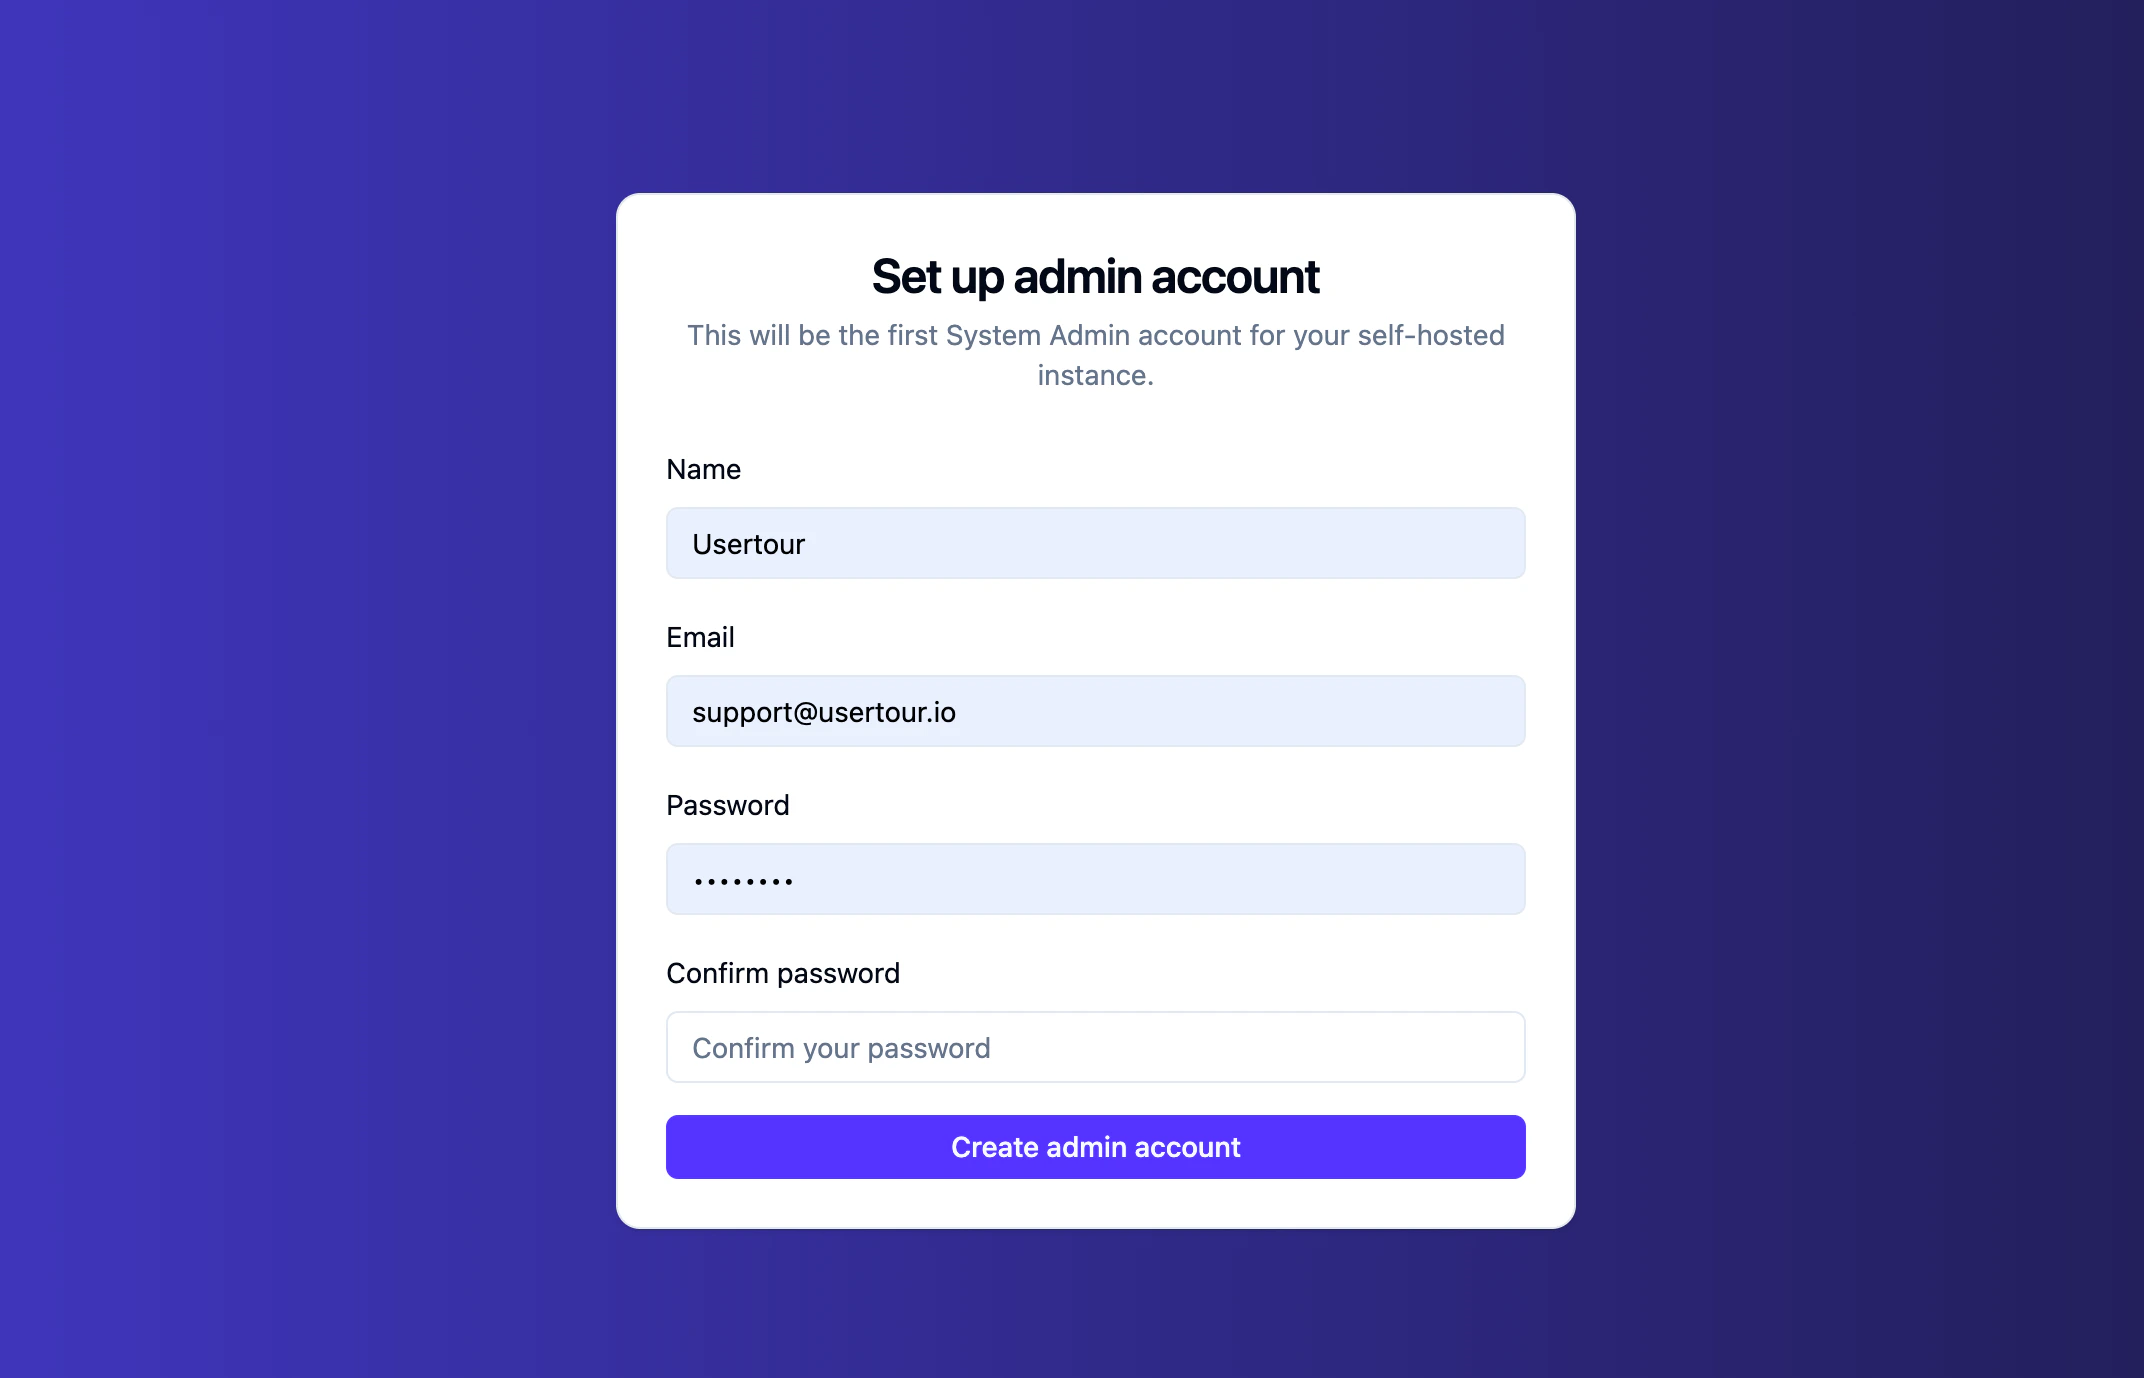 This account becomes the instance’s first System Admin. After setup, you can open System Admin from the account menu to manage:
- instance settings
- authentication policy
- instance subscription
- users
- projects
If you’re upgrading an older self-hosted deployment and you don’t yet have any System Admin, assign that permission manually first. A simple PostgreSQL example looks like this:
UPDATE "User"
SET "isSystemAdmin" = true
WHERE email = 'your-admin@example.com';
For version 0.5.0 and earlier, self-hosted deployments still seed a default bootstrap admin account:
Email: lisa@simpson.com
Password: secret42
Navigation
The current System Admin navigation includes:
- General
- Authentication
- Subscription
- Users
- Projects
The idea is simple:
- General and Authentication are instance-level settings
- Subscription is where instance licensing lives
- Users and Projects are global management pages
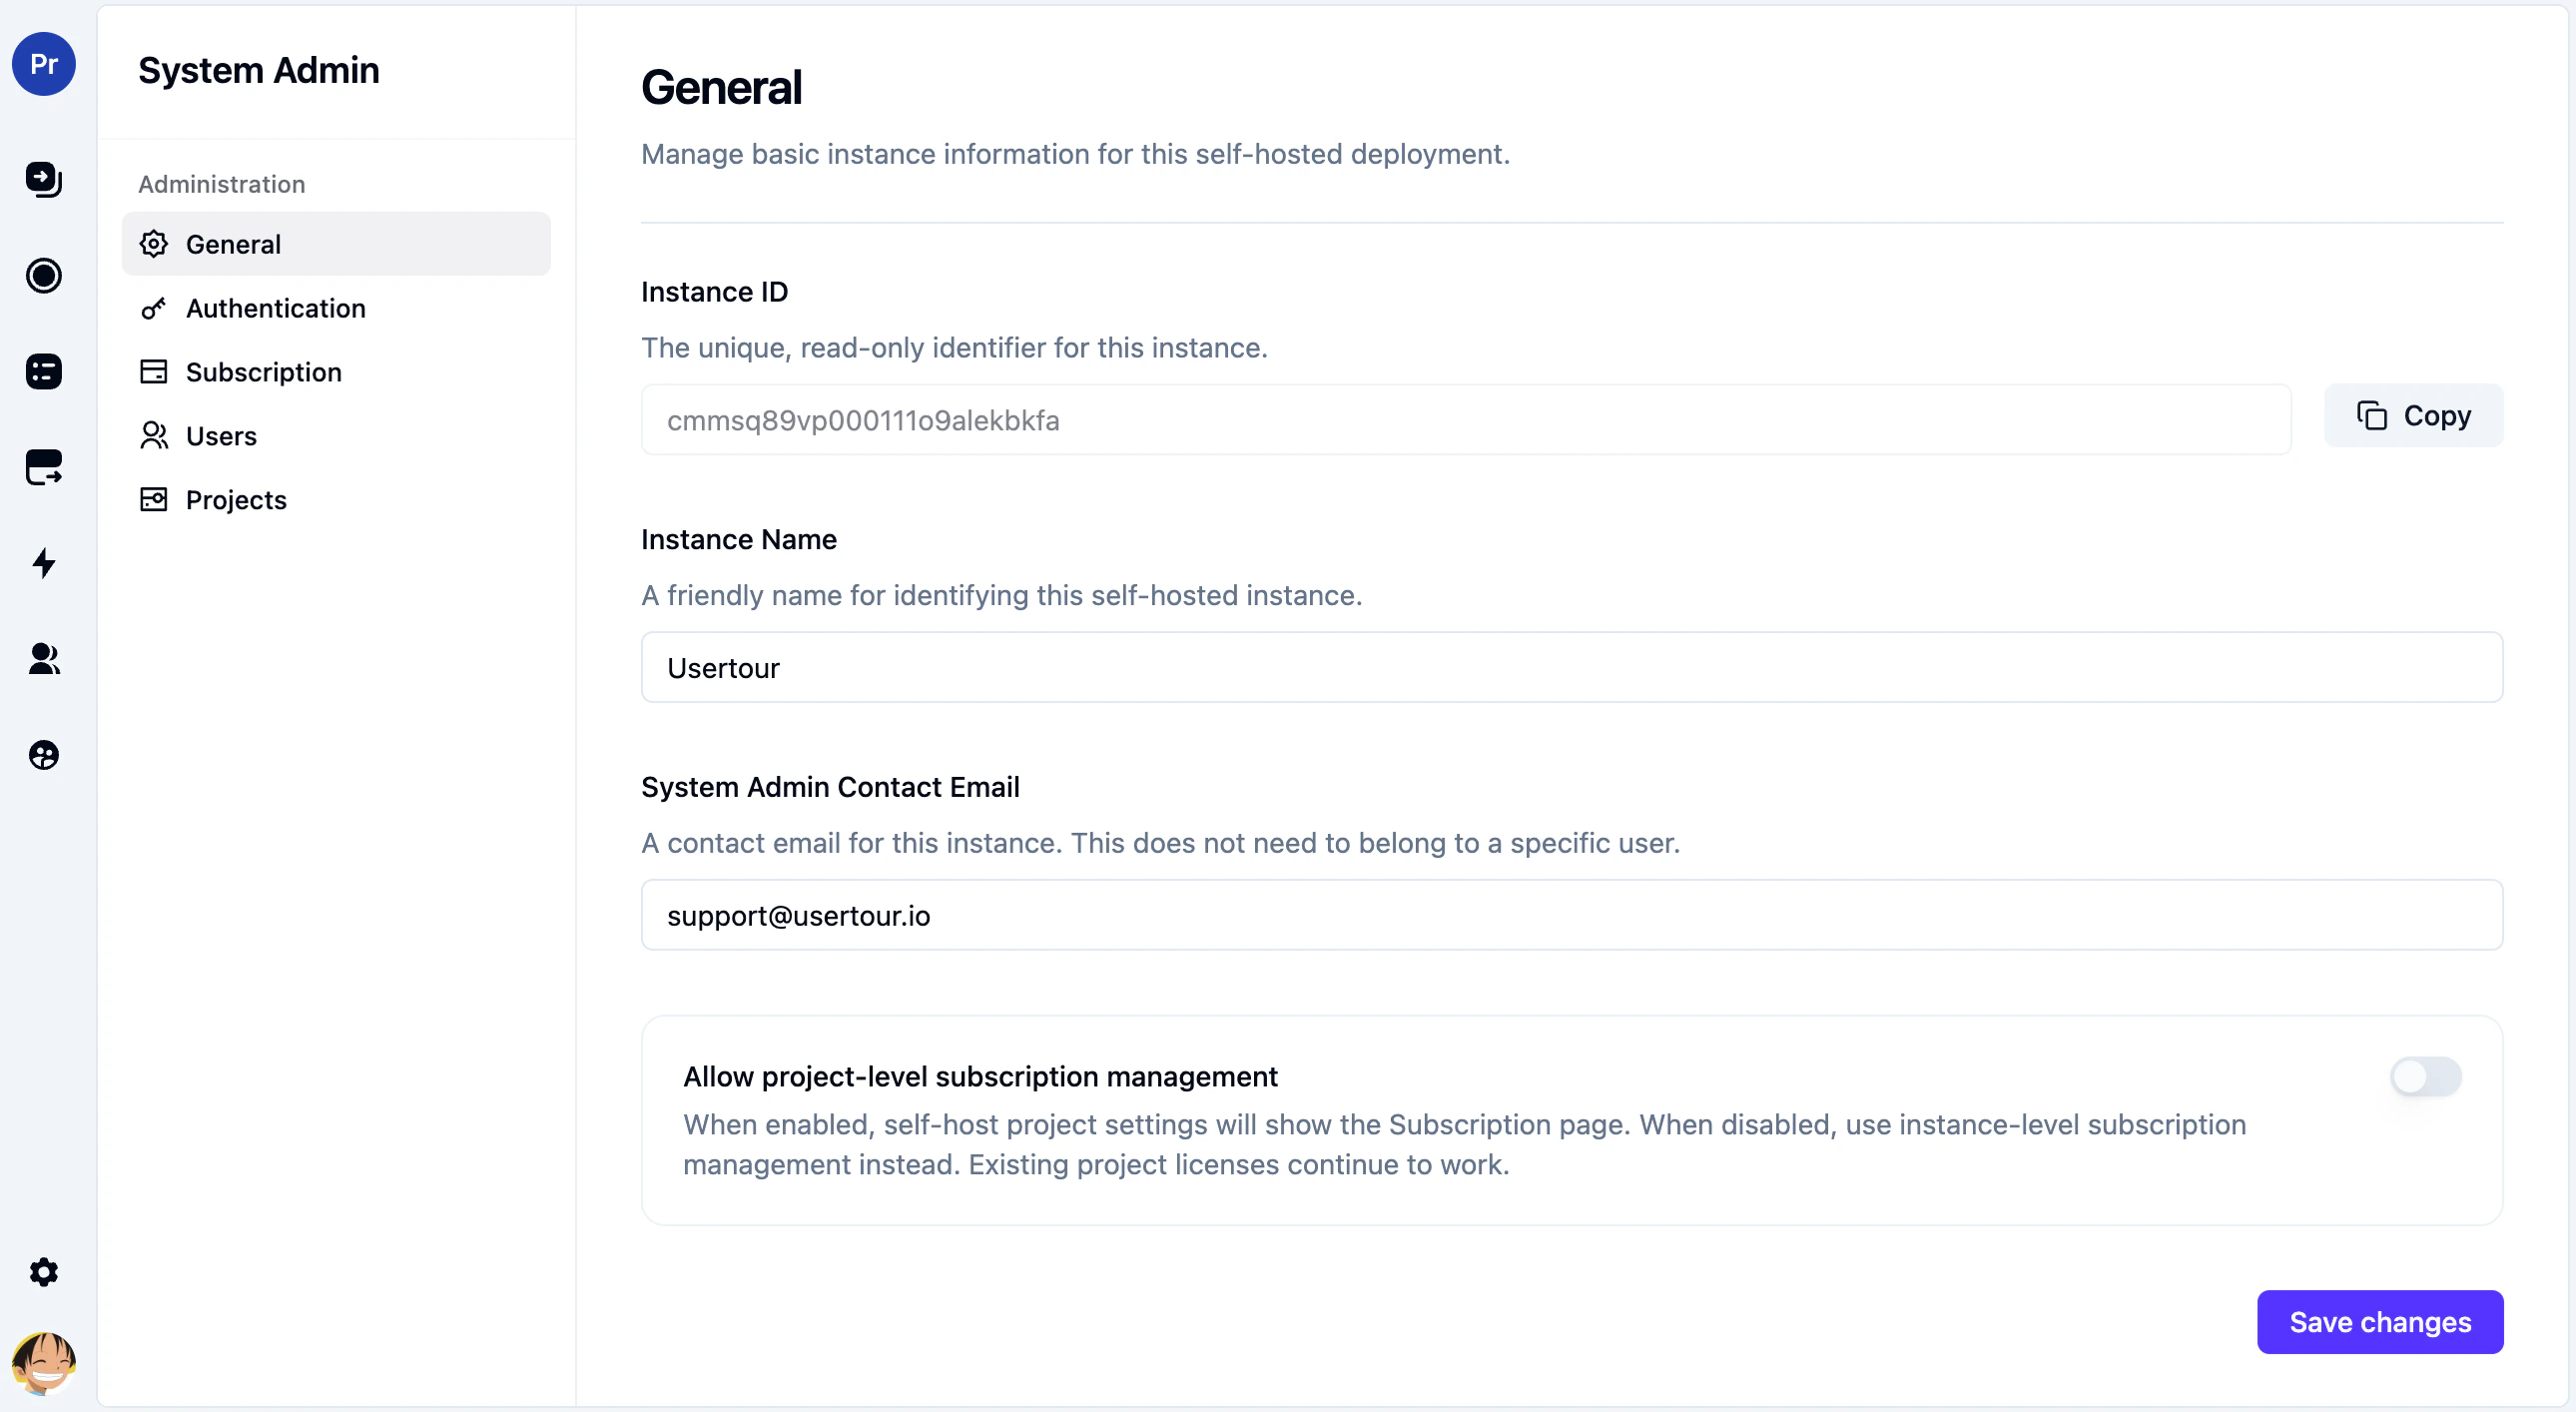
General
The General page is where you manage basic instance information and a few global behaviors.
- Instance ID
Read-only identifier used for instance-scoped licensing
- Instance Name
Friendly name for identifying the deployment
- System Admin Contact Email
Contact email for the instance
- Allow project-level subscription management
Controls whether self-hosted projects show a project-level Subscription entry in project settings
When Allow project-level subscription management is disabled:
- the project settings sidebar no longer shows Subscription
- instance-level subscription becomes the preferred management entry point
- existing project licenses continue to work
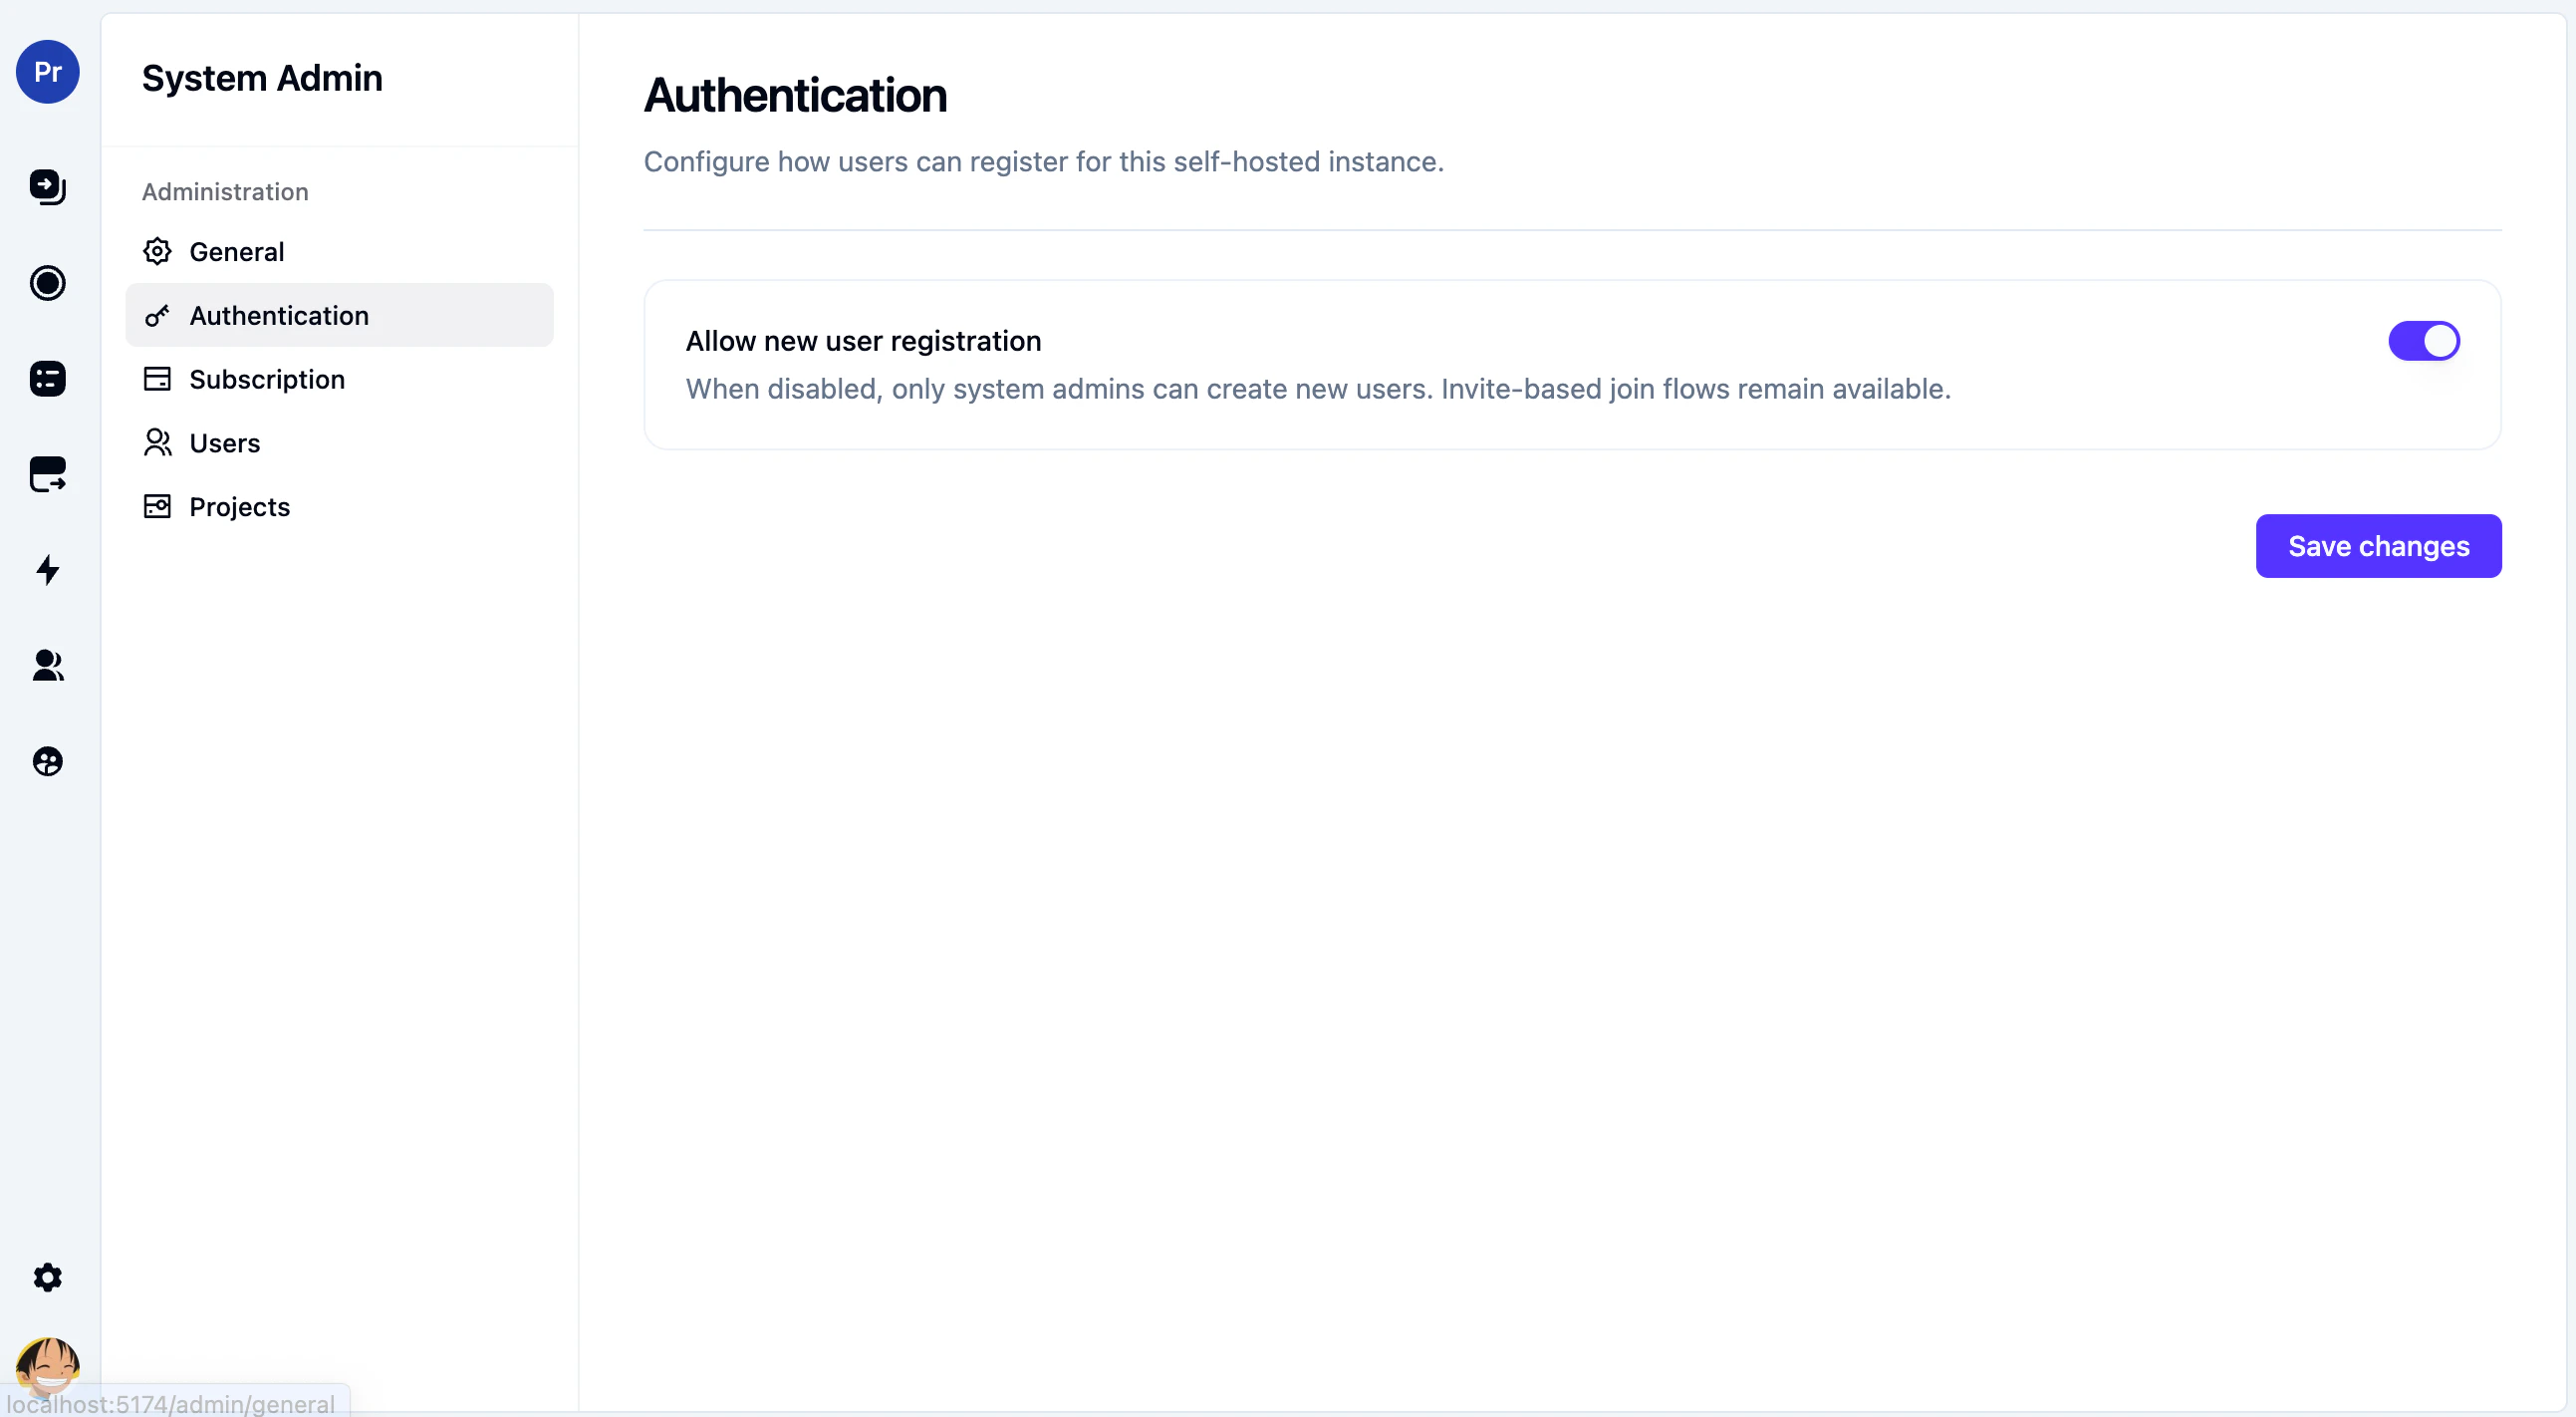
Authentication
The Authentication page is intentionally small right now. It currently exposes one instance-wide policy:
- Allow new user registration
When enabled:
- users can create new accounts from the public signup flow
When disabled:
- public signup is blocked
- system admins can still create users from System Admin > Users
- invite-based join flows continue to work
- existing users can still sign in with enabled auth providers
Two-Factor Authentication
The Authentication page also hosts the instance-wide Two-factor authentication policy. This is where a System Admin can require every user on the instance to set up 2FA with an authenticator app before they can use Usertour.
For the per-user setup flow (scanning a QR code, saving recovery codes, signing in), see the user-facing guide: Two-Factor Authentication.
Require 2FA for all users
Turn on Require 2FA for all users to enforce 2FA across the entire instance.
 When the toggle is on:
- Users who haven’t set up 2FA yet are taken to a setup page the next time they open Usertour, and they can’t use anything else until setup is finished.
- Any active sessions those users have on other devices are signed out, so they’re prompted to set up 2FA right away rather than continuing in an unprotected session.
- On their Settings → Account page, the Disable 2FA option is locked. A tooltip explains that the administrator requires 2FA.
- A System Admin can still turn the policy off later — but only after enabling 2FA on their own account.
Prerequisites
Before you can turn the policy on:
-
You must have 2FA enabled on your own account. Otherwise you’d lock yourself out the moment the policy takes effect. The toggle stays disabled and an inline message links to your account settings.

-
Your instance license must cover two-factor authentication. This is an Enterprise feature on self-hosted plans. If the current license doesn’t include it, the toggle stays disabled and the page shows an upgrade message.

For more on instance licensing and how to upload an instance license, see License Management.
Behavior when the license lapses
Two-factor authentication is a self-hosted Enterprise feature. If the instance license expires or stops covering it, the feature as a whole is paused on the instance — not silently switched off, but not actively enforced either:
- The Require 2FA for all users toggle stays in its current position, with an inline notice telling the admin that the policy is not currently being applied.
- Users who haven’t set up 2FA yet are not forced to do so.
- Users who already set up 2FA sign in with just their password while the license is unlicensed. Their stored authenticator secret and unused recovery codes are preserved in the database untouched.
- Once a valid license is in place again, everything snaps back: enrolled users are asked for their authenticator code at the next sign-in, the policy starts forcing un-enrolled users through setup again, and the Account page lets users manage 2FA again.
We treat 2FA as license-gated end-to-end rather than splitting “new enrollment” from “existing enrollment”. A self-hosted instance that no longer pays for the feature simply doesn’t have it; renewing the license restores it without anyone losing their setup.
SaaS vs. self-hosted
The instance-wide Require 2FA for all users toggle exists only in self-hosted deployments. On Usertour Cloud (SaaS), each user manages 2FA on their own account from Settings → Account; there is no instance-wide enforcement.
Emergency 2FA reset
By design, Usertour does not offer an admin button for resetting another user’s 2FA — handing one person the ability to silently drop someone else’s second factor would defeat the point of having it. The escape hatch is database-level: if a user has lost both their authenticator app and their recovery codes, a System Admin can reset 2FA directly in PostgreSQL.
-- Replace 'lost-access@example.com' with the actual user's email.
WITH target AS (
  SELECT id FROM "User" WHERE email = 'lost-access@example.com'
)
UPDATE "User"
SET "twoFactorEnabled" = false,
    "twoFactorSecret" = NULL,
    "twoFactorEnabledAt" = NULL
WHERE id IN (SELECT id FROM target);

DELETE FROM "TwoFactorRecoveryCode"
WHERE "userId" IN (SELECT id FROM target);
Only use this path when there is no other way back in. Confirm the user’s identity through a side channel (a video call, a known internal account, etc.) before resetting their second factor.
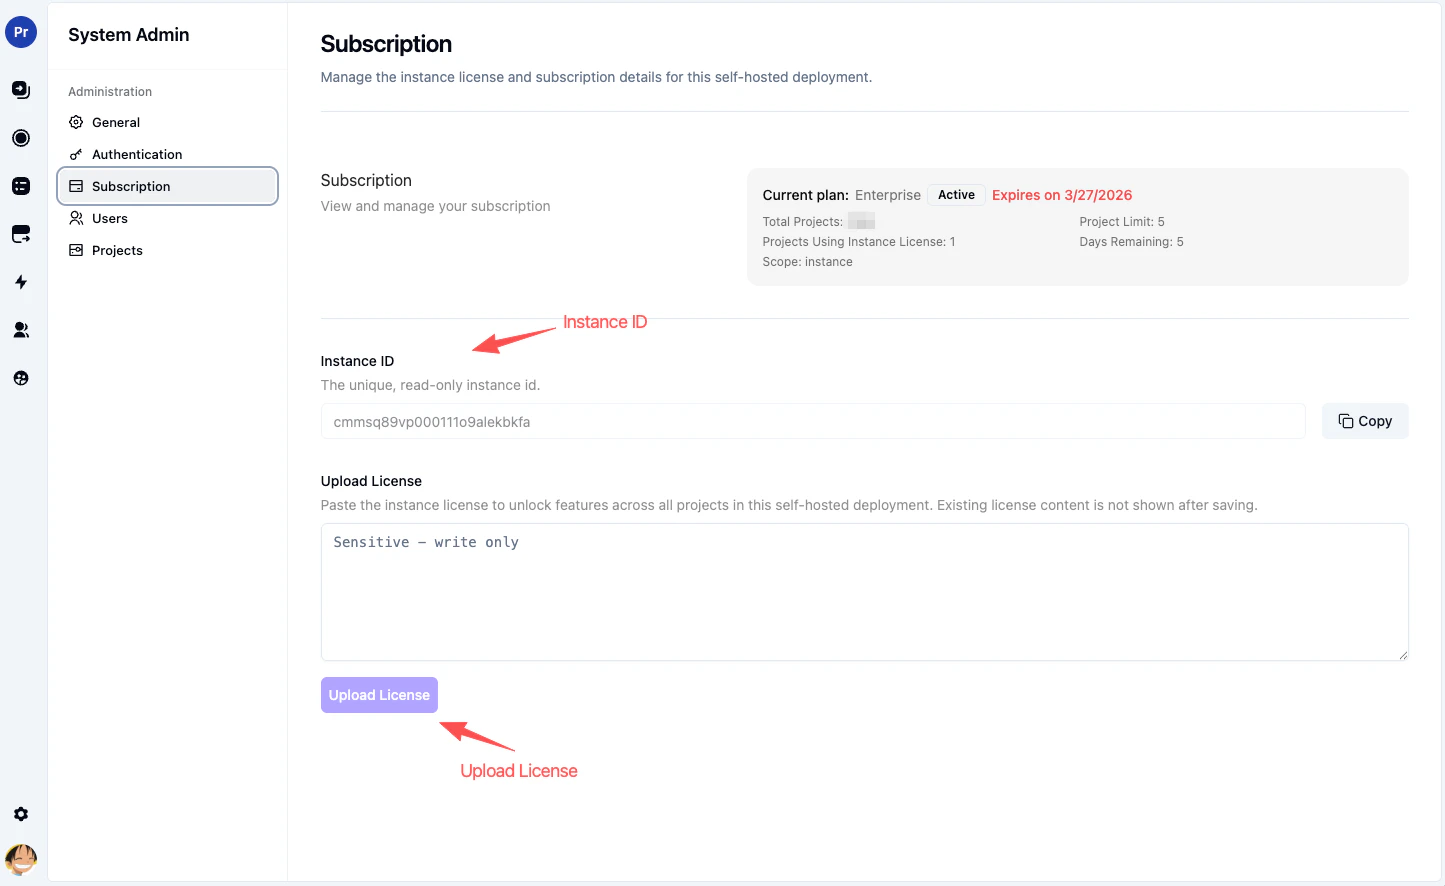
Subscription
The Subscription page is the main place to manage instance-level licensing in self-hosted mode.
From here you can:
- review the current instance plan
- copy the Instance ID
- paste an instance license
- review project usage against the current instance license
For most self-hosted setups, this is the licensing page you’ll use most often.
The current System Admin subscription flow uses a write-only license field. Paste the instance
license, submit it, and the stored license text will not be shown again afterward.
 For a full explanation of instance-level vs. project-level licensing, see License Management.
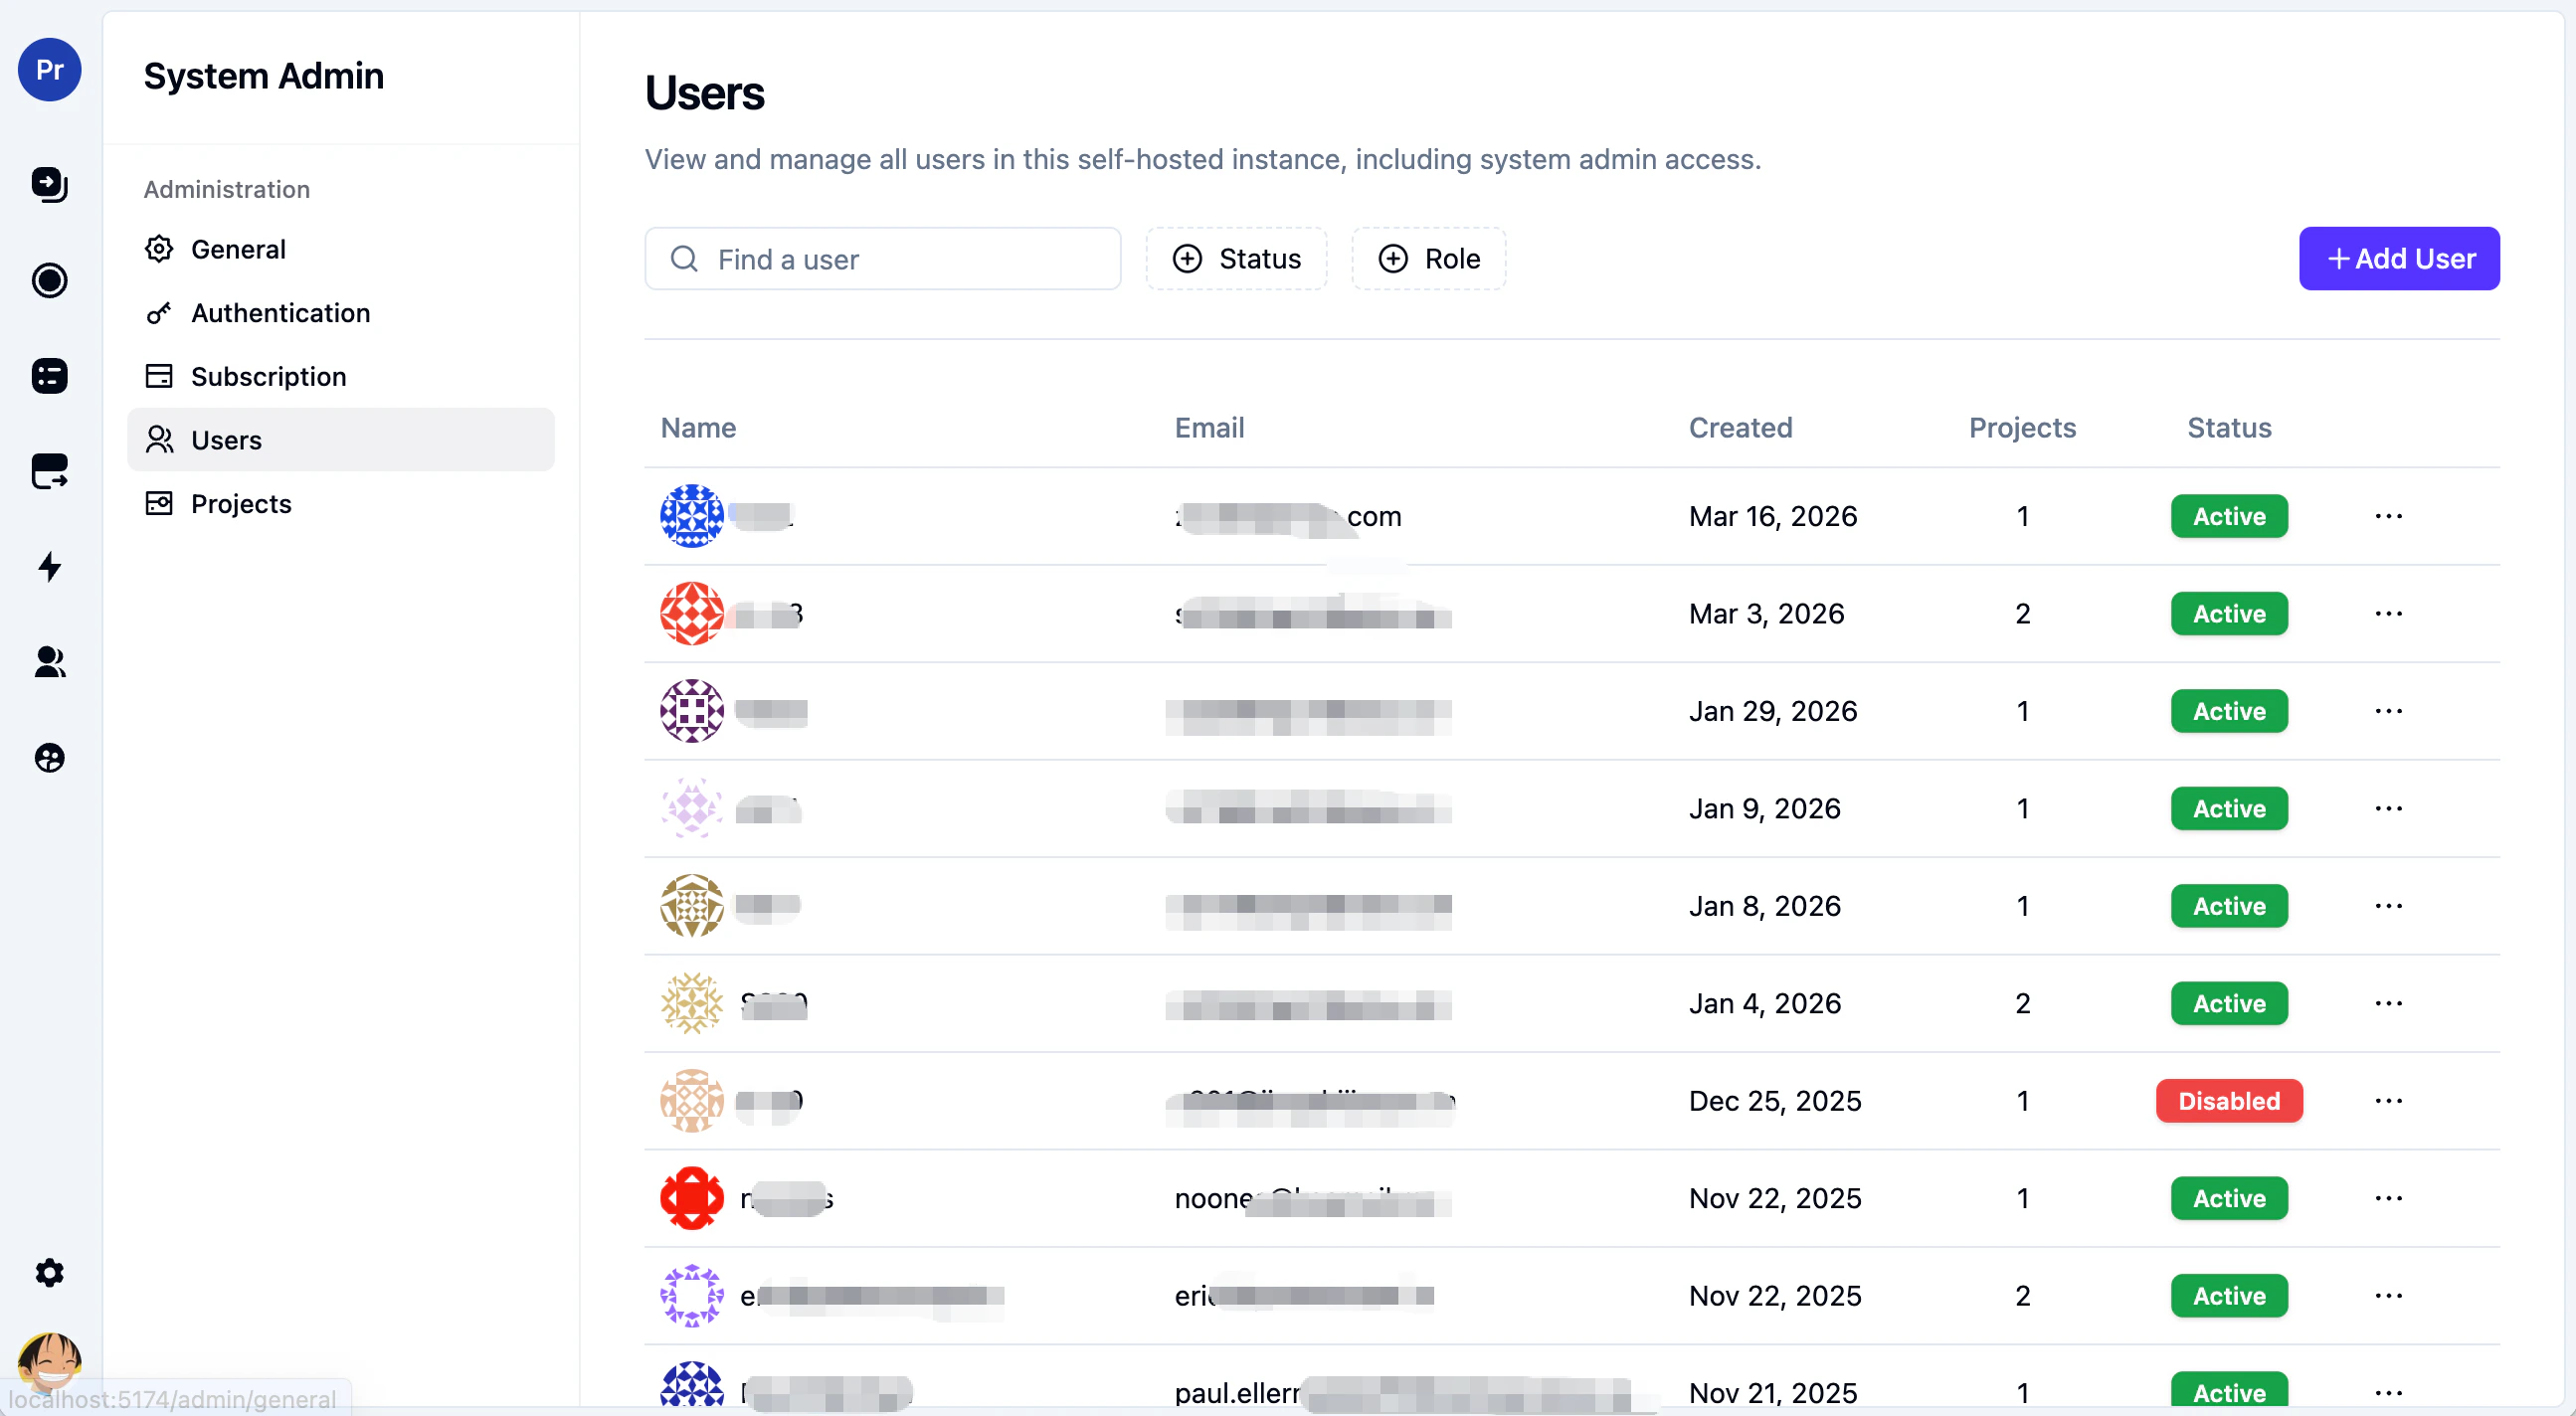
Users
The Users page gives you instance-wide user management.
This is where you can:
- search users by name or email
- add users directly with a password
- disable or re-enable users
- grant or remove System Admin access
When public registration is disabled, this page becomes the main entry point for creating users.
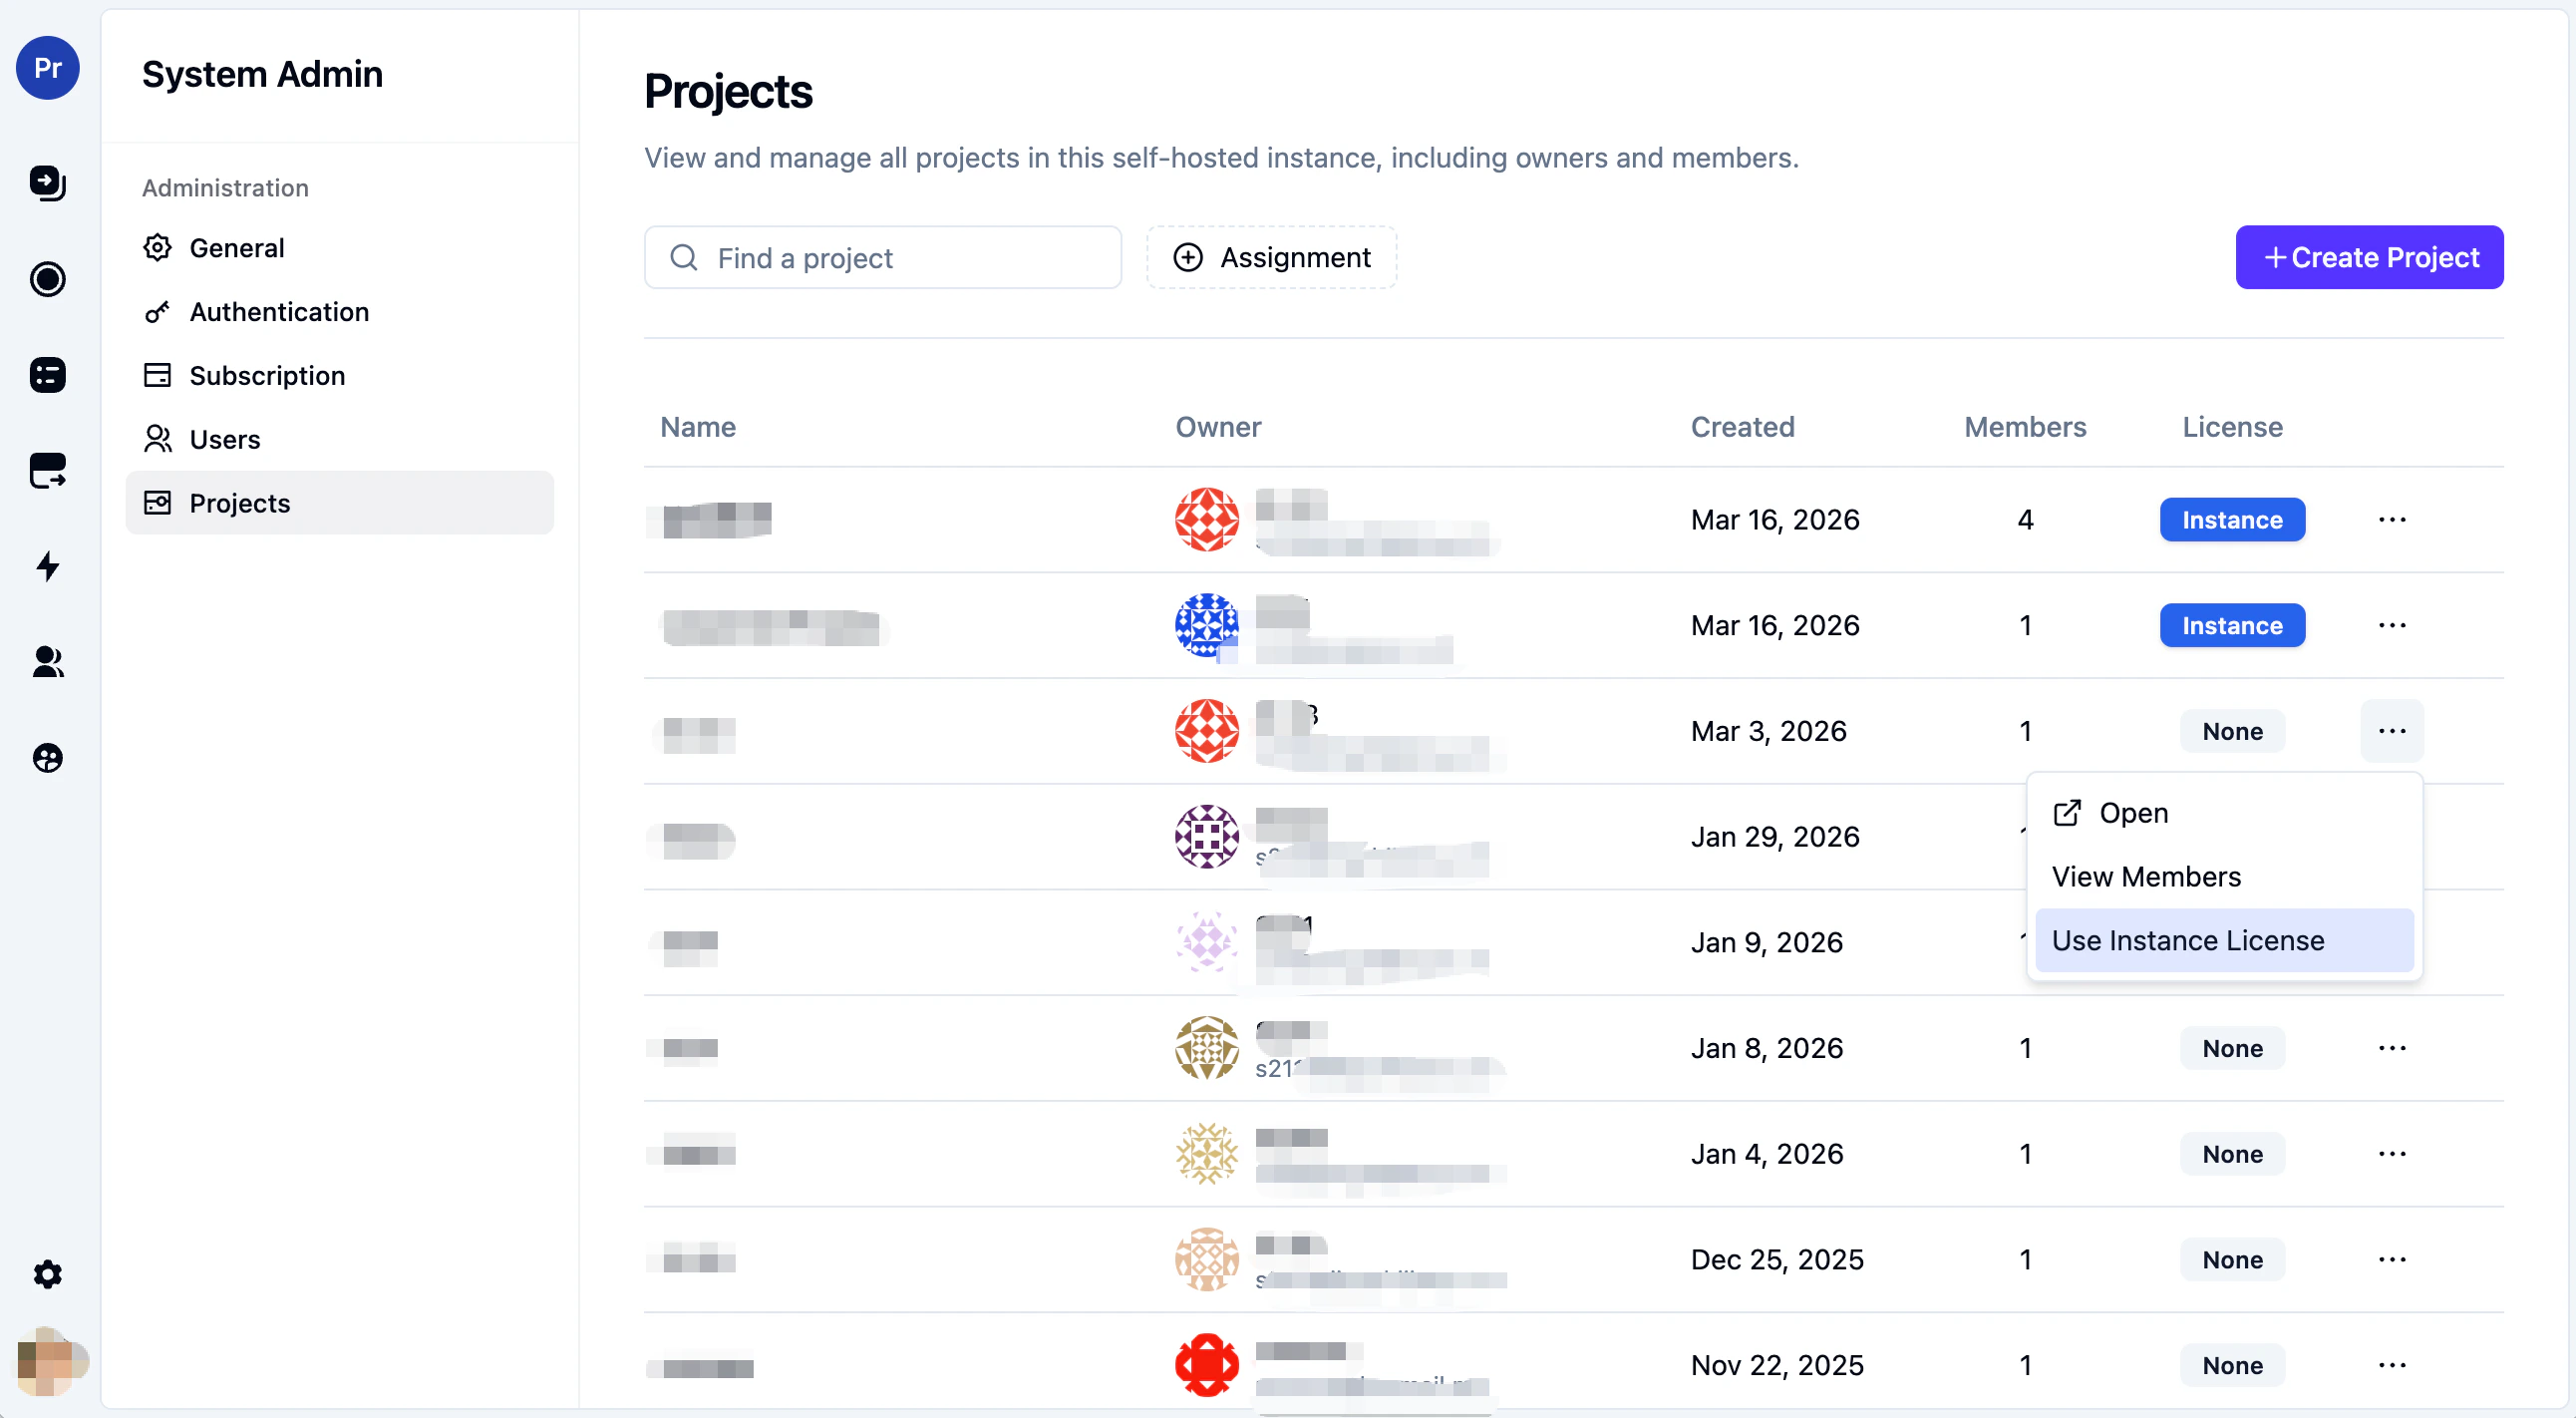
Projects
The Projects page gives you a top-level view of every project in the instance.
From here you can:
- search projects by name
- create a new project
- inspect project owners and member counts
- open project member management
- add or remove members
- control whether a project uses the instance license when applicable
If your instance license has a limited project allowance, this page is also where you decide which projects should use it. If the instance license is unlimited, projects can inherit it automatically.
Project-level vs. instance-level subscription
Self-hosted Usertour supports both:
- project-level subscription
- instance-level subscription
In practice, most teams will want to use instance-level subscription as the default and only use project-level subscription when a specific project needs separate handling. The Allow project-level subscription management setting helps reduce duplicate entry points in the UI without taking away support for project licenses.
Next steps
After configuring System Admin, you may also want to review: