

- Translations belong to a content version. They are edited alongside the draft and go live through the normal publish flow — nothing changes for end users until you publish.
- Language selection is driven by one attribute:
locale_code. You tell Usertour which language each user should see. Usertour never guesses from the browser. - Untranslated text falls back to the source. A half-finished translation never breaks content: any text you haven’t translated is shown in the language the content was authored in.
How language selection works
When content is delivered to a user, Usertour picks the language like this:- Read the user’s
locale_codeattribute (set viausertour.identify()— see Setting the user’s language). - Find an enabled translation whose code matches exactly (
zh-CNmatcheszh-CN). - If there is no exact match, fall back to the primary language: a user with
fr-CAgets a translation codedfr. - If nothing matches — or the user has no
locale_codeat all — the user sees the content in its source language.
Usertour deliberately does not detect the browser language. The correct
language for your product is the one your app is rendered in, and only your
app knows that. If your app is already internationalized, passing its active
language as
locale_code is a one-line change and is always right — a
separate guess by Usertour could disagree with what the user sees around it.Set up your languages
Languages are defined once per project, then every content shares the list.- Go to Settings → Localization.
- Click New localization.
- Pick a locale from the list — the Name and Code fields fill in automatically and stay editable.
- Click Create localization.
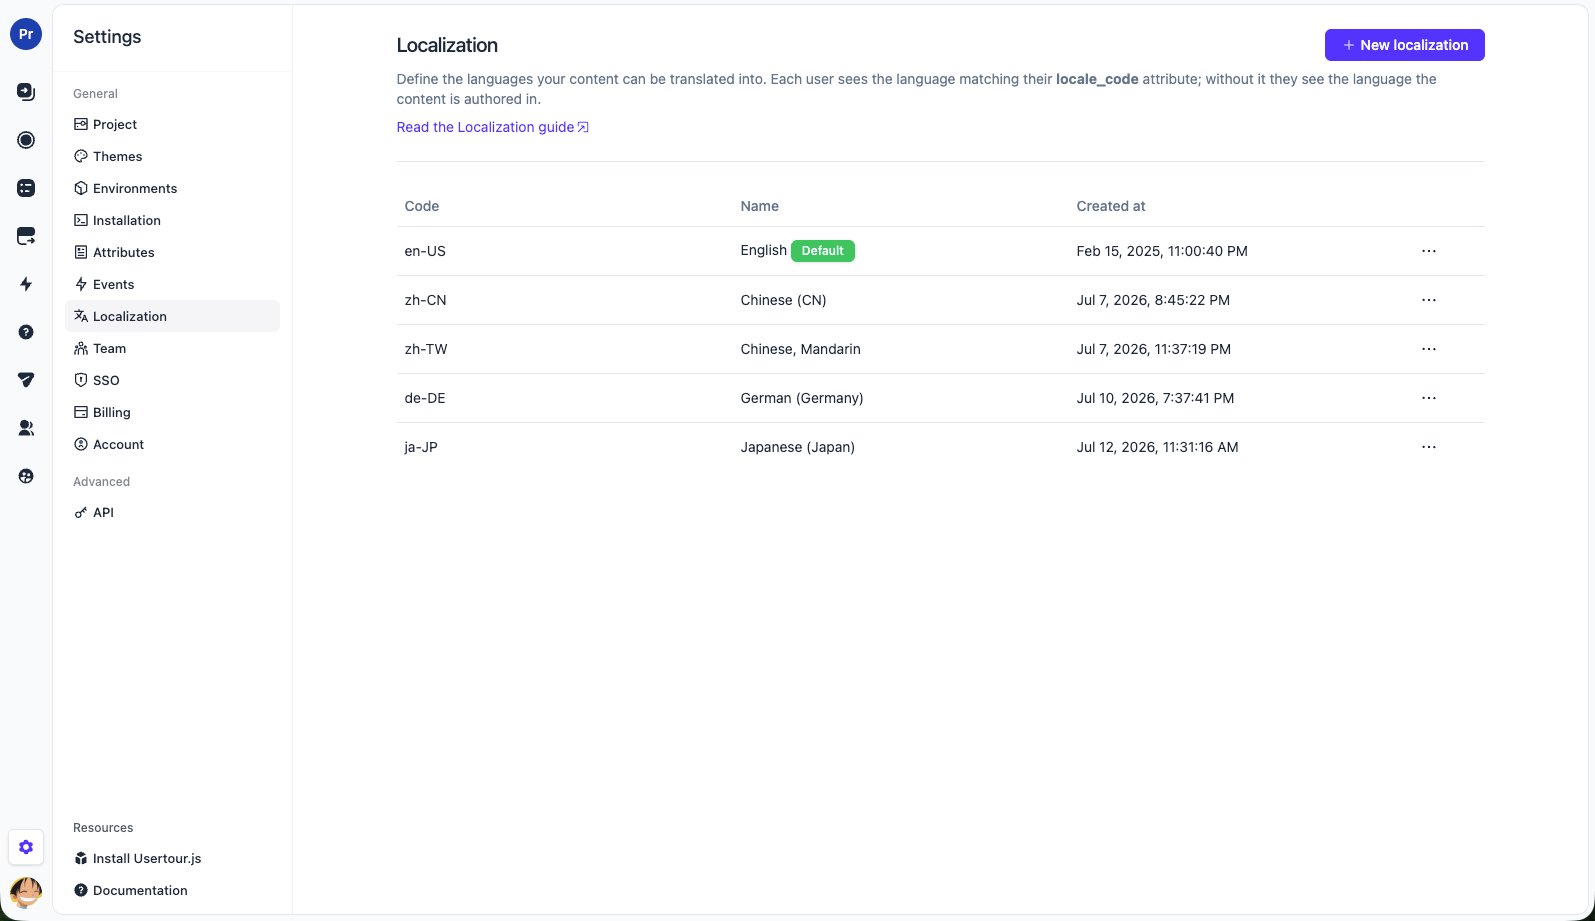
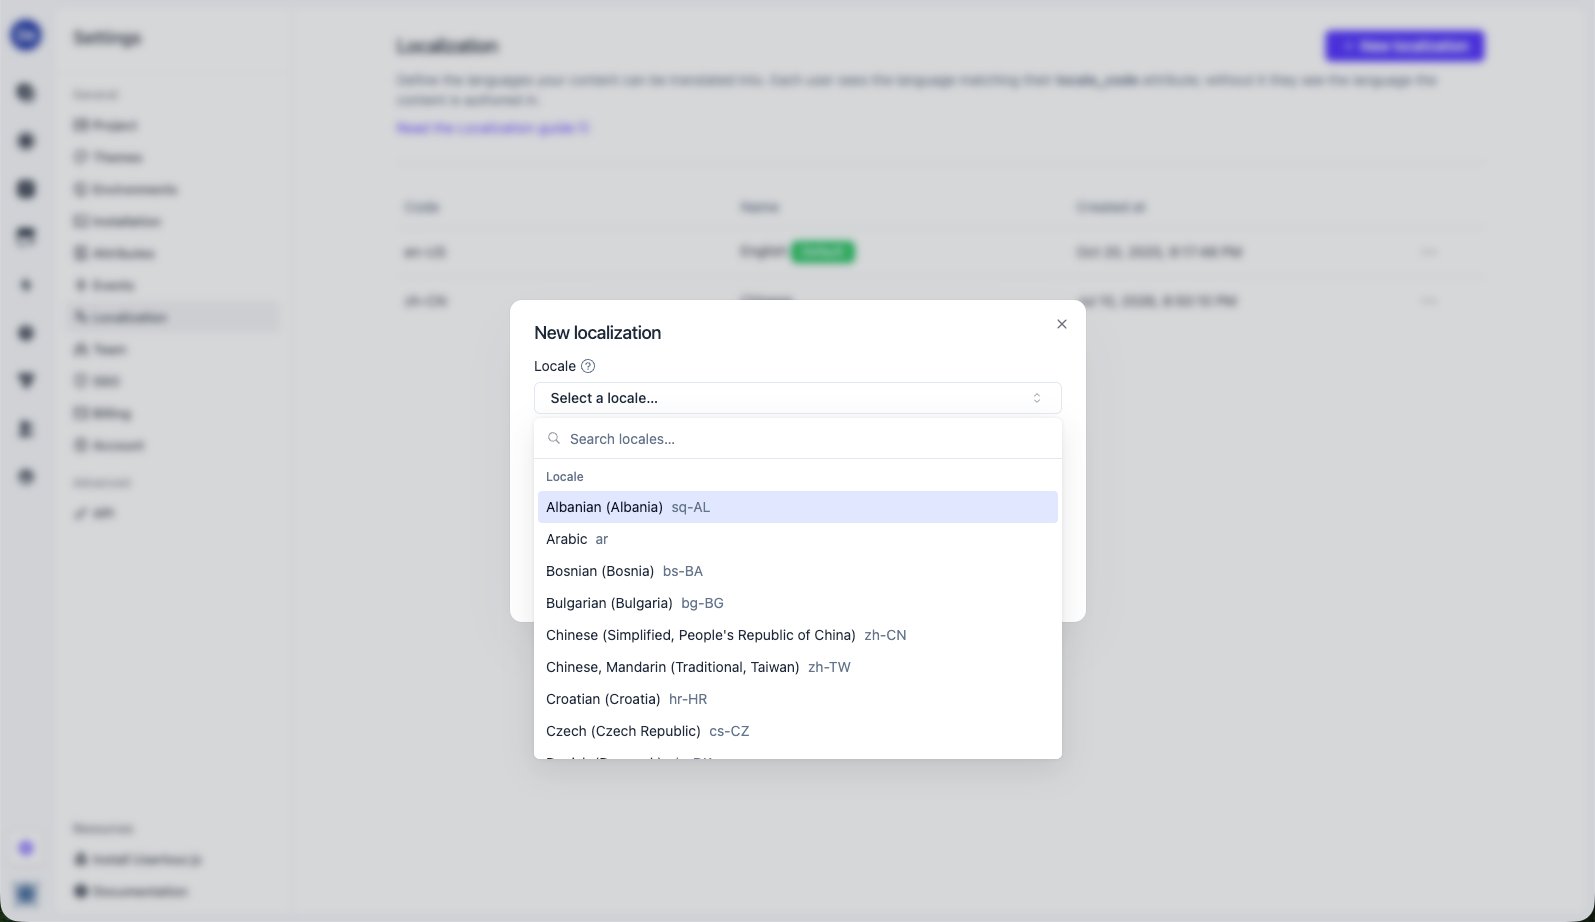
- Code is what gets matched against each user’s
locale_codeattribute, using the rules above. Letters, digits,-and_; unique within the project, and case doesn’t distinguish two codes (frandFRwould be the same language to a user, so they can’t both exist). It’s usually the locale tag, but it doesn’t have to be:fr-enterprisealongsidefrgives one language two variants, each with its own translations, selected by thelocale_codeyou set on the user. - Name is the language this localization stands for. End users never see it, but AI translate does — it’s the language the model is asked to translate into, so “French (France)” works better than a shorthand.
The default localization
The localization marked Default represents the language your content is authored in. It is not a translation target — there is nothing to translate into it — and users who don’t match any translation get this language. Use the ⋯ → Set as project default menu to change it.Deleting a localization
Deleting a localization (⋯ → Delete) takes that language out of service everywhere at once: it disappears from every content’s Localization tab, and users who were getting it see the source language instead. The default localization can’t be deleted. The translations themselves are kept. To bring a deleted language back — with every translation it had, each with its enabled state — add a localization with the same code again, or restore it through the API or MCP. To stop delivering a single content’s translation without removing the language, turn off its Status switch instead.Translate your content
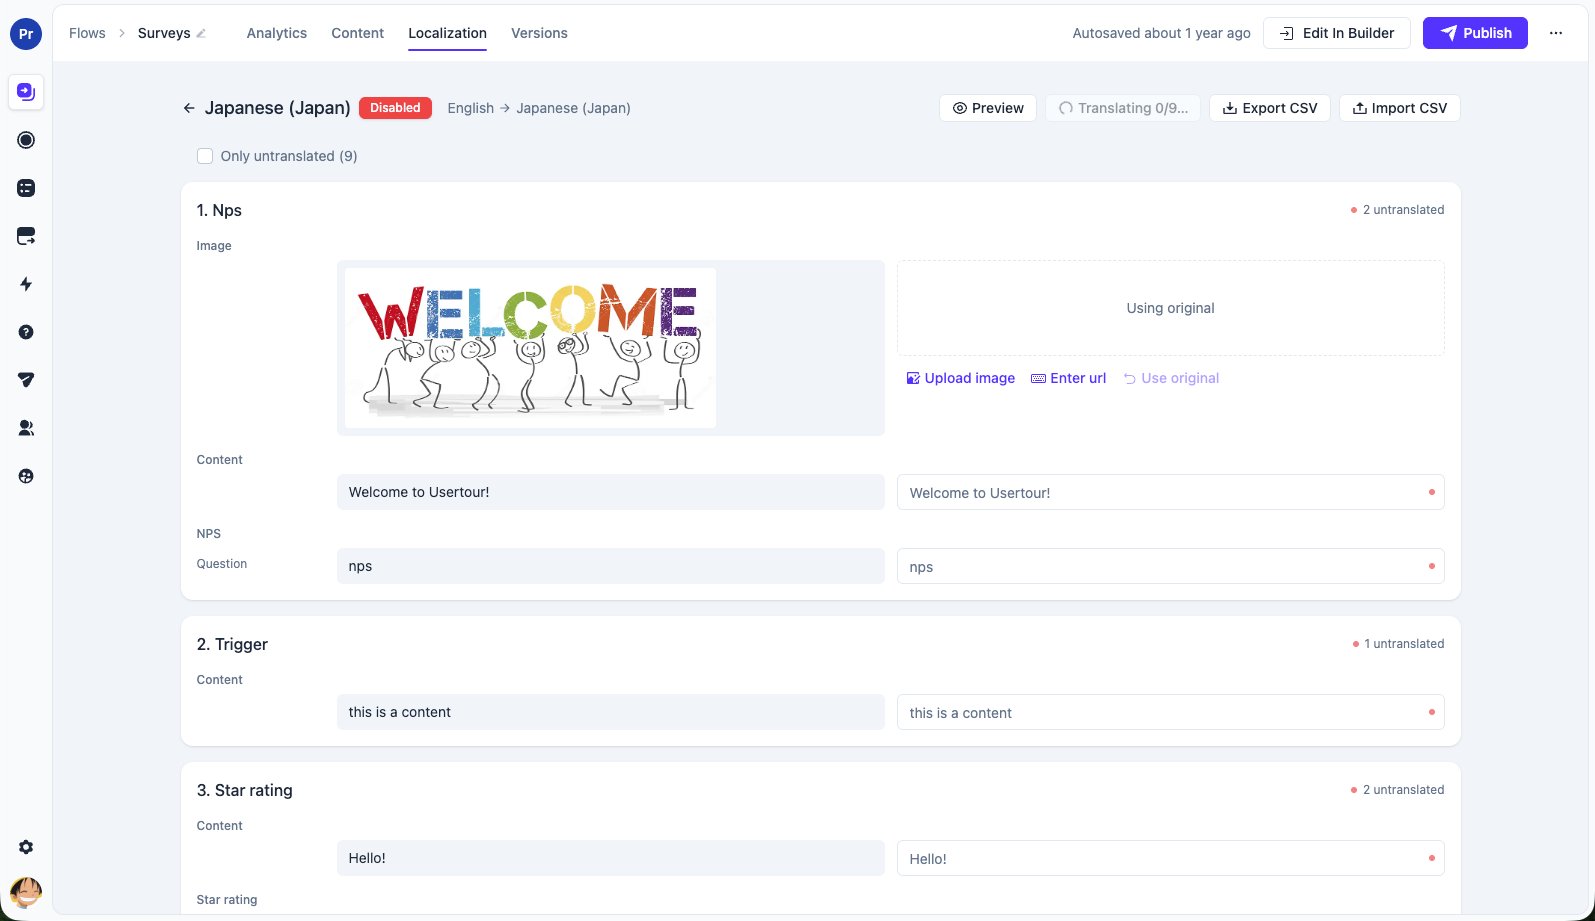
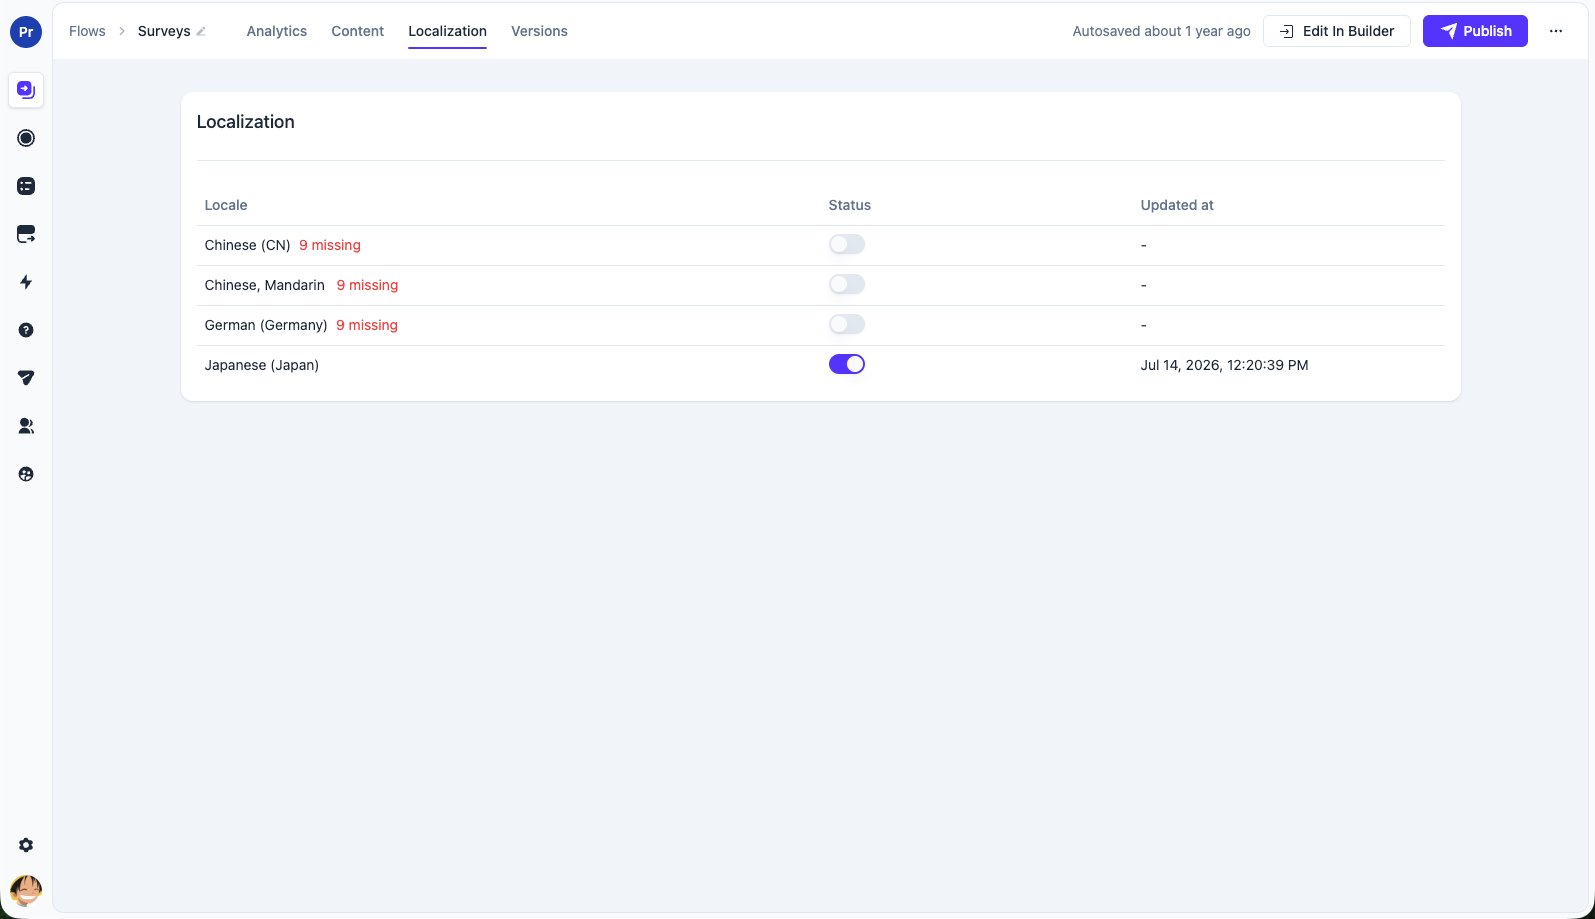
Open any flow, checklist, banner or other content and switch to the Localization tab. You’ll see one row per language with how much is still missing, an enable switch, and when it was last updated.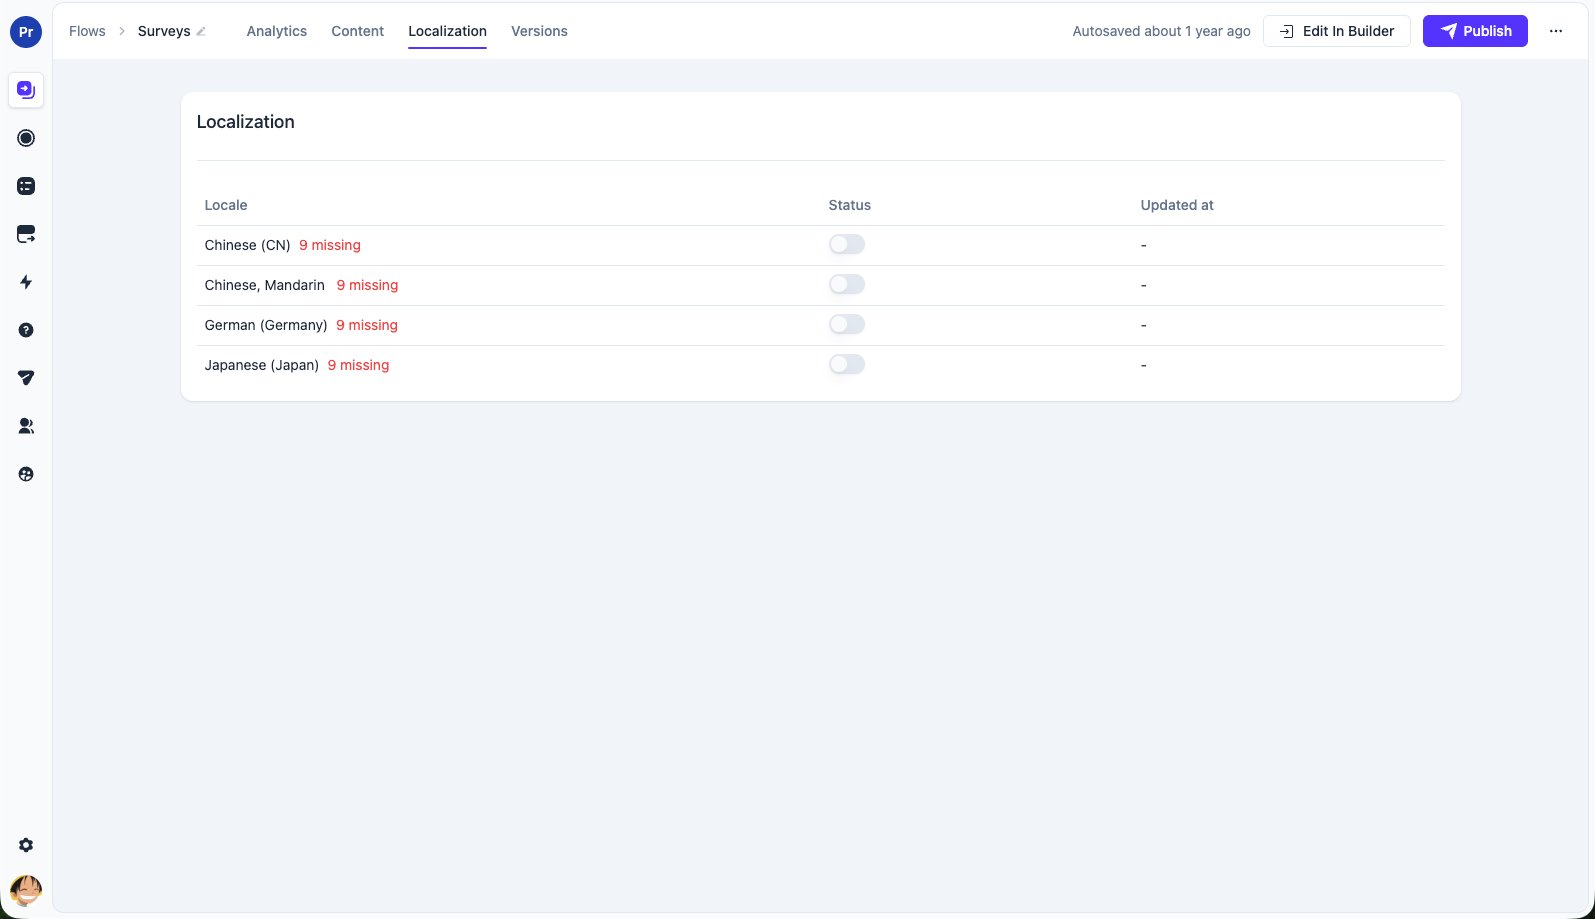
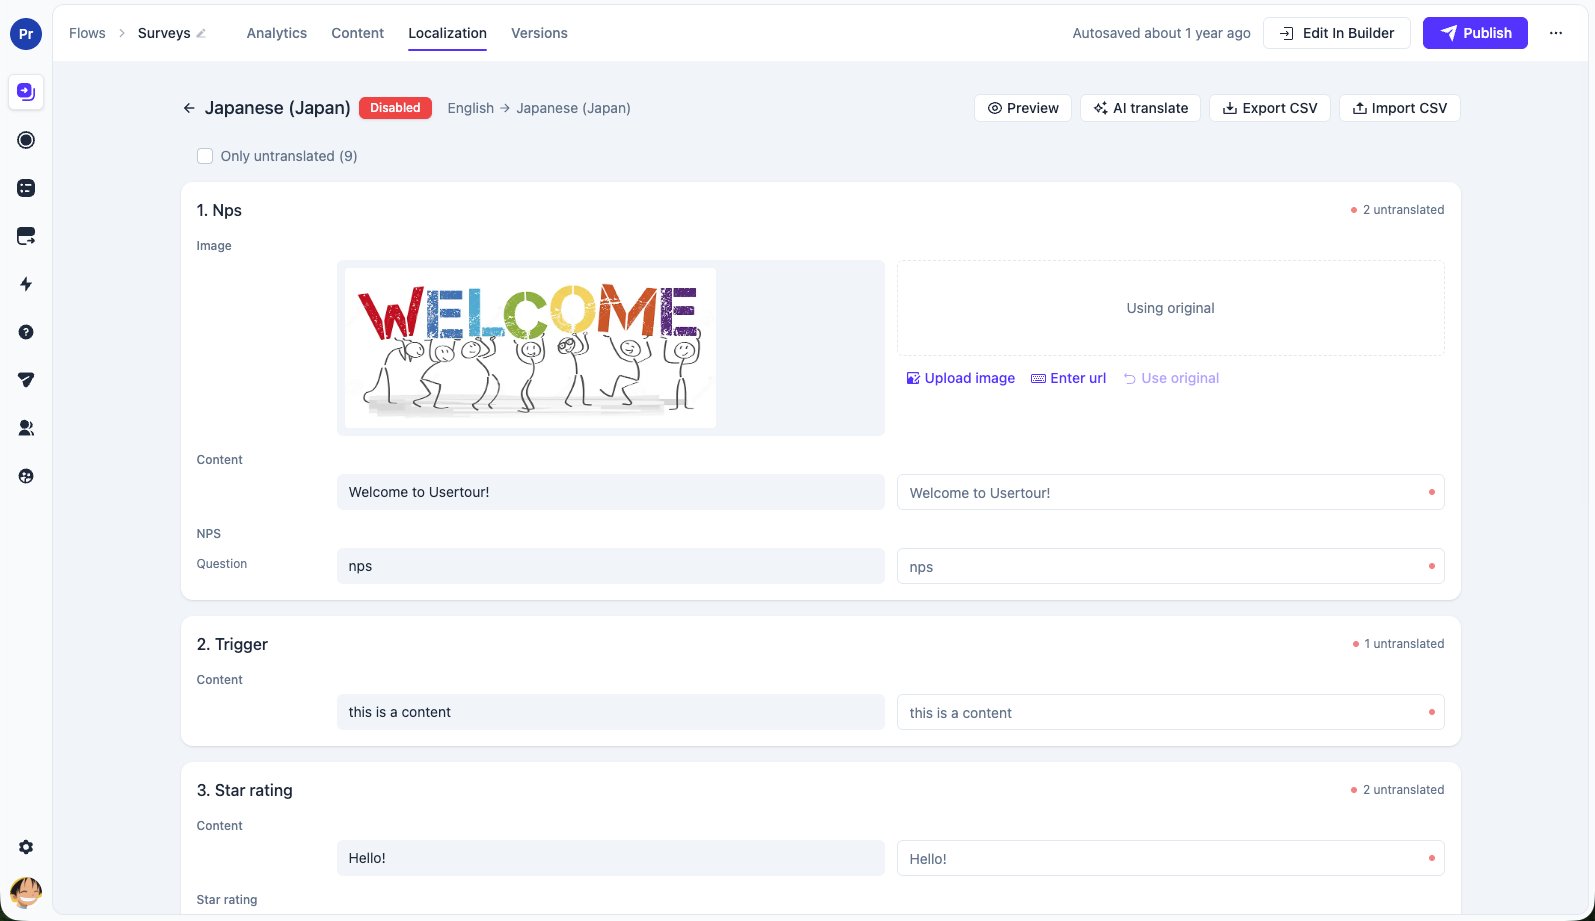
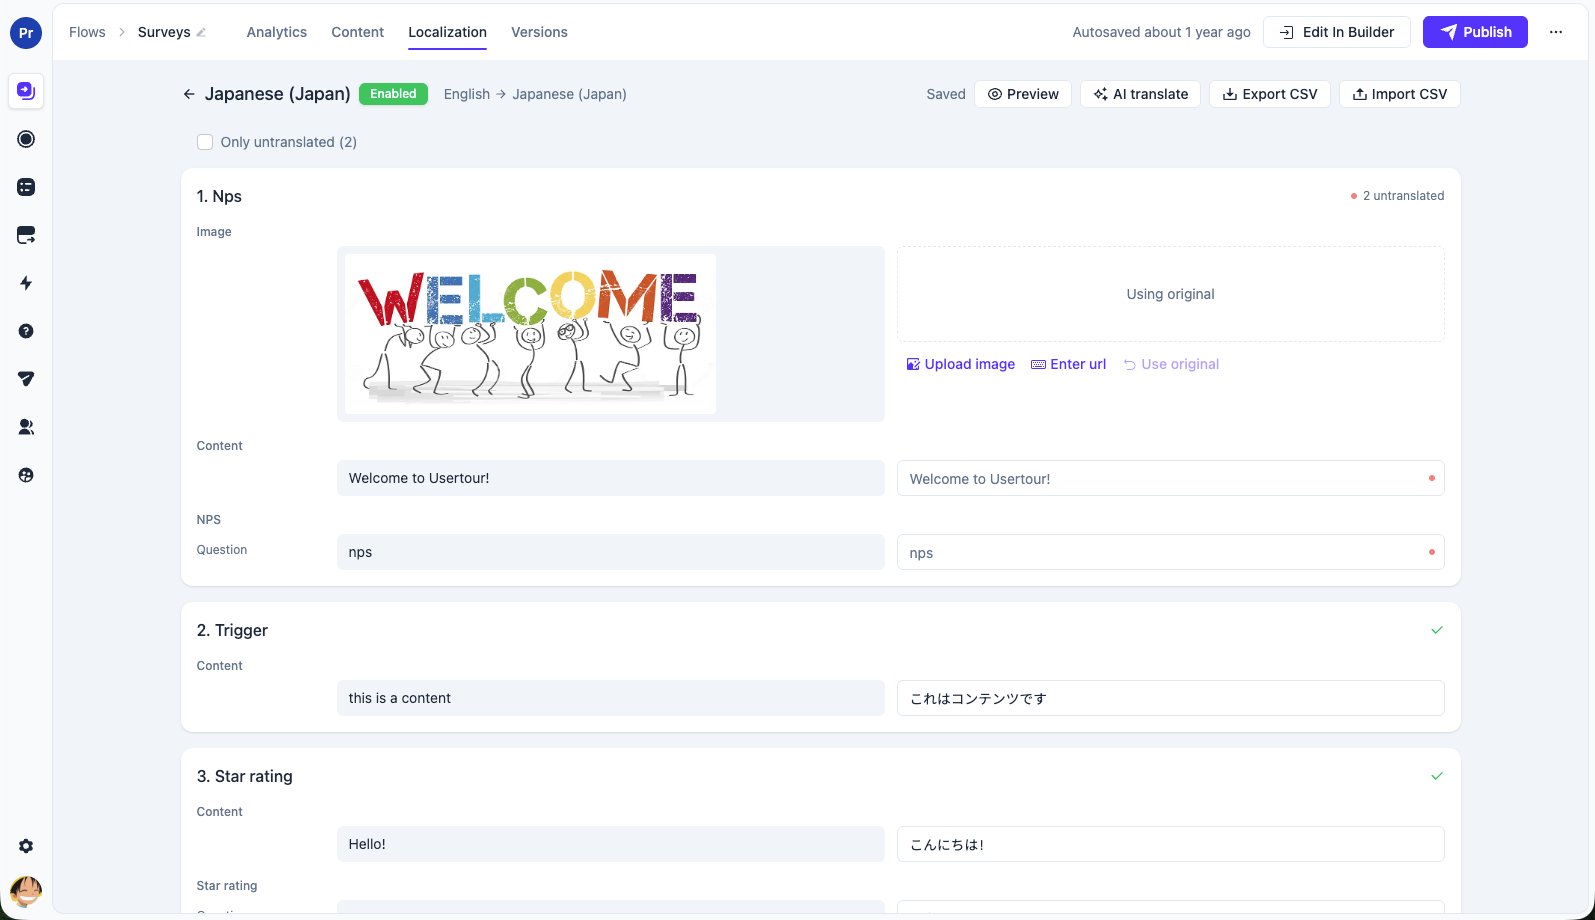
- A red dot marks rows that are still untranslated. Check Only untranslated to hide everything you’ve already done.
- A yellow dot marks rows whose source text changed after you translated them — see Keeping translations up to date.
- Each card’s header counts what’s left in it; a green check means the card is done.
- Everything autosaves as you type — the Saving/Saved indicator sits next to the header actions.
- Leaving a translation blank means “fall back to the source language” for that text.
Rich text keeps its formatting automatically. A sentence with a bold phrase
in the middle appears as separate rows (before / bold part / after) so the
translation slots back into the same formatting. Translate the fragments so
they read correctly when joined.
AI translate
If machine translation is available on your instance, the editor offers it at two levels:- The AI translate button in the header translates everything that’s still untranslated, in batches, with a progress indicator. If it stops early (for example, a provider hiccup), click it again — it continues from what’s still missing.
- Hovering a single row shows a magic-wand button that translates just that text.
On Usertour Cloud, machine translation is included with every paid plan. On
self-hosted instances you bring your own AI provider — see
Machine translation on self-hosted.
Export and import CSV
For external translators or a translation agency, use the Export CSV / Import CSV buttons in the editor header. The file has three columns —path, source, translation:
- Fill in the
translationcolumn and leavepathandsourceuntouched — rows are matched bypath, and paths are internal identifiers, not meant to be edited. - A blank translation keeps whatever is currently in the editor; it never clears an existing translation.
- Rows that don’t match the current content are skipped silently, so importing a slightly stale file is safe.
Translate via the API or MCP
The same rows are available to programs and AI agents as JSON — no file involved. Through the v2 API:path and source as the CSV, the current translation, plus kind (text to translate; destination for where a link or button navigates — any path your app can route, a relative one included; media for an image or embed URL, which must be absolute), optional (true for the two URL kinds) and outdated (the source text changed after the row was translated). Over MCP the same three calls are the list_localizations, get_version_localization and update_version_localization tools, so you can simply ask your agent to “translate this flow into French”.
It behaves like the CSV import, with three differences worth knowing:
- Unknown paths are rejected, not skipped. A path that isn’t part of the version fails the whole request and names the offender — read the rows again if the content changed. A blank translation still keeps the existing one.
- Only a draft can be written. A version that is (or ever was) published is read-only: create a new version first — it carries every translation with it — then write to that one. Reading works on any version.
- Send a language in one request. Saving re-bases the outdated tracking for the whole language on the current source text, so include every row you’re fixing in a single write.
Writes merge row by row: the paths you send are saved, every other row keeps what it has. The editor saves the same way, so an API write and someone translating the same language in the dashboard no longer overwrite each other’s rows — only the same row, written twice, ends with the later value.
POST, PATCH and DELETE on /v2/projects/{projectId}/localizations (MCP: create_localization, update_localization, delete_localization, restore_localization), so an agent asked to translate into a language the project doesn’t have yet can add it first. GET /v2/locales returns the same catalog the dashboard’s picker offers — a locale tag with the language name to file it under — so a language added by a program lands under the same name a person would have picked, which is also the name AI translate is given (over MCP the catalog is in get_authoring_guide, section localization). The catalog is a suggestion, not a fixed list: any well-formed tag is accepted. These use the localization:* scopes, while reading and writing a translation uses the content scopes — see Scopes. Changing the default localization stays in the dashboard.
Preview
The Preview button in the editor header renders the content with your working translations applied — no publish needed.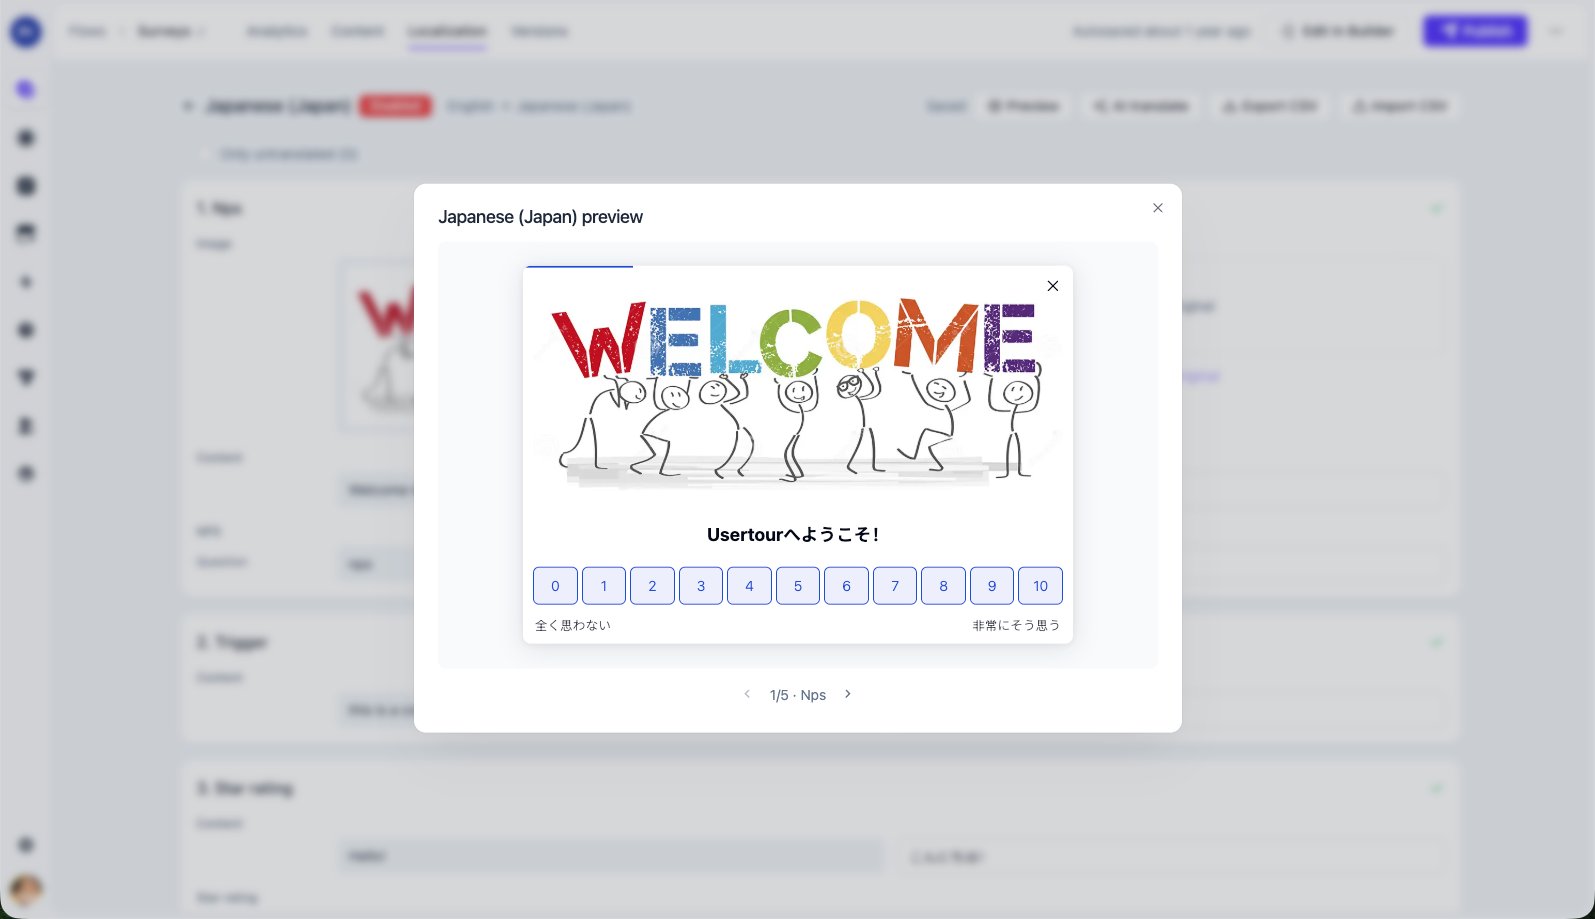
locale_code on your test user and open the draft as usual.
Enable and publish
Two switches control what ships:- Enable the language — the Status switch on the Localization tab. A disabled translation is never delivered, no matter how complete it is. This lets you translate incrementally and flip the switch when you’re happy.
- Publish the version — translations are part of the content version, so they go live exactly when the version does. If the content is already published, toggling or editing a translation creates a draft; publish it to ship the change.
Keeping translations up to date
When you change source copy after it has been translated, the affected rows are flagged:- The Localization tab and each card show an outdated count.
- In the editor, flagged rows carry a yellow dot and a Source changed hint, so a reviewer can see exactly what needs another look.
- Editing the row (or translating it with the magic wand) clears the flag.
outdated field, and GET …/versions/{id}?expand=localizations returns the missing / outdated counts for every language at once — the check to run after editing source text and before publishing, since publishing never blocks on stale translations.
Setting the user’s language
Set thelocale_code attribute when you identify the user:
locale_code is a standard user attribute, so you can also use it in start conditions and segments like any other attribute.
Built-in UI language
Besides your own copy, Usertour’s widgets contain built-in interface text — checklist dismiss prompts, resource center search and empty states, survey buttons, screen-reader labels, and date formatting. These follow the same signal: the user’slocale_code, falling back to your project’s default localization, then English.
Built-in translations ship for: English, Simplified Chinese, Traditional Chinese, Japanese, Korean, French, German, Spanish, Portuguese, and Dutch. For other languages the built-in text stays in English while your translated content still shows correctly.
What’s translatable
Inside that content, three kinds of value can differ per language:
- Text — every string a user reads, including an image’s alt text and the fallback text of a user attribute placeholder (shown when the attribute is empty).
- Destinations — where a click goes: links in rich text, an image’s click-through link, and the Navigate to page action on buttons, survey questions, checklist tasks, launchers and resource center blocks, plus a resource center list entry’s own navigation. Point each language at its localized page; leave a destination blank to keep the original. A destination whose URL contains a user attribute is managed by the source content and doesn’t appear in the translation editor.
- Media — image and video URLs, so each language can ship its own assets.
- Content names (the name in your dashboard’s content list) stay stable — they’re used in analytics and by your team. For resource center lists, give each entry a translatable List item name in the block editor instead.
- Event trackers have no end-user-visible text.
Machine translation on self-hosted
Self-hosted instances enable the AI translate buttons by configuring an AI provider through environment variables — any Anthropic key, an OpenAI-compatible gateway, or AWS Bedrock. See Environment Variables for theAI_* reference. Once configured, machine translation is available with no plan gating.